Introduction
Prism is an excellent design pattern in .NET world. It is an art not only academically but also practically. VS 2012 is a revolutionary .NET development IDE which
.NET developers love to use. The development of Prism WPF application in VS 2012 is a complex and exciting work. One of the biggest challenges in
the development of Prism
is to think every programming process with OO programming concepts and develop code in
a unit testing environment to glue different modules into one
Shell WPF application and make such a composite application run as expected. However, there is nothing impossible. I like the challenges from
Prism. This article will share with you the jobs I have done in programming standalone and interaction modules in
a Prism way.
Main tasks
1. Build up Prism architecture for application
Prism provides an excellent design pattern for developing a WPF application. After creating a new
WPF application in VS 2012, default app.xaml and
mainwindow.xaml will be created automatically. Prism gets started from here.
- Prism removes the start up element from the element tree in app.xaml and then creates an override
OnStartup event to trigger the whole application. The OnStartup event
simply initializes a bootstrapper class instance and /or application level event such as custom splash screen. - The bootstrapper class is a huge hook. It is inherited from two main Bootstrapper containers,
UnitBootstrapper and MefBootstrapper, both are developed by
Prism.
We can simply override the existing methods in those two containers to start development, see below example.
using Microsoft.Practices.Prism.Modularity;
using Microsoft.Practices.Prism.UnityExtensions;
using Microsoft.Practices.ServiceLocation;
using Microsoft.Practices.Unity;

namespace WpfAppwith_Prism
{
    public class Hookup:UnityBootstrapper
    {
        private readonly Modules.Loggerhandler logh = new Modules.Loggerhandler();
        protected override Microsoft.Practices.Prism.Logging.ILoggerFacade CreateLogger()
        {
           return this.logh;
        }
        protected override System.Windows.DependencyObject CreateShell()
        {
            return ServiceLocator.Current.GetInstance();
        }
        protected override void InitializeShell()
        {
            base.InitializeShell();
            App.Current.MainWindow = (Window)this.Shell;
            App.Current.MainWindow.Show();
        }
         protected override void ConfigureModuleCatalog()
        {
            base.ConfigureModuleCatalog();
               ModuleCatalog mc = (ModuleCatalog)this.ModuleCatalog;
               mc.AddModule(typeof(cProductModel.ProductModelc));
               mc.AddModule(typeof(cAddNagvModule.cAddnewdata));
               mc.AddModule(typeof(cAddNagvshow.ShowNagv));
        }
        protected override void ConfigureContainer()
        {
            base.ConfigureContainer();
            this.Container.RegisterInstance< Modules.Loggerhandler>(this.logh);
        }
    }
}
}
- The first thing Prism needs to do is display at least one window interface for
the user. How does Prism do this? Prism uses a bootstrapper class to implement this.
- Rename mainwindow.xaml to shell.xaml.
- Partition
shell window into different regions.
- Hook up
different new XAML windows from different modules into different regions
that are partitioned inside the shell window, see below example.
- Each
region in the shell main window will contain at least one user control or WPF
window. Each window in different regions will be published by different
modules in Prism architecture. Interactions between such different region
windows are loosely coupled by using "glue" delegates such as the
CompositePresentationEvent event aggregator in Prism. - Each
window in each region normally represents a module which can contain views, MVVM view models, and data models
in WCF or Entity Framework.
- One
Prism application will contain many modules, one module will have one MVVM
model and/or one data model (maybe it can be hosted in application level).
2. Module development
After we build up the whole structure for the application by using Prism design patterns, we will know how many modules and what kinds of "glue" delegates we
need to develop.
A module in C# means a class library that exposes an interface for outputting its commands and properties to
the Unity DI container. The Unity DI container then can
inject this module into the bootstrapper via this interface.
The demo project has developed two interactive modules and a standalone module in
the application to show us how different modules can work together to make
transactions happen in those three modules.
1. Standalone module
A standalone
module means in a Prism application we only create one module to be injected into
the Shell main window. This module will contain an MVVM model and an Entity
Framework data model, see below example:

The module class is developed as below:
using System;
using System.Collections.Generic;
using System.Linq;
using System.Text;
using System.Threading.Tasks;
using Microsoft.Practices.Prism.Modularity;
using Microsoft.Practices.Prism.Regions;
using Microsoft.Practices.Unity;
namespace cProductModel
{
public class ProductModelc : IModule {
private readonly IRegionManager _regionManager;
private readonly IUnityContainer _container;
public ProductModelc(IUnityContainer container, IRegionManager regionManager)
{
_regionManager = regionManager;
_container = container;
}
public void Initialize()
{
this._container.RegisterType< DataModelsBusiness .Icommentedit ,
DataModelsBusiness .Commentedit>(new ContainerControlledLifetimeManager());
_regionManager.RegisterViewWithRegion("MainRegion",
() =>this._container .Resolve < cProductModel.Views.Menu>());
_regionManager.RegisterViewWithRegion("DelRegion",
() => this._container.Resolve< cProductModel.Views.Detail>());
var nav = this._container.Resolve< cProductModel.Views.Navigation >();
_regionManager.Regions["NavRegion"].Add(nav);
}
}
}
A data model is injected into this standalone module via Unity DI container.
The container will bring in data business components such as Commendedit.cs and
Icommentedit.cs into modules such as:
this._container.RegisterType< DataModelsBusiness.Icommentedit,
  DataModelsBusiness.Commentedit>(new ContainerControlledLifetimeManager());
Each region in the shell window will register a view window via this standalone module class. After
the view windows are registered into regions, the view window will use
its code-behind to display data in UI controls in each window. One example is as below:
namespace cProductModel.Views
{
    public partial class Detail : UserControl
    {
        public Detail()
        {
            InitializeComponent();
        }
        void OnLoad(object sender, RoutedEventArgs e)
        {
            ViewModels.VmProduct vmc = new ViewModels.VmProduct();
             lstProdut.ItemsSource = vmc.getallproduct();
        }
    }
}
The view for this standalone module will use a view model class called Vmproduct to get the properties and events it requires. This view model class implements:
using cProductModel.DataModels;
using cProductModel.DataModelsBusiness;
using Microsoft.Practices.Unity;
using Microsoft.Practices;
using Microsoft.Practices.ServiceLocation;
namespace cProductModel.ViewModels
{
    class VmProduct : INotifyPropertyChanged, IDataErrorInfo
    {
        public int productId;
        public string name;
        public string category ;
        public string description;
        public int ProductId
        {
        get { return productId; }
        set { if (productId == value) { return; } productId = value; OnPropertyChanged("ProductId"); }
        }
        public string Name
             {
              get { return name; }
             set { if (name == value) { return; } name = value; OnPropertyChanged("Name"); }
             }
        public string Category {
             get { return category; }
             set { if (category == value) { return; } category = value; OnPropertyChanged("Category"); }
             }
        public string Description {
             get { return description; }
             set { if (description == value) { return; } description = value;
                          OnPropertyChanged("Description"); }
             }

        public Productaccess getproductdi()
             {
            var container = ServiceLocator.Current.GetInstance< IUnityContainer>();
            container.RegisterType< IProductaccess, Productaccess>();
            Productaccess pcs1 = container.Resolve< Productaccess>();
            return pcs1;
            }
        public ObservableCollection< Product> getallproduct()
        {
            ObservableCollection< Product> oc =
              new ObservableCollection< Product>(getproductdi().getallproducts());
            return oc;
        }
        public ObservableCollection< Product> allProductList
        {
            get { return getallproduct(); }
        }
        public ObservableCollection< Product> geteachproduct(int id)
        {
             ObservableCollection< Product> oc =
               new ObservableCollection< Product>(getproductdi().geteachproducts(id));
            return oc;
        }
        public ObservableCollection< Product> eachProductList
        {
            get { return  geteachproduct(1); }
        }
        public void OnPropertyChanged(string propertyName)
        {
            PropertyChangedEventHandler handler = PropertyChanged;
            if (handler != null)
            {
                PropertyChanged(this, new PropertyChangedEventArgs(propertyName));
            }
        }
        public string Type { get; set; }
        public string maker { get; set; }
        public Nullable< System.DateTime> make_date { get; set; }
        public Nullable< System.DateTime> expired_date { get; set; }
        public Nullable< decimal> unit_price { get; set; }
        public Nullable< int> stock_level { get; set; }
        public Nullable< bool> deleted { get; set; }
        #region INotifyPropertyChanged Members

        public event PropertyChangedEventHandler PropertyChanged;

        #endregion
        #region IDataErrorInfo Members

        public string Error
        {
            get { return "Error occured"; }
        }

        public string this[string columnName]
        {
            get { return columnName.ToString() + " Error"; }
        }

        #endregion
    }
}
This View Model class uses Unity DI container to inject the data model class into to get
a list of products from the ASP.NET Entity Framework, such as in the code below:
public Productaccess getproductdi()
{
    var container = ServiceLocator.Current.GetInstance< IUnityContainer>();
    container.RegisterType< IProductaccess, Productaccess>();
    Productaccess pcs1 = container.Resolve< Productaccess>();
    return pcs1;
}

public ObservableCollection< Product> getallproduct()
{
    ObservableCollection< Product> oc =
      new ObservableCollection< Product>(getproductdi().getallproducts());
    return oc;
}

public ObservableCollection< Product> allProductList
{
    get { return getallproduct(); }
}

public ObservableCollection< Product> geteachproduct(int id)
{
    ObservableCollection< Product> oc =
      new ObservableCollection< Product>(getproductdi().geteachproducts(id));
    return oc;
}
public ObservableCollection< Product> eachProductList
{
    get { return  geteachproduct(1); }
}
Only property with an OnpropertyChanged event and only methods with
an
ObservableCollection list collection can be seen by the view window. When
this view window is loaded into the shell window by this standalone module class,
the view window code behind will bring this view model class to push data
from the view model class object into the UI controls in the view window. The following image shows the output from this MVVM model.
Therefore, the workflow of the standalone module in Prism is summarized as below:
2. Interaction Modules
Interaction modules are modules which can interact with each other to exchange property and commands among them. After those modules are registered in
the bootstrapper class,
they register their own views in regions partitioned in the shell window. After views from interactive modules are registered, views' code behinds call
their own View Model classes to exchange data between those views through loosely coupled events, interfaces, shared services, and other shared
resources, etc. This Prism project develops two interaction modules, one for adding new comments and another for showing the added comments to collect comments
from the users in the view window.
- Add new comments module
At first, a new class library project is created to enable this module. Add
"system.xaml.dll" as reference. A XAML window view is added into this
project. This module now contains a view window UI. Modify the element tree to design
a simple UI as below:
The module extracts an interface from this UI window as below:
public interface IAddnewdata
{
    event EventHandler addnewdata;
    string Productid{get;}
    string name { get; }
    string category { get; }
    string description { get; }
}
The UI window then implements this interface in its code behind. See below code:
namespace cAddNagvModule.Views
{
    public partial class Addnewdata : UserControl, IAddnewdata
    {
        private cAddnagpresenter _presenter;
        public Addnewdata()
        {
            InitializeComponent();
            this.AddButton.Click += new RoutedEventHandler(AddButton_Click);
        }

        public Addnewdata(cAddnagpresenter presenter) : this()
        {
            _presenter = presenter;
            presenter.View = this;
        }

        public event EventHandler addnewdata = delegate { };

        void AddButton_Click(object sender, RoutedEventArgs e)
        {
            addnewdata(this, null);

         }

        public string category
        {
            get
            {
                TextBox txtb = this.txtCategory  as TextBox;
                return txtb.Text.Trim();
            }
        }
        public string description
        {
            get
            {
                TextBox txtb = this.txtdesp  as TextBox;
                return txtb.Text.Trim();
            }
        }
        public string name
        {
            get
            {
                TextBox txtb = this.txtName  as TextBox;
                return txtb.Text.Trim();
            }
        }
        string IAddnewdata.Productid
        {
             get
            {
                TextBox txtb = this.txtProductID as TextBox;
                return txtb.Text.Trim();
            }
        }
    }
}
The code-behind will call an event aggregator in the view model class called cAddnagpresenter to communicate with a new global common class which is
inherited from the CompositePresentationEvent class. This abstract base class provides a common place for multiple modules to share data so that this new
view model class object can take its responsibility for publishing data input by users from this view window UI to this common class object.
After input data has been put in this common place via an event aggregator, "Add comment module" completes its work of publishing data from
the data
input window via example code such as ventAggregator.GetEvent().Publish(targetaddedcol);.
The second module which is normally called the target module will come to this event aggregator common place to pick up data that is published by the first source module
and then display those data in a view window inside this target module such as the following module explained.
- Showing the added comments module
Add a new class library project, we can have a target module to communicate with the "Add comments module". This target module will create an
interface that executes some methods to pass data from a common place to UI controls in
the view window inside this target module, see below.
public interface IShowadded
{
    void SetTitle(string title);

    void SetProductID(string ProductID);

    void AddContent(string content);
}
This interface is implemented in the code behind of a view window inside this module, as
in the following example.
public partial class Showadded : UserControl, IShowadded
{
    private cAddnavgshowpresenter presenter;
    public Showadded()
    {
        InitializeComponent();
    }
    public Showadded(cAddnavgshowpresenter _presenter): this()
    {
        this.presenter = _presenter;
        _presenter.View = this;
    }
    public void SetTitle(string title)
    {
        this.ActivityLabel.Content = title;
    }
    public void AddContent(string content)
    {
        this.ContentPanel.Children.Add(new TextBlock() { Text = content });
    }
    public void SetProductID(string ProductID)
    {
        this.presenter.ProductID = ProductID;
    }
}
A view model class cAddnavgshowpresenter is introduced into the code behind of the view window in
the target module to help the view window in
the target module subscribe
to the data from the event aggregator global common place, as in the following code.
subscriptionToken = AddedEvent.Subscribe(AddedEventHandler,
                               ThreadOption.UIThread, false, erFilter);
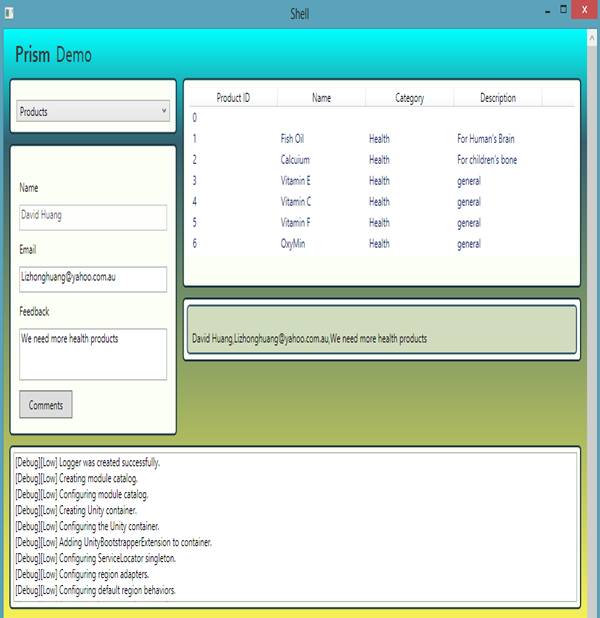
Now when we hit the Comments button in the source view window in the first module, the left side of
the below image is shown. We can collect the feedback comment data from the
end user and display the results in the target view window as in the right side of the image shown below.
We also can use shared services or shared resources to communicate one module with another in
the shell window. Prism is huge so this will be done later.
Summary
Using the Prism design pattern, we really can develop flexible, loosely-coupled, and nice UI lookout
WPF composite applications for enterprise businesses. The DI container
and event aggregator can allow a Prism WPF application to have different types of modules
to work together. A software architect can develop a robust Prism architecture
for developers. Application developers then can focus on modules development,
the WPF UI developer can focus on MVVM model development, and backend
developers can develop data models for Prism. We really need to use Agile software development and TDD methodology for developing complex Prism WPF applications.
Download example source code here.


 General
  News
News  Suggestion
  Question
  Bug
Bug  Answer
  Joke
Joke  Praise
  Rant
Rant  Admin
Admin 


