Introduction
I'll show how to create simple Windows Service in MS Visual Studio 2010 Express using no templates.
Background
The article Creating a Windows Service in C# helped me a lot, but it wasn't perfect. After I created a Windows Service and it worked, I decided to write an article to not forget how to create Windows Services.
Using the code
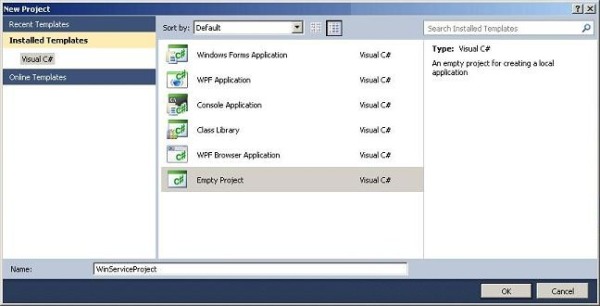
Start MS Visual Studio 2010 Express and create a new empty project.
Your Solution Explorer should now look like this:

Then you have to add two classes: WinService.cs and ServiceInstaller.cs.
The WinService class should contains this code:
namespace WinServiceProject
{
using System;
using System.IO;
class WinService : System.ServiceProcess.ServiceBase
{
static void Main()
{
System.ServiceProcess.ServiceBase[] ServicesToRun;
ServicesToRun =
new System.ServiceProcess.ServiceBase[] { new WinService() };
System.ServiceProcess.ServiceBase.Run(ServicesToRun);
}
private void InitializeComponent()
{
this.ServiceName = "WinService";
}
private string folderPath = @"c:\temp";
protected override void OnStart(string[] args)
{
if(!System.IO.Directory.Exists(folderPath))
System.IO.Directory.CreateDirectory(folderPath);
FileStream fs = new FileStream(folderPath+"\\WindowsService.txt",
FileMode.OpenOrCreate, FileAccess.Write);
StreamWriter m_streamWriter = new StreamWriter(fs);
m_streamWriter.BaseStream.Seek(0, SeekOrigin.End);
m_streamWriter.WriteLine(" WindowsService: Service Started at " +
DateTime.Now.ToShortDateString() + " " +
DateTime.Now.ToShortTimeString() + "\n");
m_streamWriter.Flush();
m_streamWriter.Close();
}
protected override void OnStop()
{
FileStream fs = new FileStream(folderPath +
"\\WindowsService.txt",
FileMode.OpenOrCreate, FileAccess.Write);
StreamWriter m_streamWriter = new StreamWriter(fs);
m_streamWriter.BaseStream.Seek(0, SeekOrigin.End);
m_streamWriter.WriteLine(" WindowsService: Service Stopped at " +
DateTime.Now.ToShortDateString() + " " +
DateTime.Now.ToShortTimeString() + "\n");
m_streamWriter.Flush();
m_streamWriter.Close();
}
}
}
This class contains two functions: OnStart and OnStop. I'll use them to show that our Windows Service is working. When the Service starts and stops, it will write a string to a file.
ServiceInstaller.cs should contain:
namespace WinServiceProject
{
using System;
[System.ComponentModel.RunInstaller(true)]
public class ProjectInstaller : System.Configuration.Install.Installer
{
private System.ServiceProcess.ServiceInstaller serviceInstaller;
private System.ServiceProcess.ServiceProcessInstaller
serviceProcessInstaller;
public ProjectInstaller()
{
InitializeComponent();
}
private void InitializeComponent()
{
this.serviceInstaller = new System.ServiceProcess.ServiceInstaller();
this.serviceProcessInstaller =
new System.ServiceProcess.ServiceProcessInstaller();
this.serviceInstaller.Description = "My Windows Service description";
this.serviceInstaller.DisplayName = "My WinService";
this.serviceInstaller.ServiceName = "WinService";
this.serviceProcessInstaller.Account =
System.ServiceProcess.ServiceAccount.LocalService;
this.serviceProcessInstaller.Password = null;
this.serviceProcessInstaller.Username = null;
this.Installers.AddRange(new System.Configuration.Install.Installer[] {
this.serviceProcessInstaller,
this.serviceInstaller});
}
}
}
In ServiceInstaller.cs, you can specify the Service's name, description, etc.
After creating the classes, add three references: System, System.Configuration.Install, and System.ServiceProcess. When you do that, your Solution Explorer will look like this:
Now your project is complete. You can build it. In the bin\Release or bin\Debug folder, you will find the file WinServiceProject.exe. This is your Windows Service.
Now we need to add our service to other Windows Services and make it work. For this, we need to use InstallUtil. I found it in C:\WINDOWS\Microsoft.NET\Framework\v4.0.30319. The last folder shows the Framework version. In the zip file attached, there are two bat files. install.bat installs our Service. It looks like this:
C:\WINDOWS\Microsoft.NET\Framework\v4.0.30319\installutil.exe WinServiceProject.exe

pause
To uninstall the service, you have to use /u key with the InstallUtil utility. The second bat file named uninstall.bat looks like this:
C:\WINDOWS\Microsoft.NET\Framework\v4.0.30319\installutil.exe /u WinServiceProject.exe

pause
Now you have three files: WinServiceProject.exe, install.bat, and uninstall.bat. You have to now decide where your service will be. For testing and debugging purposes, I suggest you leave WinServiceProject.exe in the Debug or Release folder and copy the install.bat and uninstall.bat files so you can work in a single folder.
Notice! Before editing the project and rebuilding it, always stop your service. Otherwise you can get errors.
After you install your service, you can see it in local services:
I'm Certified Force.com Developer, who have been building custom solutions using Force.com platform for last 4 years. This involves coding classes (batches, scheduled classes, email handlers), triggers and Visualforce pages (with Javascript, jQuery and CSS); adding/customizing standard and custom object. Mostly, I work on integration solutions.
(key words: Force.com, Salesforce, sObject, Apex, batch, trigger, governor limits, SOQL, Visualforce, integration, REST, Force.com IDE, Git)
Before Salesforce, for 4 years, I participated in application development using C#, Java, PHP, Qt and Action Script. Mostly, MS SQL and MySQL were used as data storage for applications.


 General
  News
News  Suggestion
  Question
  Bug
Bug  Answer
  Joke
Joke  Praise
  Rant
Rant  Admin
Admin 


 I found a lot of interesting information there.