Table of Contents
As IP camera surveillance systems are spreading, newer and higher forms of needs appear related to security systems (and their functionalities of course). This brought to life the camera video recording solutions that allow you to record audio and video stream to be able to save and store all events that happened in the area that is under video surveillance.
Video recording can be useful when you want to record a video message to send to colleagues, friends or family; or you want to upload and broadcast a video file over the Internet. It can be especially useful when evidence is needed in case of a crime.
In my previous article (http://www.codeproject.com/Articles/825074/How-to-broadcast-live-IP-camera-stream-as-Flash-vi) – in which I presented how to implement live IP camera streaming into your website – I promised that I’ll come back with an other IP camera development. So in this post, I intend to explain how to create a video recorder in C#.NET in order to record and save your camera’s stream.
For better understanding, take a closer look at the Network Video Recorders (NVR) and Digital Video Recorders (DVR) that are typically deployed in IP video surveillance systems. An NVR's a software that records video in a digital format. Although it doesn’t contain any dedicated video capture hardware, the software usually runs on a dedicated device (see the figure below).
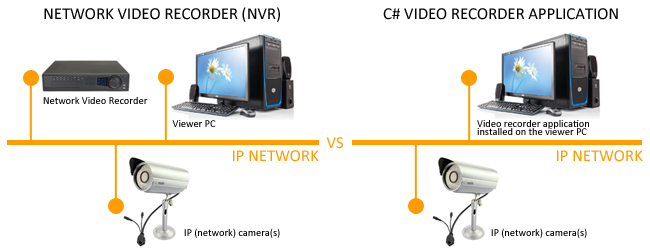
Network Video Recorder (NVR) vs C#-based video recorder application – Source: Self made
NVAs are distinct from DVRs as their input is from a network rather than a direct connection to a video capture card or tuner. Video on a DVR is encoded and processed at the DVR, while video on an NVR is encoded and processed at the camera, then streamed to the NVR for storage or remote viewing. (There are hybrid NVR/DVR security systems as well that contain the functionalities of both of them.)
In this tip, I’ll show you how to implement a video recorder application that can be used on your PC and that's able to record camera video without using any dedicated device (see the figure above). My solution's based on the ONVIF IP-based security standardization. (In this post, I don’t want to go into details related to ONVIF again. You can read more about the ONVIF technology in my previous article:
After the brief theoretical overview, it’s time to start your IP camera recorder project. For this development, you’ll need (1) an ONVIF SDK and (2) an IDE for C# programming. Let’s take a look at these two prerequisites more closely.
By using my previous article, you could learn that an IP camera SDK is essentially needed if you want to build any IP camera software. For this purpose, I used the components of Ozeki Camera SDK this time too. You can download the SDK from its official website.
For this project – as usual in case of C# programming – I used Microsoft Visual Studio as an IDE. If you need this software, you can obtain it from the official website of Microsoft. (Although the .NET Framework will be installed automatically with the Visual Studio, make sure that .NET Framework 4.0 has been installed on your PC.)
For implementing this video recorder, you need to create a Windows Forms Application. First of all, you need to create a new Visual Studio project by clicking on the ’New project’ icon. Now you need to add the DLL file (provided by the Camera SDK) as a reference to your project. Finally, there is only one setting left to do: make sure that your ’Target framework’ is ’.NET Framework 4.0’.
If you’ve done all the previously described initial steps, let's get to build this camera project.
Let’s start the development by checking out the classes that I’ve used during this project. Below I’ll present the following three classes:
- Program.cs
- Form1.cs
- Form1.Designer.cs
First of all, take a look at the Program.cs class. It contains the Main() method that is the entry point for the application. As you can see below, the running of the Form will be called in this class:
using System;
using System.Collections.Generic;
using System.Linq;
using System.Windows.Forms;
namespace Network_Video_Recorder01
{
static class Program
{
[STAThread]
static void Main()
{
Application.EnableVisualStyles();
Application.SetCompatibleTextRenderingDefault(false);
Application.Run(new Form1());
}
}
}
Okay, now let’s move to the Form1.cs class that contains all functions of the video recorder application that can be used to implement the required features. As a first step, you need to connect to your camera in order to be able to view its image. Below, you can see those methods that can be used to establish connection between your application and the camera:
_camera = IPCameraFactory.GetCamera("192.168.115.198:8080",
"admin", "admin")
_connector.Connect(_camera.VideoChannel, _imageProvider)
_camera.Start()
_videoViewerWF1.Start():
After the successful connection, you’ll need some further statements and methods to be able to record audio and video stream. You can see them below:
Button_CaptureVideoStart_Click()
StartVideoCapture()
Mpeg4Recorder_MultiplexFinished()
StopVideoCapture()
Button_SaveTo_Click()
The following code snippet presents the whole Form1.cs class that contains all functions of the application that is needed for camera video recording:
using System;
using System.Drawing;
using System.Windows.Forms;
using Ozeki.Media.IPCamera;
using Ozeki.Media.MediaHandlers.Video;
using Ozeki.Media.Video.Controls;
using Ozeki.Media.MediaHandlers;

namespace Network_Video_Recorder01
{
    public partial class Form1 : Form
    {
        private IIPCamera _camera;
        private DrawingImageProvider _imageProvider;
        private MediaConnector _connector;
        private VideoViewerWF _videoViewerWf;
        private MPEG4Recorder _mpeg4Recorder;

        public Form1()
        {
            InitializeComponent();
            _imageProvider = new DrawingImageProvider();
            _connector = new MediaConnector();
            _videoViewerWf = new VideoViewerWF();
            SetVideoViewer();
        }

        private void SetVideoViewer()
        {
            CameraBox.Controls.Add(_videoViewerWf);
            _videoViewerWf.Size = new Size(260, 180);
            _videoViewerWf.BackColor = Color.Black;
            _videoViewerWf.TabStop = false;
            _videoViewerWf.Location = new Point(14, 19);
            _videoViewerWf.Name = "_videoViewerWf";
        }

        private void button_Connect_Click(object sender, EventArgs e)
        {
            _camera = IPCameraFactory.GetCamera("192.168.115.175:8080", "admin", "admin");
            _connector.Connect(_camera.VideoChannel, _imageProvider);
            _videoViewerWf.SetImageProvider(_imageProvider);
            _videoViewerWf.Start();
            _camera.Start();
        }

        private void Button_CaptureVideoStart_Click(object sender, EventArgs e)
        {
            var path = TextBox_SaveTo.Text;
            if (!String.IsNullOrEmpty(path))
                StartVideoCapture(path);
        }

        private void StartVideoCapture(string path)
        {
            var date = DateTime.Now.Year + "y-" + DateTime.Now.Month + "m-" + DateTime.Now.Day + "d-" +
                       DateTime.Now.Hour + "h-" + DateTime.Now.Minute + "m-" + DateTime.Now.Second + "s";
            string currentpath;
            if (String.IsNullOrEmpty(path))
                currentpath = date + ".mp4";
            else
                currentpath = path + "\\" + date + ".mp4";

            _mpeg4Recorder = new MPEG4Recorder(currentpath);
            _mpeg4Recorder.MultiplexFinished += Mpeg4Recorder_MultiplexFinished;
            _connector.Connect(_camera.AudioChannel, _mpeg4Recorder.AudioRecorder);
            _connector.Connect(_camera.VideoChannel, _mpeg4Recorder.VideoRecorder);
        }

        private void Mpeg4Recorder_MultiplexFinished(object sender, Ozeki.VoIP.VoIPEventArgs<bool> e)
        {
            _connector.Disconnect(_camera.AudioChannel, _mpeg4Recorder.AudioRecorder);
            _connector.Disconnect(_camera.VideoChannel, _mpeg4Recorder.VideoRecorder);
            _mpeg4Recorder.Dispose();
        }

        private void Button_CaptureVideoStop_Click(object sender, EventArgs e)
        {
            StopVideoCapture();
        }

        private void StopVideoCapture()
        {
            _mpeg4Recorder.Multiplex();
            _connector.Disconnect(_camera.AudioChannel, _mpeg4Recorder.AudioRecorder);
            _connector.Disconnect(_camera.VideoChannel, _mpeg4Recorder.VideoRecorder);
        }

        private void Button_SaveTo_Click(object sender, EventArgs e)
        {
            var result = folderBrowserDialog1.ShowDialog();
            if (result == DialogResult.OK)
                TextBox_SaveTo.Text = folderBrowserDialog1.SelectedPath;
        }
    }
}
Having done the back end development, take a look at the Graphical User Interface. The following figure illustrates my GUI – if you’ve built and run this project successfully, you should see a similar Windows Forms Application. In order to display the image of your camera, click on the ’Connect’ button. The camera image belonging to the camera that you have specified in the Form1.cs class will be loaded soon into the ’Live camera’ section.

The GUI of the network video recorder application written in C# - Source: Self made
The following code snippet presents the whole Form1.Designer.cs class that contains all elements that are used to develop the Graphical User Interface. The GUI that can be seen above has been implemented by using this code snippet:
namespace Network_Video_Recorder01
{
partial class Form1
{
private System.ComponentModel.IContainer components = null;
protected override void Dispose(bool disposing)
{
if (disposing && (components != null))
{
components.Dispose();
}
base.Dispose(disposing);
}
private void InitializeComponent()
{
this.folderBrowserDialog1 = new System.Windows.Forms.FolderBrowserDialog();
this.GroupBox_Connect = new System.Windows.Forms.GroupBox();
this.button_Connect = new System.Windows.Forms.Button();
this.CameraBox = new System.Windows.Forms.GroupBox();
this.button_CaptureVideo1Stop = new System.Windows.Forms.Button();
this.TextBox_SaveTo = new System.Windows.Forms.TextBox();
this.button_SaveTo1 = new System.Windows.Forms.Button();
this.button_CaptureVideo1Start = new System.Windows.Forms.Button();
this.GroupBox_Capture = new System.Windows.Forms.GroupBox();
this.GroupBox_Connect.SuspendLayout();
this.GroupBox_Capture.SuspendLayout();
this.SuspendLayout();
this.GroupBox_Connect.Controls.Add(this.button_Connect);
this.GroupBox_Connect.Location = new System.Drawing.Point(10, 10);
this.GroupBox_Connect.Name = "GroupBox_Connect";
this.GroupBox_Connect.Size = new System.Drawing.Size(110, 60);
this.GroupBox_Connect.TabIndex = 0;
this.GroupBox_Connect.TabStop = false;
this.GroupBox_Connect.Text = "Connect";
this.button_Connect.Font = new System.Drawing.Font("Microsoft Sans Serif", 8.5F, System.Drawing.FontStyle.Regular, System.Drawing.GraphicsUnit.Point, ((byte)(238)));
this.button_Connect.ForeColor = System.Drawing.Color.Black;
this.button_Connect.Location = new System.Drawing.Point(10, 20);
this.button_Connect.Name = "button_Connect";
this.button_Connect.Size = new System.Drawing.Size(90, 25);
this.button_Connect.TabIndex = 6;
this.button_Connect.Text = "Connect";
this.button_Connect.UseVisualStyleBackColor = true;
this.button_Connect.Click += new System.EventHandler(this.button_Connect_Click);
this.CameraBox.Location = new System.Drawing.Point(10, 90);
this.CameraBox.Name = "CameraBox";
this.CameraBox.Size = new System.Drawing.Size(290, 210);
this.CameraBox.TabIndex = 3;
this.CameraBox.TabStop = false;
this.CameraBox.Text = "Live camera ";
this.button_CaptureVideo1Stop.Location = new System.Drawing.Point(190, 20);
this.button_CaptureVideo1Stop.Name = "button_CaptureVideo1Stop";
this.button_CaptureVideo1Stop.Size = new System.Drawing.Size(90, 25);
this.button_CaptureVideo1Stop.TabIndex = 36;
this.button_CaptureVideo1Stop.Text = "Stop capture";
this.button_CaptureVideo1Stop.UseVisualStyleBackColor = true;
this.button_CaptureVideo1Stop.Click += new System.EventHandler(this.Button_CaptureVideoStop_Click);
this.TextBox_SaveTo.Location = new System.Drawing.Point(140, 60);
this.TextBox_SaveTo.Name = "TextBox_SaveTo";
this.TextBox_SaveTo.Size = new System.Drawing.Size(140, 20);
this.TextBox_SaveTo.TabIndex = 35;
this.button_SaveTo1.Location = new System.Drawing.Point(10, 60);
this.button_SaveTo1.Name = "button_SaveTo1";
this.button_SaveTo1.Size = new System.Drawing.Size(90, 25);
this.button_SaveTo1.TabIndex = 34;
this.button_SaveTo1.Text = "Save to:";
this.button_SaveTo1.UseVisualStyleBackColor = true;
this.button_SaveTo1.Click += new System.EventHandler(this.Button_SaveTo_Click);
this.button_CaptureVideo1Start.Location = new System.Drawing.Point(10, 20);
this.button_CaptureVideo1Start.Name = "button_CaptureVideo1Start";
this.button_CaptureVideo1Start.Size = new System.Drawing.Size(90, 25);
this.button_CaptureVideo1Start.TabIndex = 33;
this.button_CaptureVideo1Start.Text = "Start capture";
this.button_CaptureVideo1Start.UseVisualStyleBackColor = true;
this.button_CaptureVideo1Start.Click += new System.EventHandler(this.Button_CaptureVideoStart_Click);
this.GroupBox_Capture.Controls.Add(this.TextBox_SaveTo);
this.GroupBox_Capture.Controls.Add(this.button_CaptureVideo1Stop);
this.GroupBox_Capture.Controls.Add(this.button_CaptureVideo1Start);
this.GroupBox_Capture.Controls.Add(this.button_SaveTo1);
this.GroupBox_Capture.Location = new System.Drawing.Point(10, 300);
this.GroupBox_Capture.Name = "GroupBox_Capture";
this.GroupBox_Capture.Size = new System.Drawing.Size(290, 100);
this.GroupBox_Capture.TabIndex = 0;
this.GroupBox_Capture.TabStop = false;
this.GroupBox_Capture.Text = "Capture";
this.AutoScaleDimensions = new System.Drawing.SizeF(6F, 13F);
this.AutoScaleMode = System.Windows.Forms.AutoScaleMode.Font;
this.ClientSize = new System.Drawing.Size(314, 414);
this.Controls.Add(this.GroupBox_Capture);
this.Controls.Add(this.CameraBox);
this.Controls.Add(this.GroupBox_Connect);
this.FormBorderStyle = System.Windows.Forms.FormBorderStyle.FixedDialog;
this.MaximizeBox = false;
this.Name = "Form1";
this.StartPosition = System.Windows.Forms.FormStartPosition.CenterScreen;
this.Text = "Network Video Recorder";
this.GroupBox_Connect.ResumeLayout(false);
this.GroupBox_Capture.ResumeLayout(false);
this.GroupBox_Capture.PerformLayout();
this.ResumeLayout(false);
}
private System.Windows.Forms.GroupBox GroupBox_Connect;
private System.Windows.Forms.Button button_Connect;
private System.Windows.Forms.GroupBox CameraBox;
private System.Windows.Forms.Button button_CaptureVideo1Stop;
private System.Windows.Forms.TextBox TextBox_SaveTo;
private System.Windows.Forms.Button button_SaveTo1;
private System.Windows.Forms.Button button_CaptureVideo1Start;
private System.Windows.Forms.FolderBrowserDialog folderBrowserDialog1;
private System.Windows.Forms.GroupBox GroupBox_Capture;
}
}
You can start to record the audio and video camera stream by clicking on the ’Start capture’ button. If you want to finish the recording, click on the ’Stop capture’ button. In order to save your recoding, define a destination folder where you want to save and store the video file to, then click on the ’Save to’ button. As you can see below, I’ve specified that my recording will be saved into the ’Test_recording’ folder in the Desktop. After opening this folder, you can also see that my recorded camera stream can be found there as an .mp4 video file. This way, it is now possible for me to check out what's going on around my table and my PC when I'm not there.
After recognizing the significance of ONVIF technology, in my first article about how to implement live IP camera streaming into a website, I’ve promised that I’ll come back with an other IP camera solution. At this time, I presented a new guide that explains how to create a video recording application (NVR/DVR software) for your camera using C#.NET. This software allows you to record and save your camera’s audio and video stream, so it can be useful for security purposes, for capturing and sharing important moments or just for fun. By implementing for example e-mail sending feature, you can easily automate the sharing of your recordings. To use my source code, the following prerequisites are needed: an ONVIF-compliant camera SDK (like Ozeki Camera SDK) and an IDE for C# programming (like Microsoft Visual Studio).
In this section, I listed all the webpages that I used as resources to write this tip. Below, you can also find the direct download links for the necessary software:
- http://en.wikipedia.org/wiki/Network_Video_Recorder
- http://www.codeproject.com/Articles/825074/How-to-broadcast-live-IP-camera-stream-as-Flash-vi
- http://www.onvif.org/specs/core/ONVIF-Core-Spec-v210.pdf
- http://www.camera-sdk.com/p_13-download-onvif.html
- http://www.microsoft.com/en-US/download/details.aspx?id=17851


 General
  News
News  Suggestion
  Question
  Bug
Bug  Answer
  Joke
Joke  Praise
  Rant
Rant  Admin
Admin 


 .
.
