Introduction
When you want to add a class in a C++ project using the generic class wizard, one is often annoyed by the fact that you can't provide a "default" path where the class files will be created. Most projects use separated sources, "cpp" and "h" aren't kept in the same directory as the "sln" and "vcproj" files. When you want to add many classes in a directory, you waste a lot of time because you have to click on both ".h" and ".cpp" browse buttons and select a directory. The wizard always starts in the directory where project configuration files are stored. These two browsing steps have to be performed each time you want to add a class, and the IDE doesn't store the last path used in the wizard. For the next class, you have to browse again through your hierarchy. If you have a lot of directories and deep-nested folders, this may quickly turn into a nightmare.
Visual Studio .NET wizards
Fortunately, there's an easy way to fix a standard wizard. Wizards are in fact composed of a JavaScript file communicating with a HTML file and Visual Studio .NET IDE. This file is a template for the dialog box you see in the IDE. The HTML also contains some JavaScript functions to deal with fields and buttons. You can easily add some fields in your wizard and extend it through JavaScript methods. All wizards are stored in the Visual Studio .NET folder, you will find them in the "Microsoft Visual Studio .NET/VC7/VCWizards" directory. The "Add class" wizard is available in the "ClassWiz" folder. This folder contains directories called "ATL", "Generic" and "MFC", we will modify the "Generic" folder. The "Generic" folder contains three folders: "HTML", "Images" and "Scripts". You will find the dialog template in "default.htm" (/HTML/1033) and the corresponding JavaScript is "default.js" (/sScripts/1033).

The HTML template
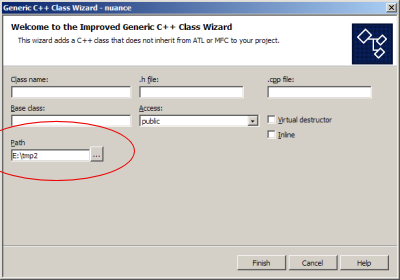
Opening the "default.htm" file in a browser will bring you into a familiar interface. Here's what you can see (in Firefox, the background will be violet).
Now, if you check the source of "default.htm", you will find a first part defining the HTML form followed by a JavaScript section. The "<HEAD>" section at the beginning of the file contains the definition of the fields used in the wizard. You can add a <SYMBOL> with a given type. We will add a "PATH" textfield with an empty string as default value. This field will receive the path returned by the dialog created using the GetDirectoryViaBrowseDlg function. More on this later.
<SYMBOL NAME="HEADER_FILE_VALID" TYPE=bool VALUE=false></SYMBOL>
<SYMBOL NAME="IMPL_FILE_VALID" TYPE=bool VALUE=false></SYMBOL>
<SYMBOL NAME="PATH" TYPE="text" VALUE=""></SYMBOL>
These symbols are used by the JavaScript to access the fields values. Next step is to add the field in the form. This is quite easy if you have some HTML knowledge. The form layout is based on a table, you will find some "TD" and "TR" tags. We will add the field just below the base class field. We must also add a button after the field, clicking on this button will open the browse directory dialog, this behavior is defined using the onClick attribute. Each control must have a unique ID, you can also define the keyboard shortcut to access the field (ACCESSKEY attribute). The text field called sideBtn666ThreeColumn will send its value into the PATH symbol we defined above. Note that we defined a new function called OnBrowsePath() which will be called when the button is pressed, we have to implement this function.
<SPAN CLASS="itemText" TITLE="">
<LABEL FOR="BASE_CLASS_NAME" ID="BASE_CLASS_NAME_LABEL"
TITLE="Enter the name for the base class from
which the class is to be derived.">
<U>B</U>ase class:
</LABEL>
<BR>
<INPUT CLASS="sideBtnThreeColumn" ID="BASE_CLASS_NAME"
TYPE="text" ACCESSKEY="b"
TITLE="Enter the name for the base class from
which the class is to be derived."
TABINDEX="6">
</SPAN>
<SPAN CLASS="itemText" TITLE="">
<P>
<LABEL FOR="PATH" ID="PATH_LABEL"
TITLE="Enter the path where the class files will be stored">
<U>P</U>ath</LABEL>
<BR>
<INPUT CLASS="sideBtn666ThreeColumn" ID="PATH" TYPE="text" ACCESSKEY="p"
TITLE="Enter the path where class will be stored" TABINDEX="6">
<BUTTON CLASS="buttonClass666Custom" ID="BrowsePathBtn" TYPE="BUTTON"
TITLE="Browse for the path." onClick="OnBrowsePath();"
TABINDEX="6">...</BUTTON>
</SPAN>
We also remove the two buttons which follow the ".h file" and ".cpp file" fields. I always put the ".h" and ".cpp" together in the same directory. You could change that if you find this annoying, it's a matter of duplicating the path field and the corresponding code.
In a browser, this should look like this now:
The JavaScript section of default.htm
We add the OnBrowsePath() function which is quite similar to the files browsing functions already present in defaut.htm. It basically calls the GetDirectoryViaBrowseDlg function with a default path as the 2nd argument. This path will be read from a cookie, I will talk about this in the next section. The OnBrowsePath() returns a string containing the full path of the directory. This path will be appended to the .h and .cpp files at another place (default.js).
function OnBrowsePath()
{
var strFile;
try
{
L_Title1_Text = "VS Wizards Select Path to store class files";
strPath = window.external.GetDirectoryViaBrowseDlg (L_Title1_Text,
cookieData.thePath);
}
catch(e)
{
if (e.number != OLE_E_PROMPTSAVECANCELLED)
{
var L_ErrMsg1_Text = "Error in OnBrowsePath()";
if (e.description.length != 0)
{
L_ErrMsg1_Text += ": ";
L_ErrMsg1_Text += e.description;
}
window.external.ReportError(L_ErrMsg1_Text);
}
return;
}
PATH.value = strPath;
}
I didn't add any code to validate the directory, I expect the returned directory from GetDirectoryViaBrowseDlg to be valid. To produce a more robust wizard, you could add a case in the switch present in the Validate(obj) function.
Storing the path for next time
I'm not a JavaScript expert, and tried various solutions. There's a tutorial on MSDN (Scripting) Working with files but it uses ActiveX controls, and Visual Studio .NET will open an authorization window each time you call the wizard. You can't write files with JavaScript for security reasons, you have to hack the things using an ActiveX control or an applet. A better and clean way is to use cookies. I found some JavaScript code for cookies, it's taken straight from the O'Reilly "Definitive Guide" about JavaScript: cookies code. I just cut and paste their code into default.htm.
We first define a global variable cookieData which is instantiated at the beginning of InitDocument(document). We provide a default location for the first time the wizard is used, the cookie ("last_path") also needs an indication about its expiration.
var cookieData;
function InitDocument(document)
{
setDirection();
CLASS_NAME.focus();
cookieData = new Cookie(document, "last_path", 24*365*10);
if (!cookieData.load() || !cookieData.name) {
cookieData.name = "last_path";
}
if (cookieData.thePath==null)
{ cookieData.thePath="C:\\"; cookieData.store();}
if (window.external.FindSymbol("DOCUMENT_FIRST_LOAD"))
{
var L_WizardDialogTitle_Text = "Generic C++ Class Wizard";
window.external.AddSymbol("WIZARD_DIALOG_TITLE",
L_WizardDialogTitle_Text);
window.external.SetDefaults(document);
}
window.external.Load(document);
PATH.value = cookieData.thePath;
}
We should not forget to store the path in the cookie when we have finished. A call to the store() method of the cookieData will be fine in OnFinish(document).
function OnFinish(document)
{
if (!ValidateInput())
return;
cookieData.thePath = PATH.value;
cookieData.store();
}
The default.js file
We still have to modify the script that acts as a bridge between the IDE and the template, namely "default.js". One has to add a variable at the beginning: var strPath = wizard.FindSymbol("PATH");, its purpose is to get the value of the PATH from the template. It's now quite easy, we just have to append the path to the .cpp and .h files.
var strProjectName = wizard.FindSymbol("PROJECT_NAME");
var strClassName = wizard.FindSymbol("CLASS_NAME");
var strHeader = wizard.FindSymbol("HEADER_FILE");
var strImpl = wizard.FindSymbol("IMPL_FILE");
var strBaseName = wizard.FindSymbol("BASE_CLASS_NAME");
var strPath = wizard.FindSymbol("PATH");
var newclass = oCM.AddClass(strClassName, strPath+"/"+strHeader,
vsCMAddPositionEnd, "", "", vsCMAccessDefault);
newclass.AddFunction(strClassName, vsCMFunctionConstructor, "",
vsCMAddPositionEnd, vsCMAccessPublic, strPath+"/"+strImpl);
var oDestructor = newclass.AddFunction("~"+strClassName,
vsCMFunctionDestructor, "", vsCMAddPositionEnd,
vsCMAccessPublic, strPath+"/"+strImpl);
Installation
Open the zip file and copy the default.js and default.htm at the correct location (I included the whole path to be sure, you will probably have to move them to the correct place). I suggest that you make a backup of your current wizard in case you have a problem. You won't have to restart Visual Studio .NET to setup the new wizard. If you call the "Add Class" wizard in a C++ project the same way as you did before these fixes, you should see the new version.
Conclusion
I developed and tested the wizard in Visual Studio .NET 2003. I guess it will work with previous versions of Visual Studio .NET, the original version of Microsoft was written in 2001. If you can improve it, feel free to post your modifications in the board :) As I said before, I'm not a JavaScript expert at all, this was the second time I worked with JavaScript code and it was a good way to learn a bit about this scripting language (and to come up with the fact that I prefer Python ;)).
This member has not yet provided a Biography. Assume it's interesting and varied, and probably something to do with programming.


 General
  News
News  Suggestion
  Question
  Bug
Bug  Answer
  Joke
Joke  Praise
  Rant
Rant  Admin
Admin 


 I guess the generation is done programatically. In default.js, there's a call to IncludeCodeElementDeclaration. There's must be a way to override this function but I can't help more about this, I haven't play enough with addins and wizards
  I wish to remove the "#pragma" in the .h and replace with the good old header composed of #ifndef _INCLUDE_H_, etc. IMO, the best way would be to create a special addin that replicates the operations performed by the wizard and use that. (this is somehow what you have done with the VB macros)