Introduction
This Article is designed for the BizTalk Beginners to start with the
Simple application, which would give the outline experience in handling
Messages in BizTalk.
In BizTalk, the flow of messages can be designed two different approaches.
- Message only Solution (Without Orchestration)
- Orchestration based solution
As I have covered the Message only solution on my other article, I am taking up the Orchestration
based approach here. We should always keep in mind that,
In message only solution,
physical receive port is a publisher and physical send port is a subscriber.
In Orchestration based solution, the message makes a round trip to the orchestration
>Physical Receive port-Publisher
>Logical Receive port-Subscriber
>Logical Send Port-Publisher
>Physical Send Port-Subscriber
Lets design a simple solution to understand how orchestration based solution works...!
Scenario
To perform simple transformation using orchestration in BizTalk
Steps
- Creating a biztalk
Input & Output Schema
- Creating a Map and
testing the map
- Configuring Biztalk
Orchestration
- Deploying BizTalk
Application
- Testing the
Application
Tutorial
Get Ready...
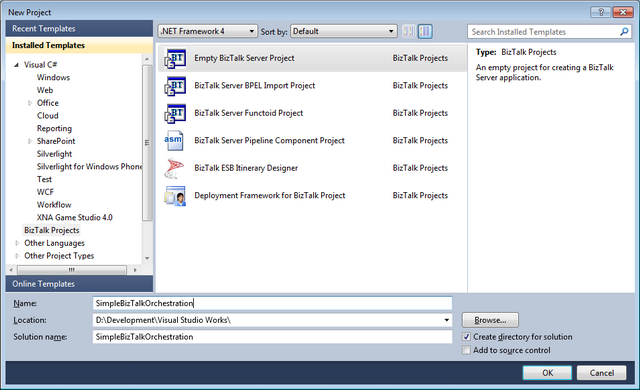
- Start>>Visual
Studio 2010 >> Biztalk >> Biztalk Empty Project>> Name your
Empty Project/Solution as SimpleBizTalkOrchestration
- Create a Receive Schema
Goto Solution Explorer>>Add new item>>Schema>>schema1(name it
as ReceiveSchema)

- ReceiveSchema>>In
the Root RightClick(RC)>>Add New Child Element>>Name it as FirstName
- Repeat the above step
to create another elements as LastName
- Repeat the steps 2
and 3 and create another schema (name it as SendSchema) and create an element
as FullName
Creating a Map
- Solution Explorer>>Add
new item >>Map (name it as MapTransform)
- You will find an
interface with Source Schema and Destination Schema on Left and Right side of a
Canvas
- Click on source
schema>>Biztalk Type Picker window will open>>Expand the Tree
Structure>>Expand the Schema>> Select the Receive Schema and
SendSchema for the Source and Destination respectively
- Expand the root
elements on Send and Receive schemas
- Now Goto
Toolbox>>String Functoid>>String Concatenation functoid>>Drag
and drop to the canvas
- From ReceiveSchema
drag the connect the FirstName and LastName to the FullName
Test the Map
- Generate an
instance of input schema, by right click and click on generate instance.
- Edit the file from
its output location and Assign the generated xml’s full path to the input
instance of map
- Test the map by clicking on Test map
Configuring Orchestration
Orchestration is a logical representation of a flow of message in
BizTalk. Let design the flow for our application with the below steps
- Solution
Explorer>>Add new item>>Orchestration (name it as SimpleOrch)
- All the schemas have
to be linked to a message in an orchestration. So we need to Assign the
Receiveschema and SendSchema as a message. Goto Orchestration pane and create a
message as ReceiveMsg
- Assign the
ReceiveSchema to the message type from the Schema tree selection
- Repeat steps 2 and
3 and assign SendMsg with SendSchema
- Now, Drag and drop
Receive shape Transform shape and Send shape from toolbox as shown below
- Now we need to
create Physical ports, Right click on the Port surface and click on New port.
Double click on the new port and and go through the wizard,
Configure the Port binding as shown below, you can also mention the Port
binding as specify later
- Repeat the above
steps for Send port also as shown below
- You can now see the
physical ports being configured as below
- But if you notice,
you can see error icons on top of each shape, because we didn’t configured it
yet.Now we need to tell receive shape,
- what message it has to
receive by assigning the RcvMsg to receive shape
- Right click the properties
of receive shape and assign RecvMsg to the message
- To which physical port it
has to be linked(Operation)
- Assign
RcvPort.Operation_1.Request to the operation
3. Activate to true, which will trigger your orchestration
Repeat the same for
Send port with the configurations below
configure transform
shape by double clicking the transform shape , in which we will assign the Maps
for transformation as shown below
If you notice now, all our error icon has gone, which means we have
configured all shapes.
Pre-Deployment Steps
In order to deploy the application, follow the below steps
- All the BizTalk Application has to be signed before deploying. Got to
project properties>>signing tab>>Create a new key and assign it
- In Deployment tab, Give the Application name as SimpleBizTalkOrch,Our application
will be deployed in this name in BizTalk Administration console.
Deploying the
Application
All set, we are ready to deploy now J
Right click on the project , and click on deploy
Deploy succeeded message will be displayed in the output window.
Receive shape: It’s a logical receive port in orchestration which
subscribes to the message
Post-Deployment
Steps
- Goto BizTalk
Administration Console, check whether application is listed
- Check whether
Receive location, send port and Orchestration are unenlisted/disabled state
- Goto
Orchestration>>Right click on
SimpleBizTalkOrchestration.SimpleOrch>>Properties>>Bindings
tab>> assign the Host instance as BizTalkServerApplication
- Now create desired
input and output folder before starting the application, because receive
location will not get started, if the location is non-existing
- Now Right click on
the application and start it
- Make sure,
Orchestration, Send port and Receive location are in started state
- Restart the Host
Instance
- Your Application is
Ready to Test now
Testing the
Application
- Create an XML
Document as per the ReceiveSchema or use the generated instance
- Make sure the XML
file is prepared as ReceiveSchema Structure(FirstName and LastName as elements)
- Copy that XML file
and Paste it in the Receive folder which you had created
- The Biztalk
Application will pick up that XML file>. You can see the file will get
disappeared with in a few seconds after you place that
- When you open the
Send folder you would find a generated XML file with the filename as Output.xml
with the element FullName(as per our SendSchema)
Summary
The Message from the File location is picked up by the Physical receive port and published to the message box database, this message will be subscribed by the Logical receive port in orchestration. This incoming incoming message is transformed to another format using a map and published into message box through logical send port and this message is subscribed by the physical send port and sent to the destination file folder.
With this we have completed the simple BizTalk Orchestration
Application, Have an Happy Start to the Biztalk J
This member has not yet provided a Biography. Assume it's interesting and varied, and probably something to do with programming.


 General
  News
News  Suggestion
  Question
  Bug
Bug  Answer
  Joke
Joke  Praise
  Rant
Rant  Admin
Admin 


