Introduction
VS 2012 does not support vdProj setup projects. You are offered InstallShield lite as an alternative. There is another option. however, and that is to use WIX. This article describes how to deploy, previously deployed WinForm projects
from earlier versions of Visual Studio. It also describes using WIX to deploy a VS2012 Hello World project.
It is written for developers, who like me, just deployed their Winform
projects in a basic way using the (until now) supported Setup Project template.
I had never heard of WIX until a few days ago. As a general purpose .NET
programmer having to deal with a change of WinForm deployment was the last
thing I wanted.
I had a quick play with InstallShield lite but couldn't make any sense of it (my inadequacy not theirs). Annoyed, I decided to stay on VS2010. Checking out the various forums indicated that my annoyance was widespread. Some posts mentioned WIX as an alternative, so I looked around and found:
- 3rd party vdProj to WIX converter (www.add-in-express.com). This costs but
it allows your existing projects to be migrated onto VS 2012 and deployed
straight away.
- Wix Project template add in
(http://visualstudiogallery.msdn.microsoft.com/491dc26d-90b0-4e0d-a45e-4281d93f81c6).
This is free and allows you generate WIX Projects in your VS2012 Solution.
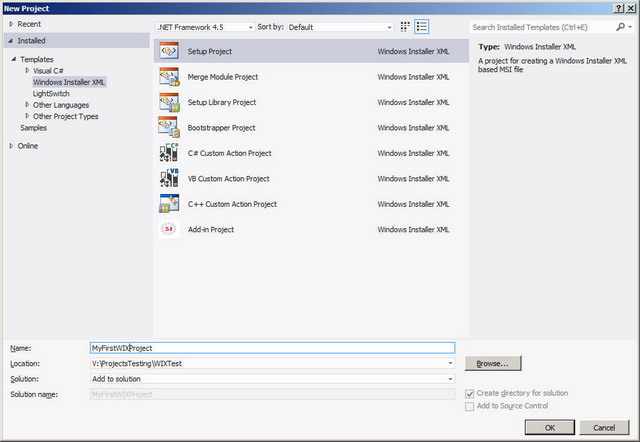
Actually I am unsure whether or not the Windows Installer XML Template
was there out of the box as the reference template by Shikhar Jan is for Addin.
All I can say is after installing Shikhar Jan's template the setup option was
available as below
- Excellent WIX tutorial (http://wix.tramontana.co.hu/).
Background
WIX project essentially contains a XML file Product.wxs. A familiarity with XML is essential to make use of WIX by editing the
contents of this file.
Using the Code
VDProj conversion
This couldn't be simpler. Once the converter addin is installed, migrate your VS2010 solution to VS2012 accepting the fact that
the setup project is incompatible. In the VS2012 Solution Explorer Window R.H. click the incompatible Setup
project and select 'Convert to WIX project' from the context menu.
A WIX project is created in the solution. Build this project and your setup
is done, deploy the resultant setup.exe and MSI file as normal.
New WIX Project Generation
This is a bit more daunting than the conversion. Assuming your have installed
the template then I suggest having the tutorial open and then
- Make a new Hello World project.
- Add a new 'Windows Installer XML' project to the HelloWorld solution.
- Open the product.wxs file and have the tutorial handy. I have only
implemented the setup of the EXE. The tutorial covers additional items.
Notice that the tutorial puts things in different places compared to the set
up template. This is not a problem. The important thing is the composition of
each XML Node.
I thought it best to stay with the template construct and update it by
following the intent of the tutorial.
Notes
- If you are using ReSharper you can generate your guids by placing the
cursor inside the inverted commas of the field, type nguid and press TAB.
- There are comprehensive notes in the mouse over of the attributes in the
file.
- Watch your typing. Ids are case sensitive. I came to grief with
<Property Id="Diskprompt" instead of <Property Id="DiskPrompt". That said, the Compiler error was accurate and informative so it wasn't that
hard to find.
Below are the sections as created by the Template. Each section is followed
with the same section altered to my interpretation of the tutorial.
Original Product
<Product Id="*" Name="MyFirstWIXProject" Language="1033" Version="1.0.0.0" Manufacturer="Microsoft" UpgradeCode="2b2b3c08-44a1-4fb0-9045-28736f81f2d6">
<Package InstallerVersion="200" Compressed="yes" InstallScope="perMachine" />

<MajorUpgrade DowngradeErrorMessage="A newer version of [ProductName] is already installed." />
<MediaTemplate />

<Feature Id="ProductFeature" Title="MyFirstWIXProject" Level="1">
<ComponentGroupRef Id="ProductComponents" />
</Feature>
</Product>
Altered Product
<Product Id="54612752-7163-4B36-8CA6-01615090CD7F" Name="WIXTestSetup" Language="1033" Codepage="1252" Version="1.0.0.0" Manufacturer="MyCompany Ltd."
UpgradeCode="1756bfd5-c713-412a-9524-fb1b72886116">
<Package Id="*" Keywords="Installer" Description="My WIXTest Installer" Languages="1033" SummaryCodepage="1252" InstallerVersion="200"
Compressed="yes" InstallScope="perMachine" Comments="WIXTest Installer is a registered trademark of MyCompany and Co.Ltd" />
<Media Id="1" Cabinet="Sample.cab" EmbedCab="yes" DiskPrompt="CD-ROM #1" />
<Property Id="DiskPrompt" Value="WIXTestSetup Installation [1]"/>
<MajorUpgrade DowngradeErrorMessage="A newer version of [ProductName] is already installed." />


<Feature Id="ProductFeature" Title="WIXTestSetup" Level="1">
<ComponentGroupRef Id="ProductComponents" />
</Feature>
</Product>
Original Directory Fragment
<Fragment>
<Directory Id="TARGETDIR" Name="SourceDir">
<Directory Id="ProgramFilesFolder">
<Directory Id="INSTALLFOLDER" Name="MyFirstWIXProject" />
</Directory>
</Directory>
</Fragment>
Altered Directory Fragment
<Fragment>
<Directory Id="TARGETDIR" Name="SourceDir">
<Directory Id="ProgramFilesFolder" Name="PFiles">
<Directory Id="MyCompany" Name = "MyCompany" >
<Directory Id="INSTALLFOLDER" Name="WIXTestSetup" />
</Directory>
</Directory>
</Directory>
</Fragment>
Original Component Fragment
<Fragment>
<ComponentGroup Id="ProductComponents" Directory="INSTALLFOLDER">
<!-- TODO: Remove the comments around this Component element and the ComponentRef below in order to add resources to this installer. -->
<!-- <Component Id="ProductComponent"> -->
<!-- TODO: Insert files, registry keys, and other resources here. -->
<!-- </Component> -->
</ComponentGroup>
</Fragment>
Altered Component Fragment
<Fragment>
<ComponentGroup Id="ProductComponents" Directory="INSTALLFOLDER">
<!-- TODO: Remove the comments around this Component element and the ComponentRef below in order to add resources to this installer. -->
<Component Id="MainExecutable" Guid="4BFF8919-9C07-4BBE-BD1C-46AB49524566">
<!-- TODO: Insert files, registry keys, and other resources here. -->
<File Id="WIxTestExe" Name ="WIXTest.exe" DiskId="1" Source="V:\ProjectsTesting\WIXTest\WIXTest\bin\Debug\WIXTest.exe" KeyPath="yes" />
</Component>
<Component Id="ProgramFilesFolder" Guid="53B3FC8A-9D2B-4CDD-BE68-D155435C6163">
<RemoveFolder Id="ProgramFilesFolder" On="uninstall"/>
</Component>
</ComponentGroup>
</Fragment>
Conclusion
Build the WIX project and you should find an MSI file available in the usual
debug directory. As an absolute beginner with WIX I have missed something as no
setup file is generated. But the MSI does work and installs your helloworld
project without any options. Likewise it de-installs correctly. That is enough
to convince me that this is an achievable path forward. If I need to do any work
on one of my VS2010 projects I will move it to VS2012 and use the converter.
For new projects I will use the template.
Points of Interest
I am humbled by the quality of the tutorial referenced above. My sincere
thanks to the author and the contributors.
This member has not yet provided a Biography. Assume it's interesting and varied, and probably something to do with programming.


