Introduction
This tip shows how a Shopping\To do list application is created. It gives an idea of the following:
- Adding a list Item in an Activity
- Opening Dialog from Android Activity
- Working with SQlite
- How to return data from one activity to another
In this tip, we will be discussing about the first 2 points.
The Beginning
This tip assumes that you are aware of how an Android project is created. Create a new Android Project with the following details:
- Application Name = UtilityPlus Project Name = UtilityPlus Package Name = com.utility.utilityplus
- Minimum Required SDK & Target SDK = API 11 Android 3.0 (HoneyComb) and Click Finish.
Activities & Resources
This application contains the following major components:
MainActivity - Displaying the list of existing Shopping\To do List Dialog - A pop-up asking for the name of list from user - Add new Data Activity - User would enter the content of list here.
Adapter - For display of Data in MainActivity DatabaseHelper - For connecting and communicating with MainApplication
Using the Code
Adding a List Item in an Activity
Before moving on, we need to understand a few basic concepts, which are being used here:
- ListView - Displays a scrollable list of logically related items. It's an important UI Component and is used in many apps for various purposes.
- ListView Item - The items\data being displayed in a single row. It can be plain text(e.g. displaying the names of your contacts) or it can be much more complicated with 2
EditText for name and number, 2 buttons for edit and delete. - Data Source - The web definition of DataSources say: "The people, documents, products, activities, events and records from which data are obtained." [Reference: http://www.evaluationtoolkit.org/glossary]
With respect to coding, it can be an ArrayList, Array of any data-type (basic or complex) - Adapter - A piece of code which takes data from a data-source and makes it compatible to the
ListView.
In practical, the relationship between ListView and its adapter is much more complicated.
Display Plain Text as a List Item in the ListView
- Add
ListView in the resource layout XML - Create\find a Data Source
- Create an
Adapter for a Data Source - Assign
Adapter to the ListView
It's done!
The ListView can be dragged from the left pane of the graphical display of the Resource XML or the below code can be copied in the XML view:
<ListView
android:id="@+id/listView1"
android:layout_width="match_parent"
android:layout_height="wrap_content"
>
</ListView>
Data Source: Here, we are taking an Array of String:
String[] strNoData = { "Item1", "Item2", "Item3" };
Adapter: We are using simple arrayAdapter and then set adapter in the listview using setAdapter.
ArrayAdapter<string> objAdapter = new ArrayAdapter<string>(this,
        android.R.layout.simple_list_item_1, android.R.id.text1,
        strDataSource);
listview.setAdapter(objAdapter);</string> </string>
Display Set of Controls as a List Item in the ListView
Steps
- Add
ListView in the resource layout XML - Create\find a Data Source
- Create an XML layout resource for the row template in
ListView - Create an
Adapter for a Data Source - Assign
Adapter to the ListView
It's done !!!
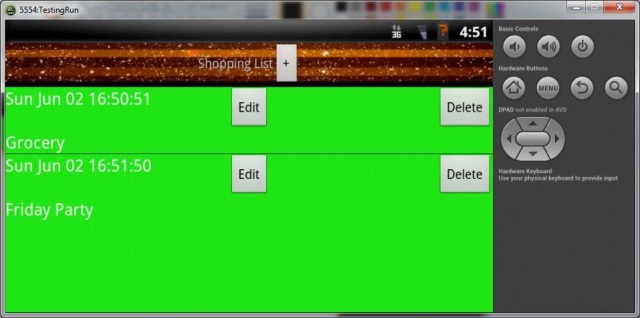
XML layout resource for the row template in ListView. The below template would be used for all the rows in the ListView.
<LinearLayout ...
    <FrameLayout  ...
    <TextView android:id="@+id/textView_datetime"
    android:layout_width="wrap_content" android:layout_height="wrap_content"
    android:text="" android:textAppearance="?android:attr/textAppearanceMedium"
    android:layout_gravity="left"/>
    <Button android:id="@+id/button_Edit" android:layout_width="wrap_content"
    android:layout_height="wrap_content" android:text="@+string/str_edit"
    android:onClick="onClick" android:layout_gravity="center_horizontal"/>
    <Button android:id="@+id/button_delete" android:layout_height="wrap_content"
    android:layout_width="wrap_content" android:text="@+string/str_delete"
    android:layout_gravity="right" android:onClick="onClick"/>
    </FrameLayout>
    <TextView android:id="@+id/textView_notename" android:layout_width="wrap_content"
    android:layout_height="wrap_content" android:text=""
    android:textAppearance="?android:attr/textAppearanceMedium"
    android:gravity="bottom"/>
</LinearLayout>
Creating a Custom Adapter
We can extend any adapter class provided by Android and can create our own custom adapter. Here, we would be using ArrayAdapter class. In the adapters, we need to override getView method. This method would return the view of single row. See the code below:
@Override
public View getView(int position, View convertView, ViewGroup parent) {
LayoutInflater vi = (LayoutInflater)
getContext().getSystemService(Context.LAYOUT_INFLATER_SERVICE);
convertView = vi.inflate(R.layout.showlistrow, null);
ShowData showData = m_ListItems.get(position);
if (showData != null) {
try {
} catch (Exception ex) {
...
}
}
return convertView;
}
Now, the above code is correct but we can optimize it further. We can reuse the Views of ListItems which are not visible on the screen.
Let's suppose, 5 Listitems can be displayed on the screen. We would create new view for each item. Right now, there are 5 views in the memory.
When we scroll down our listitem, the first ListItem is not being displayed and 6th comes in the view. So, instead of creating a new view for the 6th item , we can reuse the first items view. Creating a new view in Android is expensive Just add a check for existing view.
@Override
public View getView(int position, View convertView, ViewGroup parent) {
if(convertView!=null) {
LayoutInflater vi = (LayoutInflater)
getContext().getSystemService(Context.LAYOUT_INFLATER_SERVICE);
convertView = vi.inflate(R.layout.showlistrow, null);
ShowData showData = m_ListItems.get(position);
if (showData != null) {
try {
} catch (Exception ex) {
...
}
}
return convertView;
}
Assign adapter to ListView:
ShowDataAdapter adapter_Data = new ShowDataAdapter
(this,android.R.layout.simple_list_item_1, android.R.id.text1,list_AdapterItems);
listview.setAdapter(adapter_Data);
Opening Dialog from Android Activity
This can be achieved in 2 ways:
- Via
AlertDialog - Via
Dialog Class
Via AlertDialog
- Declare
AlertDialog object - Set Message and Title
- Set Positive and Negative Buttons
- Show Dialog
AlertDialog alertDialog = new AlertDialog.Builder(Main.this).create();
alertDialog.setTitle("Error...");
alertDialog.setMessage("Unable to open. Continue?");
alertDialog.setPositiveButton();
alertDialog.setNegativeButton();
alertDialog.show();
Via Dialog Class
Steps
- Create an XML Resource for Dialog Layout.
- Derive a class from
android.app.Dialog class of Android.
In the XML Resource, add all the controls that we want to display in our Dialog. Here, we would be adding a TextView and OK, Cancel buttons.
In the constructor of derive class, set XML Resource by calling setContentView().
setContentView(R.layout.popup);
Revision History
- 9th June 2013: Initial release
This member has not yet provided a Biography. Assume it's interesting and varied, and probably something to do with programming.


 General
  News
News  Suggestion
  Question
  Bug
Bug  Answer
  Joke
Joke  Praise
  Rant
Rant  Admin
Admin 


