Introduction
In the example, I'm using the free Greenfish Icon Editor to create a big glossy icon for use with Windows.
http://greenfishsoftware.blogspot.nl/2012/07/greenfish-icon-editor-pro.html
Other editors can be used too of course, for serious work a heavyweight drawing program can be used to create a picture, which can then be converted to an icon using an icon editor.
The nice thing about the Greenfish Icon Editor is, apart from the fact that it is free, that it already has excellent drawing functions built in, and even supports layers, so you don't need a separate drawing program.
Start the Editor
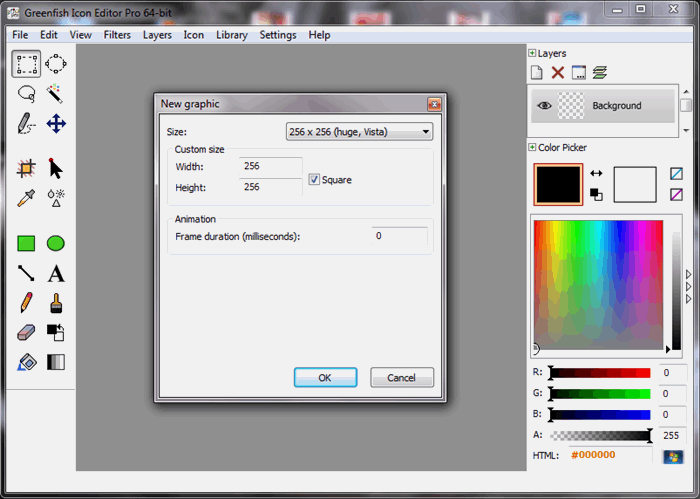
Let's start by firing up the icon editor and select "New graphic" from the file menu.
Set the size to 256 x 256 (huge, Vista).
Even if you only want a small icon, it's best to start with a larger sized version which can be scaled down later.
Creating the Button
Select a drawing color, e.g. red with the Color Picker on the right.
Choose the "Ellipse" tool and draw a circle.
From the Filters menu, select the "Bevel" option.
Set the size and other options until it looks like a button.

Adding a Letter
Add a new layer, by choosing "New Layer" in the top right box.
Select a drawing color, e.g. white with the Color Picker on the right.
Choose the "Text" tool and type a letter, set the size to 120.
From the Filters menu, select the "Drop Shadow" option.
Play with the settings until the shadow looks right.
Creating the Transparency Effect
Add a new layer, by choosing "New Layer" in the top right box.
Select white as the drawing foreground color, set the "Color alpha opacity" to 200 with the slider on the bottom of the colors panel.
Select white as the drawing background color, set the "Color alpha opacity" to 0.
Choose the "Elliptical select" tool and draw a circular selection over the button.
Choose the "Gradient fill" tool and draw from the top left to the bottom right of the selection.
Save the Icon
Save your project as a .gfie file first, otherwise layer information will be lost.
Now save as .ico file.
If you try to create new icon sizes with reduced colors, see step below, without saving as .ico first, there can be loss of image quality.
Creating Other Icon Sizes
Choose the "New page" icon from the toolbar.
Create the standard Windows icon sizes like 48x48, 32x32 and 16x16 preferably in 32-bits and 256 colors.
Conclusion
Save and enjoy your icon, you can also use the "Test" option in Greenfish Icon Editor to see how it looks on various backgrounds.
Software developer in the Netherlands, currently working on Video Surveillance applications.
Experience: C#, C++, VB, ASP, SQL Server, PostgreSQL, Gitea, TeamCity.
It all started with Black&White, no not the whiskey but the Sinclair ZX81 followed by several Atari's and PC's. The journey continues ...


 General
  News
News  Suggestion
  Question
  Bug
Bug  Answer
  Joke
Joke  Praise
  Rant
Rant  Admin
Admin 


