Introduction
In our previous tip, we discussed what is code first approach and various database initialization strategies in code first approach. You can read them here.
In this tip, we will discuss database migration in code first approach. We know that, in code first approach at first we write the database code and according to code, it generated the database. This is very smooth and straight forward. Now, think about a situation where the database is generated using code first technique and then modification needed in database like need to add another column in some table and there is already existing data in that table. In this situation, we can implement code first approach database migration technique. In this example, at first we will create simple code first strategy to build database teen we will see how to migrate small change in database using command. Have a look at the below example:
using System;
using System.Collections.Generic;
using System.ComponentModel.DataAnnotations;
using System.ComponentModel.DataAnnotations.Schema;
using System.Data.Entity;
using System.Linq;
using System.Text;
using System.Threading.Tasks;

namespace ConsoleApp
{
    [Table("Student")]
    public class Student
    {
        [Key]
        public int studentId{get;set;}
        [Required]
        [MaxLength(20,ErrorMessage="Please enter name within 20 character")]
        public string studentName{get;set;}
        [Required]
        [MaxLength(20,ErrorMessage="Please enter name within 20 character")]
        public string studentSurname{get;set;}

        public int addressID { get; set; }

        public virtual Address Address { get; set; }
    }

    [Table("Address")]
    public class Address
    {
        [Key]
        public int addressId{get;set;}
        public string country{get;set;}
        public string state{get;set;}

 [EmailAddress]
        public string email { get; set; }
    }

    public class MyDbContext : DbContext
    {
        public MyDbContext() : base("name=DBConnectionString")
        {
        }
        public DbSet<Student> Student { get; set; }
        public DbSet<Address> Address { get; set; }
    }
}
There are two models defined called ”Student” and “Address” and “MyDbContext” class is defined which is inherited from DbContext class. Now, we will write the below code to generate the database for first time.
using(MyDbContext ctx = new MyDbContext())
    {
            ctx.Database.Create();
    }
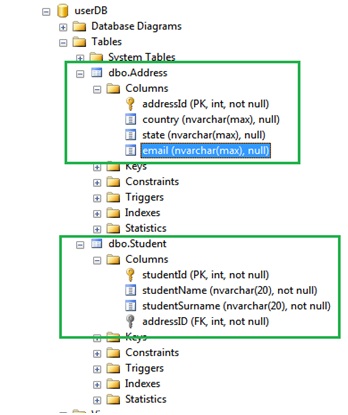
Make sure you have provided proper connection string and once you open the database in SQL server management studio, you will find that the tables are created as per below screen.
Now, let’s think that we need to add another table in the existing database. How we will do that? We can use migration strategy to updated database as per new model definition. Now, we will add the below model to existing database.
[Table("Course")]
    public class Course
    {
        public Course()
        {
            student = new List<Student>();
        }
        [Key]
        public int CourseId { get; set; }

        public List<Student> student { get; set; }

        public string courseName { get; set; }
    }
First of all, we have to Enable migration for this application. Open nuGet package manager console and run the below command:
Enable-migrations

Once this command runs successfully, we will see that one folder named “Migrations” has created in solution and it contains file named “Configuration”. This file contains the configuration section of migration like whether automatic migration is on or off and others.
Then we have to run.
add-migration “Identifier name”
Command which will add the migration history in another .cs file, the migration name is nothing but string identifier which may need to rollback some migration in future.
Here, we are seeing that the .cs file is created with unique identifier name followed by our specified migration identifier separated by underscore(_).
If we open the file, we will see code something like below for this migration example. The code is purely auto generated and this is nothing but for migration history.
public partial class CourseAdded : DbMigration
    {
        public override void Up()
        {
            CreateTable(
                "dbo.Student",
                c => new
                    {
                        studentId = c.Int(nullable: false, identity: true),
                        studentName = c.String(nullable: false, maxLength: 20),
                        studentSurname = c.String(nullable: false, maxLength: 20),
                        addressID = c.Int(nullable: false),
                        courseID = c.Int(nullable: false),
                    })
                .PrimaryKey(t => t.studentId)
                .ForeignKey("dbo.Course", t => t.courseID, cascadeDelete: true)
                .ForeignKey("dbo.Address", t => t.addressID, cascadeDelete: true)
                .Index(t => t.courseID)
                .Index(t => t.addressID);

            CreateTable(
                "dbo.Course",
                c => new
                    {
                        CourseId = c.Int(nullable: false, identity: true),
                        courseName = c.String(),
                    })
                .PrimaryKey(t => t.CourseId);

            CreateTable(
                "dbo.Address",
                c => new
                    {
                        addressId = c.Int(nullable: false, identity: true),
                        country = c.String(),
                        state = c.String(),
                        email = c.String(),
                        pin = c.String(),
                    })
                .PrimaryKey(t => t.addressId);
        }

        public override void Down()
        {
            DropIndex("dbo.Student", new[] { "addressID" });
            DropIndex("dbo.Student", new[] { "courseID" });
            DropForeignKey("dbo.Student", "addressID", "dbo.Address");
            DropForeignKey("dbo.Student", "courseID", "dbo.Course");
            DropTable("dbo.Address");
            DropTable("dbo.Course");
            DropTable("dbo.Student");
        }
    }
The beauty of the migration history is, at any point of time, we can run the migration code and bring our database in this state. Now, we want to reflect the updated model into database and for that we have to run the below command.
Update-database
Here, I have run the latest migration history to seed database.
Let’s open the database and we should find another table in database just like below.
Border Line
Database migration is absolutely useful when the database already exists and it’s meaningful when database exists along with data. Entity Framework will just reflect the updated model to database without altering the existing data.
I am software developer from INDIA. Beside my day to day development work, i like to learn new technologies to update myself. I am passionate blogger and author in various technical community including dotnetfunda.com , c-sharpcorner.com and codeproject. My area of interest is modern web technology in Microsoft stack. Visit to my personal blog here.
http://ctrlcvprogrammer.blogspot.in/


 General
  News
News  Suggestion
  Question
  Bug
Bug  Answer
  Joke
Joke  Praise
  Rant
Rant  Admin
Admin 


