Introduction
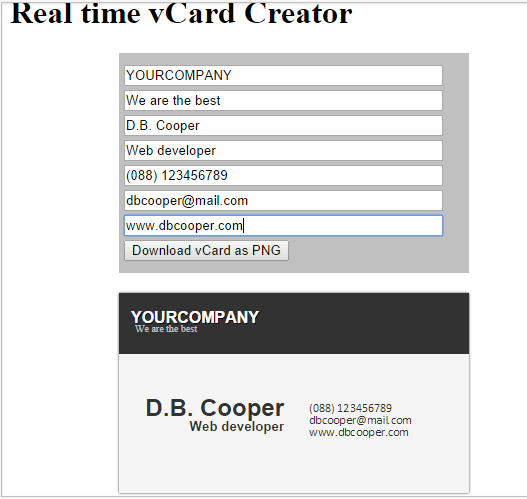
In this example, I've implemented a very simple vCard creator using some JavaScript libraries including AngularJS. Though here in this application, AngularJS did a very small job compared to other libraries, the motivation and the idea came from that little yet powerful functionality of AngularJS.
Background
In this application, we need to do some simple tasks. First, we need to design the vCard using CSS. Then, we need to let the users enter and edit their data in real time where we will need AngularJS. And then, we need to convert the vCard HTML div into a canvas and download that as a PNG image. That's it.
Using the Code
Here, I will explain the blocks of code.
<!DOCTYPE html>
<html>
<head>
    <title>vCard Creator demo</title>
    <link rel="stylesheet" type="text/css" href="main.css">
</head>
<body>

<div id="wrapper" ng-app>
    <h1>Real time vCard Creator</h1>
<div id="editor">
    <input placeholder="Company name" ng-model="cname"/>
    <input placeholder="Company tag line" ng-model="tagline"/>
    <input placeholder="Your full name" ng-model="name"/>
    <input placeholder="Your designation" ng-model="desig"/>
    <input placeholder="Phone number" ng-model="phone"/>
    <input placeholder="Email address" ng-model="email"/>
    <input placeholder="Website url" ng-model="url"/>
    <button id="saveBut">Download vCard as PNG</button>

</div>

<div id="card">

    <header>
        <h4>{{cname}}</h4>
        <p>{{tagline}}</p>
    </header>
    <div id="theBody">
        <div id="theLeft">
            <h2>{{name}}</h2>
            <h5>{{desig}}</h5>
        </div>
        <div id="theRight">
            <p>{{phone}}</p>
            <p>{{email}}</p>
            <p>{{url}}</p>
        </div>
    </div>

</div>

</div>

<script type="text/javascript" src="angular.min.js"></script>
<script type="text/javascript" src="jquery.min.js"></script>
<script type="text/javascript" src="html2canvas.js"></script>
<script type="text/javascript" src="canvas2image.js"></script>
<script type="text/javascript" src="base64.com"></script>

</body>
</html>
This is the HTML structure of our application. There are two parts of the structure. One is the editor div and another is the card div. Editor div is for letting the users enter their information and card div is for showing the information on the card. These two divs are enclosed by a wrapper div where we put the ng-app attribute because inside that div, we will use angular. We can put the ng-app into the HTML tag so that we can use angular anywhere in the webpage. Next, we create some input tags for taking input from the users. Check that every input tag has a ng-model data attribute where we are passing a corresponding value of the input tag. We are placing this ng-model here because we want to update the values in realtime inside the card div. Now, inside the card div, check that we have placed some weird looking double curly braces and inside the braces we put the values from the ng-model. Basically, what we will write inside the input tags will be updated inside these curly braces instantly. So editing the vCard is done here. Our target is, when a user clicks the download button, then the current card will be converted into an image and it will be downloaded into the users computer.
#editor{
    width:350px;
    background: silver;
    margin:0 auto;
    margin-top:20px;
    padding-top:10px;
    padding-bottom:10px;
}
input{
    width:90%;
    margin-left:5px;
}
button{
    margin-left:5px;
}
#card{
    width:350px;
    height:200px;
    background:whitesmoke;
    box-shadow: 0 0 2px #323232;
    margin:0 auto;
    margin-top:20px;
}
header{
    background:#323232;
    padding:5px;
}
header h4{
    color:white;
    line-height:0;
    font-family:helvetica;
    margin:7px;
    margin-top:20px;
    text-shadow: 1px 1px black;
    text-transform:uppercase;
}
header p{
    line-height:0;
    color:silver;
    font-size:10px;
    margin:11px;
    margin-bottom:20px;
}
#theBody{
    background:blue;
    width:100%;
    height:auto;
}
#theLeft{
    width:50%;
    float:left;
    text-align:right;
}
#theLeft h2{
    margin-right:10px;
    margin-top:40px;
    font-family:helvetica;
    margin-bottom:0;
    color:#323232;
}
#theLeft h5{
    margin-right:10px;
    font-family:helvetica;
    margin-top:5px;
    line-height:0;
    font-weight: bold;
    color:#323232;
}

#theRight{
    width:50%;
    float:right;
    padding-top:42px;
}
#theRight p{
    line-height:0;
    font-size:12px;
    color:#323232;
    font-family:Calibri;
    margin-left:15px;
}
This is the CSS of the application where we have simulated a vCard design and created the editor panel for the users to input the data.
<script>
    $(function() {

    $("#saveBut").click(function() {

        html2canvas($("#card"), {

            onrendered: function(canvas) {

                theCanvas = canvas;

                Canvas2Image.saveAsPNG(canvas);

            }
        });
    });
});
</script>
Finally, insert this script just before closing the body tag of the HTML file. This contains the event for the download button where html2canvas function is converting the card div into an HTML canvas and after finishing rendering the canvas, we are saving the canvas as a PNG file. After adding this script, we are done.
Limitation
The canvas2image.js doesn't append a .png extension after the file name. So if you cannot open the image with anything, then please rename the file and add .png after the file name.
jsFiddle
This member has not yet provided a Biography. Assume it's interesting and varied, and probably something to do with programming.
 General
  News
News  Suggestion
  Question
  Bug
Bug  Answer
  Joke
Joke  Praise
  Rant
Rant  Admin
Admin 


