Introduction
This article attempts to unravel some of the many issues I've been asked (and asked myself) about the Composite UI Application Block – CAB. This ace in Microsoft's Patterns & Practices group's deck provides a reusable, component based framework for building complex, smart client GUIs using best (depends on your definition of best I guess) practices. In essence, it allows complex GUIs to be built up using simpler, independently developed, tested, and deployed components.
Initially targeted at WinForms - particularly using C# - CAB is now being promoted for a wider set of client technologies, including WPF and WPF/E. As I write this in the post-Christmas darkness and cold that is January, the next release has been tentatively announced as April 2007 so there's not long to wait.
Hopefully this article will answer the following questions:
- What is it?
- Why would I want to use it?
- Why is it so complicated?
- Which bits are provided by CAB and which bits do I have to implement?
- How do I use it?
Composite UI Application Block (CAB)
The Composite UI Application Block is a GUI framework for creating complex, modularized smart client applications. Basically it provides the following:
- A framework that promotes a structured approach to building line of business applications.
- Dynamically loading, independent yet interoperating modules hosted in a common shell.
- Event broker for loosely coupled communication between modules and parts of modules.
- A Command pattern implementation.
- Base classes for Model-View-Control (MVC) and Model-View-Presenter (MVP) pattern implementations.
- An infrastructure for dynamically loading services. E.g. authentication, authorization, module location, and module loading.
- Guidance packages to ease component creation.
Shall we share a CAB?
CAB is primarily intended for designing business applications based on a use case–driven approach by a team of developers. However there is no reason why you shouldn't use it when developing your own (lonely developer) applications. Indeed, since it provides a plug-in framework, it allows you to develop an application that can have new modules added in the future without having to change the main application.
Using a team of developers to build an application presents its own particular problems. Teams typically consist of:
- Core developers – the architects and lead developers building the GUI framework, common services etc
- Application developers – designing and coding the business related windows i.e. implementing the business use cases
Team members come and go (and get run over by busses), so it's important to have consistency in the architecture and insulate the application developers from any complications of the core workings. They can independently develop, test and deploy their modules and not have to worry too much about the GUI framework itself. (or fiddle with it and mess it up). Once the core developers have built the application framework, the learning curve for the applications developers is very short. Conversely, any changes required in the core framework can happen (mostly) independently of the plug-in modules.
There must have been hundreds of GUI frameworks developed that work like CAB (some of them by me) for building enterprise GUIs, but if Microsoft promote CAB and their view of best practices, it's more likely to me adopted (rightly or wrongly) by the developer community.
The cost of (a) CAB
There is a cost to providing an insulated environment for the application developer. The framework implementation (CAB and the application core) has to provide a pretty generalised mechanism to handle things. At the core of CAB is the ObjectBuilder that extensively uses Dependency Injection (aka Inversion of Control) and a pipeline of strategies that allows multiple operations to take place as objects are instantiated and prepared for use. It also supports controlled disposal of object instances by executing the appropriate pipeline processes in the reverse order. Much of this is implemented using aspect oriented programming (AOP) and reflection using context attributes – so be prepared if dive into core CAB code.
This makes it very easy for the application developer who has to simply mark up constructors, event handlers, modules etc with the appropriate attributes. (Although life is a little tougher for the core developers!)
CAB terms and definitions
I don't intend going into too much detail here otherwise I'd just end up plagiarizing other texts. However, I'll briefly summarise the basic terms and definitions you'll come across in this and other articles about the CAB framework.
As I said before, CAB is primarily intended to be used by teams of developers; I'll try and indicate which of these terms are aimed at and whose responsibility it is to implement that part. There are three distinct areas of responsibility:
- CAB – part of the provided CAB framework.
- Core developers (CD) – the developers responsible for the application framework.
- Application developers AD) – the developers working on specific areas of functionality or use cases.
Remember this is only representative, but check out the linked pages for reference material and further reading. Note the clear separation of concerns between the various components. It's fundamental to the way CAB is constructed and avoids a spider web architecture.
Shell application (CD)
This is the container that hosts the application. Its job is to load and start the main application Shell.
Shell (CD)
The main user interface common to all the dynamically loaded modules is the Shell. Typically a form, it always hosts a root WorkItem, which is the root access to all the services, modules, and WorkItems registered by the modules.
Workspace (CD)
A workspace is a control that is primarily responsible for holding and displaying user interface elements created by WorkItems. CAB provides some standard workspaces (tab, mdi, panel etc) however you can implement your own.
Service (CD)
Service classes encapsulate common functionality for the client application, a specific module or WorkItems. Security and web service access might typically be handled by a service class.
Module (CD AD)
The logical grouping of WorkItems into a single deployment unit is a Module. This allows you to easily distribute new GUI functionality into an existing application. Effectively a plug-in.
ProfileCatalog (CD)
Typically a configuration XML file that specifies which modules and services need to be loaded into the application. You can override the default implementation if you need to load the configuration from somewhere else e.g. a database or web service.
ModuleLoader (CAB)
A service provided by CAB, which is responsible for loading the modules described in the ProfileCatalog. It dynamically loads the assembly, looks and instantiates the ModuleInit class if it was found.
ModuleInit (CD AD)
Each module needs ModuleInit class. This is responsible for loading all the services, WorkItems and GUI extensions (UIExtensionSite) required by the Module.
UIExtensionSite (CD)
UIExtensionSite is a class for extending the Shell with menus, tool strips or status strips.
WorkItem (CD AD)
A WorkItem is a class encapsulating all the logic required for a use case. Technically, it's a container that hosts all the required objects such as views and their presenters or controllers, state and commands.
Command (CAB)
A class for implementing the Command pattern. CAB supports commands created manually or declarative commands by applying the [CommandHandler] attribute to the command handler method. You can register multiple invokers for one command.
EventPublication
CAB provides an event broker that easily allows events to be published from class on the Module. This provides a way for loosely coupled WorkItems to communicate. This is implemented using .NET events that are marked with the [EventPublication] attribute.
EventSubscription
EventSubscription is the receiving end of an event. A class that wishes to subscribe to a specific event simply implements an event handler - a method with a common signature marked up with the [EventSubscription] attribute.
Model/View/Controller/Presenter
The Model is the business class a WorkItem contains and processes. E.g Account, Client. The View is a user control that is responsible for presenting the model to the user and allowing the user to modify its contents. The Controller/Presenter links the Model and the View. CAB encourages either MVC or MVP patterns but doesn't impose either. However, SCSF is geared towards a MVP and has wizards to generate them. Incidently, MS p&p now seem to be advocating the use of the WorkItemController as the preferred approach.
SmartPart
A SmartPart is just another name for a regular UserControl marked up with the [SmartPart] attribute.
ObjectBuilder
ObjectBuilder is a core CAB component. It's basically a factory for creating objects that require specific build strategies to be created or that need features such as instantiation and initialization of dependant objects when being created. This is achieved using Dependency Injection and an Object Builder pipeline. It uses AOP techniques available through the use of ContextAttributes that enable code to be injected or replaced at runtime. This is the fundamantal "magic happens" ingredient.
Smart Client Software Factory - SCSF
Getting started with CAB is bit of a mission and there's quite a few things you need to do get your application framework built. Also creating new Modules and WorkItems is more tedious than it need be. The SCSF is an extension to VS 2005 that greatly simplifies these tasks using Guidance Packages – in other words wizards. It's also possible to create your own custom Guidance Packages to give to application developers.
So let's get building.
Basically, you have two options to build a CAB framework and application:
- Do it yourself from scratch
- Use the Smart Client Software Factory (SCSF) and Guidance Packages (Wizards in old money)
I've chosen to build a simple application from scratch to help clarify how CAB applications are constructed and where the various components are used and fit together – SCSF neatly hides stuff of under the hood and we're trying to peek under the hood in this article. There are now quite a few sample applications around, not least the hands on labs linked at the end of this article. But Googling around, there seem to be no samples using the MDIWorkspace, so it seems useful one to build.
I know, I know. With the advent of WPF and its lack of MDI support because of the way it renders only top level windows, MDI may not be the best idea. But if you're planning to build a docking framework custom workspace, it's possibly a good place to start.
Now I'll hold my hands up now and say this is not a fully featured CAB application and doesn't use all the facilities provided by CAB – status, services, dynamic module loading etc. It's just an example of how to build a CAB application that happens to use the MDIWorkspace. The emphasis is on the word simple. (The application, not the author)
The Shell Application
- Create a new C# Windows application using the New Project wizard and call it SimpleMDIApp.
- Add references to the following CAB assemblies. You can download these from Microsoft or extract them from the attached source and project files.
- Microsoft.Practices.CompositeUI.dll
- Microsoft.Practices.CompositeUI.WinForms.dll
- Microsoft.Practices.ObjectBuilder.dll
- Rename Program.cs to SimpleMDIShellApp.cs
- Replace the generated code with this.
using System;
using System.Windows.Forms;
using Microsoft.Practices.CompositeUI;
using Microsoft.Practices.CompositeUI.UIElements;
using Microsoft.Practices.CompositeUI.WinForms;
using Microsoft.Practices.CompositeUI.Commands;
using Microsoft.Practices.CompositeUI.Services;

namespace SimpleMDIApp
{
    public class SimpleMDIShellApp : FormShellApplication<WorkItem,
                                                  SimpleMDIShellForm>
    {
        [STAThread]
        public static void Main()
        {
            new SimpleMDIShellApp().Run();
        }
    }
}
This is bare minimum Shell Application, but it needs a Shell – in this case SimpleMDIShellForm - to provide the menus, toolbars and workspace.
The Shell
Rename the existing, generated Form.cs to SimpleMDIShellForm.cs. You can now build and run the application, but it's not that exciting. It just displays Form1, but it is running in the CAB framework.
Add a menu and status bar by opening SimpleMDIShellForm.Designer.cs and change the existing code to be:
<param name="disposing" />
namespace SimpleMDIApp
{
partial class SimpleMDIShellForm
{
private System.ComponentModel.IContainer components = null;
protected override void Dispose(bool disposing)
{
if (disposing && (components != null))
{
components.Dispose();
}
base.Dispose(disposing);
}
#region Windows Form Designer generated code
private void InitializeComponent()
{
this.menuMain = new System.Windows.Forms.MenuStrip();
this.fileToolStripMenuItem =
new System.Windows.Forms.ToolStripMenuItem();
this.windowToolStripMenuItem =
new System.Windows.Forms.ToolStripMenuItem();
this.statusStrip1 = new System.Windows.Forms.StatusStrip();
this.menuMain.SuspendLayout();
this.SuspendLayout();
this.menuMain.ImeMode = System.Windows.Forms.ImeMode.HangulFull;
this.menuMain.Items.AddRange(new
System.Windows.Forms.ToolStripItem[] {
this.fileToolStripMenuItem,
this.windowToolStripMenuItem});
this.menuMain.Location = new System.Drawing.Point(0, 0);
this.menuMain.MdiWindowListItem = this.windowToolStripMenuItem;
this.menuMain.Name = "menuMain";
this.menuMain.Size = new System.Drawing.Size(735, 24);
this.menuMain.TabIndex = 0;
this.menuMain.Text = "menuStrip";
this.fileToolStripMenuItem.Name = "fileToolStripMenuItem";
this.fileToolStripMenuItem.Size =new System.Drawing.Size(35, 20);
this.fileToolStripMenuItem.Text = "File";
this.windowToolStripMenuItem.Name =
"windowToolStripMenuItem";
this.windowToolStripMenuItem.Size=new System.Drawing.Size(57,20);
this.windowToolStripMenuItem.Text = "Window";
this.statusStrip1.Location = new System.Drawing.Point(0, 384);
this.statusStrip1.Name = "statusStrip1";
this.statusStrip1.Size = new System.Drawing.Size(735, 22);
this.statusStrip1.TabIndex = 1;
this.statusStrip1.Text = "statusStrip1";
this.AutoScaleDimensions = new System.Drawing.SizeF(6F, 13F);
this.AutoScaleMode = System.Windows.Forms.AutoScaleMode.Font;
this.ClientSize = new System.Drawing.Size(735, 406);
this.Controls.Add(this.statusStrip1);
this.Controls.Add(this.menuMain);
this.MainMenuStrip = this.menuMain;
this.Name = "SimpleMDIShellForm";
this.Text = "Simple CAB MDI Application";
this.menuMain.ResumeLayout(false);
this.menuMain.PerformLayout();
this.ResumeLayout(false);
this.PerformLayout();
}
#endregion
private System.Windows.Forms.MenuStrip menuMain;
private System.Windows.Forms.ToolStripMenuItem
fileToolStripMenuItem;
private System.Windows.Forms.StatusStrip statusStrip1;
private System.Windows.Forms.ToolStripMenuItem
windowToolStripMenuItem;
}
}
All this basically does is add a MenuStrip, StatusStrip and a couple of MenuItems to the original form code. It also changes the form title and some styles. The important thing is the ToolStripMenuItem called fileToolStripmenuItem.
You can now build and now run this – it's now just a simple application form with a functionless menu and status strip.
The Module
Although this example won't use the Module to do anything useful, I've included it because it's important to understand the order things happen in CAB to make best use of it.
Insert a new C# class called SimpleMDIModuleInit as follows:
using System;
using System.Windows.Forms;
using Microsoft.Practices.CompositeUI;
using Microsoft.Practices.CompositeUI.Commands;
using Microsoft.Practices.CompositeUI.SmartParts;
using Microsoft.Practices.ObjectBuilder;

namespace SimpleMDIApp
{
    public class SimpleMDIModuleInit : ModuleInit
    {
        private WorkItem workItem;

        [InjectionConstructor]
        public SimpleMDIModuleInit([ServiceDependency] WorkItem workItem)
        {
            this.workItem = workItem;
        }

        public override void AddServices()
        {
            base.AddServices();
        }

        public override void Load()
        {
            base.Load();
        }
    }
}
There's a few interesting things to note here. The ModuleLoader in CAB will find and instantiate an instance of classes derived from ModuleInit. The overridden AddService and Load methods are then called giving you the opportunity to create any common services or initialization prior to the shell being created and displayed. CAB reflects over the class and identifies the InjectionConstructor and ServiceDependency attributes to achieve this. The details of module loading order and services are beyond the scope of this article.
The MDI workspace
To complete the Shell, we just need a workspace – in this case the MDI workspace. Easy:
namespace SimpleMDIApp
{
    public partial class SimpleMDIShellForm : Form
    {
        private WorkItem m_workItem;
        private IWorkspace m_mdiWorkspace;

        public SimpleMDIShellForm()
        {
            InitializeComponent();
        }

        [InjectionConstructor]
        public SimpleMDIShellForm(WorkItem workItem,
                 IWorkItemTypeCatalogService workItemTypeCatalog) : this()
        {
            this.m_workItem = workItem;
            m_mdiWorkspace = new MdiWorkspace(this);
        }
    }
}
This has added an injection constructor (by attribute) that CAB finds by reflection. It is called just prior to the shell being created and displayed. The constructor creates a new member MDI workspace and stores the WorkItem.
We're almost done with the Shell and WorkSpace now. We just need a way to close it and create new WorkItems (Views/Forms). So add the following command handlers to SimpleMDIShellForm to cope with this.
[CommandHandler("FileExit")]
public void OnFileExit(object sender, EventArgs e)
{
    Close();
}

[CommandHandler("FileNewContact")]
public void OnFileNew(object sender, EventArgs e)
{
    ContactWorkItem contactWorkItem =
           m_workItem.WorkItems.AddNew<contactworkitem />();
    contactWorkItem.Show(m_mdiWorkspace);
}
As you can see, command handlers are methods with a common signature, marked up with the [CommandHandler] attribute which identifies the Command as a string. The WorkItem we're going to create is called ContactWorkItem and this is referenced in the OnFileNew command handler. We'll be creating this in the next section.
For these methods to get called we need to fire the Commands FileExit and FileNewContact – we'll do this from the Shell menu strip. Modify SimpleMDIShellApp and add the following two methods:
protected override void AfterShellCreated()
{
base.AfterShellCreated();
ToolStripMenuItem fileItem =
(ToolStripMenuItem)Shell.MainMenuStrip.Items["fileToolStripMenuItem"];
RootWorkItem.UIExtensionSites.RegisterSite("FileDropDown",
fileItem.DropDownItems);
AddMenuStripButton(RootWorkItem, "FileNewContact", "New");
AddMenuStripButton(RootWorkItem, "FileExit", "Exit");
}
private void AddMenuStripButton(WorkItem workItem, string commandName,
string text)
{
ToolStripButton button = new ToolStripButton();
button.Text = text;
button.ToolTipText = text;
workItem.UIExtensionSites["FileDropDown"].Add(button);
workItem.Commands[commandName].AddInvoker(button, "Click");
}
AfterShellCreated is an overridden FormShellApplication method called by CAB (rather obviously) after the shell form has been created. Our implementation, gets a reference to the root "File" menu item, registers it as "FileDropDown" and uses our own helper method AddMenuStripButton to associate add a menu item and Command that are associated with the with the menu click event. Note the scope of the Commands. They are defined and added in this file, but their recipient command handlers are in SimpleMDIForm. Here's where the fileToolStripMenuItem string is used to reference the File menu name property.
There are many ways to add the menus and commands to your application. How it's done here is one very simple way to demonstrate things. An alternative is to use centrally defined constants for the command strings and do the UIExtensionSite registration and menu/command work in an associated WorkItem module. You could also dynamically, load the menus from a configuration file based on user role and permissions.
The WorkItem, View and Controller
So now the Shell and application is complete and the core developer's work is done. We just need to create a WorkItem and Form view to display in the MDI workspace – the application developers job. This represents a business component in our application and in this case, it's just a form allowing the user to enter new contact details. In practice this would probably also be used to display existing contact details as well.
Create a new User Control called ContactView.cs and add some controls to it.

View the generated code and modify it to be:
using System;
using System.Windows.Forms;
using Microsoft.Practices.CompositeUI;
using Microsoft.Practices.CompositeUI.SmartParts;
using Microsoft.Practices.CompositeUI.UIElements;
using Microsoft.Practices.ObjectBuilder;

namespace SimpleMDIApp
{
    [SmartPart]
    public partial class ContactView : UserControl
    {
        private ContactController controller;

        public ContactView()
        {
            InitializeComponent();
        }

        [CreateNew]
        public ContactController Controller
        {
            set { controller = value; }
        }

    }
}
The differences between the standard generated code and a CAB enabled control is the [SmartPart] attribute for the class. Smart parts are essentially the visual components of a CAB application. Additionally, this WorkItem will use an MVC pattern, so the Controller property is marked up with the [CreateNew] attribute. CAB uses dependency injection to link up loosely coupled components at runtime, in this case the View hold a reference to its Controller.
Now create the Controller class called ContactController.cs:
using System;
using System.Collections.Generic;
using System.Text;
using Microsoft.Practices.CompositeUI;

namespace SimpleMDIApp
{
    public class ContactController : Controller
    {
        public ContactWorkItem ContactWorkItem
        {
            get { return base.WorkItem as ContactWorkItem; }
        }
    }
}
In this bare-bones example, this controller just has a property that returns its WorkItem.
The last piece of the jigsaw is the WorkItem itself - the class that encapsulates the business logic of the various visual and non-visual components. Create a new class called ContactWorkItem:
using System;
using System.Windows.Forms;
using Microsoft.Practices.CompositeUI;
using Microsoft.Practices.CompositeUI.Commands;
using Microsoft.Practices.CompositeUI.SmartParts;
using Microsoft.Practices.CompositeUI.UIElements;
using Microsoft.Practices.CompositeUI.Utility;
using Microsoft.Practices.CompositeUI.WinForms;
using Microsoft.Practices.CompositeUI.EventBroker;
using System.Drawing;

namespace SimpleMDIApp
{
    public class ContactWorkItem : WorkItem
    {
        private static Point pos = new Point(0, 0);
        private ContactView m_contactView;
        private WindowSmartPartInfo m_smartPart;

        public void Show(IWorkspace parentWorkspace)
        {
            m_smartPart = new WindowSmartPartInfo();
            m_smartPart.ControlBox = true;
            m_smartPart.Location = pos;
            m_smartPart.Title = "Untitled - Contact";
            pos = Point.Add(pos, new Size(10, 10));
            m_contactView = Items.AddNew<contactview />();
            parentWorkspace.Show(m_contactView, m_smartPart);

            this.Activate();
        }

        protected override void OnActivated()
        {
            base.OnActivated();
        }

        protected override void OnDeactivated()
        {
            base.OnDeactivated();
        }

        protected override void OnTerminated()
        {
            base.OnTerminated();
        }
    }
}
Our public Show method does the work of creating a view and adding it to the MDI workspace. It instantiates a WindowSmartPartInfo object that manages the smart part attributes, adds a newly (using Generics) created ContactView to the parent workspace. In this case it's the MDI workspace created in the SimpleMDIShellForm.
The Show method is called from the OnFileNew event handler in SimpleMDIShellForm in response to the FileNewContact command fired when the menu button is clicked.
A few points to note:
- OnActivate and OnDeactivate CAB overridables called when the WorkItem gets or loses focus.
- OnTerminated is (in this case) called when the application closes. This depends on how you manage the lifetime of the WorkItems.
- The static Point member is there so new Views don't just hide a previously created view.
- This uses the MVC pattern, but CAB doesn't enforce this. In fact when using the SCSF, the approach is MVP.
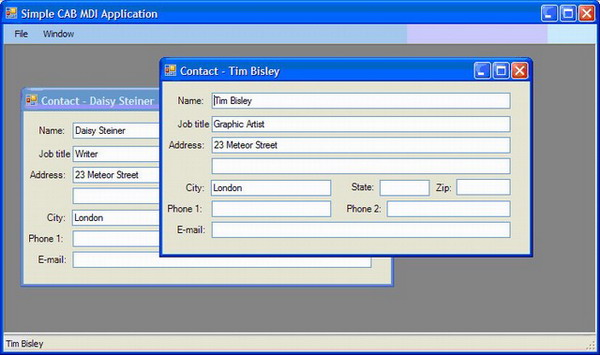
You should now be able to build and run this exciting(!) application. Remember, this is only a starting point to understand the structure and organization of components in a CAB application – in this case using an MDIWorkspace. It only touches on the capabilities CAB offers, but is a useful learning exercise.
The sample code
The attached sample application is almost the same as the code in this article with a few additions. The main one being the use of a config file to setup the Shell form menus. There are four helper classes :
- ShellItemsSection.cs
- UIElementBuilder.cs
- MenuItemElement.cs
- MenuItemElementCollection.cs
These are used to build the menu, load services and modules from App.config.
Also, there is code to update the status strip with the contact name when the ContactWorkItem is active.
Skip to the end Daisy
This article has dug into some of the mechanisms and components of CAB and how they might be used in an MDI GUI application. Hopefully it's been useful in understanding how it's possible to build complex GUI smart clients from loosely coupled GUI components using teams of developers and a structured approach.
Some useful links and references.


 General
  News
News  Suggestion
  Question
  Bug
Bug  Answer
  Joke
Joke  Praise
  Rant
Rant  Admin
Admin 


