Introduction
This is a short article on how to enable selection of multiple items inside a ListBox (or a derived class, such as ListView) using only the mouse.
Background
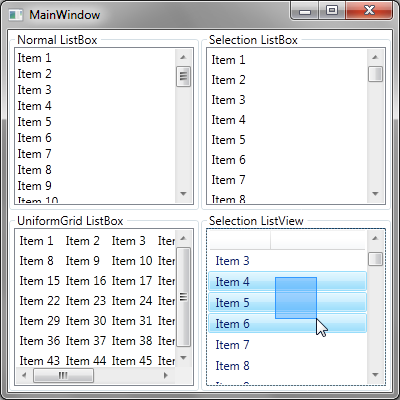
It's surprising that the native ListBox in WPF doesn't support selecting items by dragging a box around them (also called rubber band selection), like found in Windows Explorer. You can select multiple items by holding down the shift key and dragging the mouse, but there will be no visual feedback (apart from the selection changing) of where you're dragging, and you have to use the keyboard and mouse at the same time.
Thinking that it was a simple option that I was missing, after searching the internet, I couldn't find anything that behaved like the one found in Explorer or that was simple to integrate (i.e., doesn't require a separate DLL or wrapping the ListBox in another control) and automatically scrolled the content if the mouse was dragged outside of the bounds of the control.
Using the code
The code is designed to be easy to use; include the ListBoxSelector.cs file in your project (optionally changing the namespace to match that used in the rest or your project, as I couldn't think of an original name!) and then change your XAML to use the attached property, e.g.:
xmlns:local="clr-namespace:SelectionExample"
<ListBox local:ListBoxSelector.Enabled="True"/>
That’s it!
How it works
This part of the article will go into the detail on how the control works. For the selection to work, the following requirements need to be handled:
- Drawing the rectangle: Feedback needs to be provided of where the user is dragging and this must be confined to the inside of the
ListBox (i.e., can't go over the scroll bars). - Automatic scrolling: If the selection rectangle is dragged outside of the control's bounds then the content should scroll in the direction of the mouse.
- Item selection: Any item that intersects with the selection rectangle should be selected, as well as de-selected should the selection rectangle change and no longer intersect with it.
- Attached property: The selection rectangle should be easy to use in XAML without having to use code-behind.
These requirements are implemented in separate classes, with the attached property gluing them together.
Drawing the selection rectangle
The easiest way to draw the selection rectangle on top of the ListBox is to create a class derived from Adorner and override the OnRender method as follows:
private sealed class SelectionAdorner : Adorner
{
public SelectionAdorner(UIElement parent)
: base(parent)
{
this.IsHitTestVisible = false;
this.IsEnabledChanged += delegate { this.InvalidateVisual(); };
}
public Rect SelectionArea { get; set; }
protected override void OnRender(DrawingContext drawingContext)
{
base.OnRender(drawingContext);
if (this.IsEnabled)
{
double[] x = { this.SelectionArea.Left + 0.5, this.SelectionArea.Right + 0.5 };
double[] y = { this.SelectionArea.Top + 0.5, this.SelectionArea.Bottom + 0.5 };
drawingContext.PushGuidelineSet(new GuidelineSet(x, y));
Brush fill = SystemColors.HighlightBrush.Clone();
fill.Opacity = 0.4;
drawingContext.DrawRectangle(
fill,
new Pen(SystemColors.HighlightBrush, 1.0),
this.SelectionArea);
}
}
}
Nothing that special really, apart from that if the control is not enabled, then nothing will be drawn. Also, I ran into a problem that sometimes the edges of the rectangle were blurry, but by adding the centre of the edges to a GuidelineSet, everything looks nice and crisp.
The Adorner ensures that the selection rectangle will be drawn on top of the control; however, we need an AdornerLayer to host it and need to make sure it won't draw past the bounds of the content of the ListBox (e.g., make sure it doesn't drawn over any scroll bars). The default template of the ListBox uses a ScrollViewer, which contains the scroll bars and a ScrollContentPresenter, which fortunately has an AdornerLayer property that is exactly what we need!
To find the ScrollContentPresenter, we can search through the visual children of the ListBox until we find one (we'll use a breadth first search so we find the top most ScrollContentPresenter). Here is a simple generic helper function to find the first of any child type:
private static T FindChild<T>(DependencyObject reference) where T : class
{
var queue = new Queue<DependencyObject>();
queue.Enqueue(reference);
while (queue.Count > 0)
{
DependencyObject child = queue.Dequeue();
T obj = child as T;
if (obj != null)
{
return obj;
}
for (int i = 0; i < VisualTreeHelper.GetChildrenCount(child); i++)
{
queue.Enqueue(VisualTreeHelper.GetChild(child, i));
}
}
return null;
}
Automatic scrolling
There are different ways to handle the scrolling when the mouse leaves the bounds of the control. One way (used by Windows Explorer, for example) is to select the items and bring them into view, so the further the mouse moves outside of the bounds, the faster the scrolling. Another way is to scroll by a fixed amount at a fixed interval (for example, if you hold an arrow key down). This control uses the latter approach as I personally find it more predictable (I'm sure I'm not the only person who has selected over a thousand rows in Excel when I only wanted to scroll a little!)
When the mouse leaves the bounds of the control, a timer is started that will scroll the content while the mouse remains outside of the bounds. The interval of the scrolling is the same as the default value for when a user presses and holds a scroll button. Reading the documentation on the RepeatButton.Interval property (the buttons each end of a scroll bar are RepeatButtons), it mentions that the default value is that of SystemParameters.KeyboardSpeed. Unfortunately, we can't just use that value as it's not a measurement of time, but instead the property returns "a value in the range from 0 (approximately 2.5 repetitions per second) through 31 (approximately 30 repetitions per second)". How useful!? We'll use linear interpolation to get the interval in milliseconds, like so:
private static int GetRepeatRate()
{
const double Ratio = (400.0 - 33.0) / 31.0;
return 400 - (int)(SystemParameters.KeyboardSpeed * Ratio);
}
The other tricky part of scrolling the content is that the ScrollViewer.VerticalOffset property means two different things based on the value of ScrollViewer.CanContentScroll; if this property is true, then the offset value represents the number of items; if it's false, then the offset value is in Device Independent Pixels. To position the selection rectangle, we need to work in DIPs so when calculating the change in scroll position and CanContentScroll is true (which by default it is), we need to calculate the height of the items. To do this, the ListBox provides a property which returns an ItemContainerGenerator, which can be used to get the container of an item in the ListBox at a specified index.
private double CalculateOffset(int startIndex, int endIndex)
{
double sum = 0;
for (int i = startIndex; i != endIndex; i++)
{
FrameworkElement container =
this.itemsControl.ItemContainerGenerator.ContainerFromIndex(i)
as FrameworkElement;
if (container != null)
{
sum += container.ActualHeight;
sum += container.Margin.Top + container.Margin.Bottom;
}
}
return sum;
}
Selection of items
The simplest way to select the items is to go through them all and see which ones intersect the selection rectangle. As mentioned in the automatic scrolling section, we can use the ItemContainerGenerator class to get the container of each item and, after converting the co-ordinates to those of the ListBox, see if it intersects with the selection rectangle.
We also need to keep track of the previous value of the selection rectangle to see if the rectangle has been reduced and, therefore, if we need to unselect an item. The naive way of handling unselecting items would be if the intersection between the selection rectangle and the item's bounds fails then set the item's selection property to false, but this doesn't handle the case where the user has already selected some items and wants to select more by holding down the shift/control key.
public void UpdateSelection(Rect area)
{
for (int i = 0; i < this.itemsControl.Items.Count; i++)
{
FrameworkElement item =
this.itemsControl.ItemContainerGenerator.ContainerFromIndex(i)
as FrameworkElement;
if (item != null)
{
Point topLeft = item.TranslatePoint(
new Point(0, 0),
this.itemsControl);
Rect itemBounds = new Rect(
topLeft.X,
topLeft.Y,
item.ActualWidth,
item.ActualHeight);
if (itemBounds.IntersectsWith(area))
{
Selector.SetIsSelected(item, true);
}
else if (itemBounds.IntersectsWith(this.previousArea))
{
Selector.SetIsSelected(item, false);
}
}
}
this.previousArea = area;
}
Attached property
An attached property is used to bind the above classes together. This class also receives the events from the ListBox and forwards them to the required class. Everything is relatively straightforward with this class, though instead of listening to the MouseLeftButtonDown event from the ListBox, the class uses the PreviewMouseLeftButtonDown event.
This may seem like a minor difference but the former is a Bubbling event and the latter is a Tunneling event (see Routing Strategies for more details). This basically means that the MouseLeftButtonDown starts at the bottom and works its way to the top of the visual tree; the preview version starts at the root element and works its way towards child elements. Since the ListBox uses the MouseLeftButtonDown event to enable selection, we'll use the PreviewMouseLeftButtonDown event to intercept the mouse before the ListBox gets a chance to change the selection.
Since we're taking the MouseLeftButtonDown event away from the ListBox, we need to check if there are any child controls that need to handle the mouse input (such as a CheckBox or Button etc). To do this, we can use the InputHitTest method to find the control under the mouse and send it the mouse event. We can then check which control has captured the mouse and, if it's the ListBox, capture the mouse for ourselves.
private bool TryCaptureMouse(MouseButtonEventArgs e)
{
Point position = e.GetPosition(this.scrollContent);
UIElement element = this.scrollContent.InputHitTest(position) as UIElement;
if (element != null)
{
var args = new MouseButtonEventArgs(e.MouseDevice,
e.Timestamp, MouseButton.Left, e.StylusDevice);
args.RoutedEvent = Mouse.MouseDownEvent;
args.Source = e.Source;
element.RaiseEvent(args);
if (Mouse.Captured != this.listBox)
{
return false;
}
}
return this.scrollContent.CaptureMouse();
}
The other thing to take note of is because we're accessing the child elements of the ListBox, we need to wait for it to be loaded. This is easy to do; we check the IsLoaded property and, if it's false, subscribe to the Loaded event.
Limitations
The code should work with custom templates for the ListBox providing the template has a ScrollViewer in it. If it doesn't, then nothing bad will happen (i.e., the code won't throw any exceptions), but the code won't do anything and the ListBox will be the same as if it didn't have the property set.
History
- 20/12/11 - Fixed bug where the selection doesn't work if the
ListBox is in a TabControl. - 13/06/11 - Enabled child controls to receive mouse input.
- 10/06/11 - First release.
This member has not yet provided a Biography. Assume it's interesting and varied, and probably something to do with programming.


 General
  News
News  Suggestion
  Question
  Bug
Bug  Answer
  Joke
Joke  Praise
  Rant
Rant  Admin
Admin 


