Introduction
As the title depicts, this article is about the multi-level, scrollable, browser compatible, XP Style JavaScript Start Menu as well as context menu.
Background
The need of Start Menu started with a project requirement where there were tonnes of application links to be displayed in an organised manner. Then the solution was identified to implement the Start Menu like feature in the project, which can handle all the application links with ease.
So, I started searching for JavaScript menu API which could be moulded into the XP style start menu. I found out multiple options viz - List based menu, Tree based menu, CSS based menu etc., but none of them were suitable for my requirements. Most of the freely available menus fulfilled the requirements of multi-level menu, but none of them were scrollable.
Finally, I decided to prepare my own start menu API, and here is the result.
Using the Code
To start with, you are supposed to carry out the following steps:
- Include the following CSS and JS files in your HTML page
HEAD section:
<LINK REL="stylesheet" TYPE="text/css" HREF="base.css" />
<LINK REL="stylesheet" TYPE="text/css" HREF="theme.css" />
<SCRIPT TYPE="text/javascript" SRC="Utility.js"></SCRIPT>
<SCRIPT TYPE="text/javascript" SRC="StartMenu.js"></SCRIPT>
The Utility.js file is a multi-purposed file, which contains common functions which are needed for manipulating the DOM objects.
The StartMenu.js is the key file which contains the overall functionality.
The two CSS files viz - base.css and theme.css are for styling the menu.
- In the
body section, create one container with a unique ID to hold all the menu items to be created.
<DIV ID='menuContainer'></DIV>
- For creating menu items, you can either add a JavaScript file or you can place your code directly within the
<script> open/close tag. For code readability, I have added a JavaScript file in the samples provided. Either way, you need to add the following code in your file:
var menu = null;
function bindOnLoad(e) {
_screenDimensions();
_addEvent(window, function(e) { _screenDimensions(); }, "resize");
_disableSelection(document.body);
createStartMenuItems(e);
}
function createStartMenuItems(e) {
menu = new StartMenu('menuContainer');
menu.add(false,'MenuBar01','MenuItem01','Menu Item 01',function(evt)
{alert('Hi ! \n' + this.toString()); } ,
'Description of Menu Item 01','MenuBar02','MainMenu',
'any extra information about the menu item goes here.
You can access this information directly in your binded function');
menu.add(false,'MenuBar01','MenuItem02','Menu Item 02');
menu.add(true,'MenuBar01');
menu.add(false,'MenuBar01','MenuItem03','Menu Item 03');
menu.add(false,'MenuBar02','MenuItem04','Menu Item 04 Javascript call',
'javascript:alert("you can call function this way also")');
menu.add(false,'MenuBar02','MenuItem05',
'Menu Item 05 Open codeproject.com','url:http://www.codeproject.com/');
menu.add(false,'MenuBar02','MenuItem06','Menu Item 06');
menu.add(false,'MenuBar02','MenuItem07','Menu Item 07');
var item = new MenuItemHashmap();
item.menuBarId = 'MenuBar02';
item.menuText = 'Menu item created using map';
item.menuOnClick = function(e) { alert('called from map.\n\n' +
this.toString());}
item.meta = 'extra information on this item goes here';
menu.addMap(item);
item.clear();
item.menuBarId = 'MenuBar02';
item.menuText = 'SubMenu item created using map';
item.menuOnClick = function(e) { alert('called from next map.\n\n' +
this.toString());}
item.meta = 'extra information on this sub item goes here';
menu.addMap(item);
menu.init("MenuBar01", e, false);
}
- Add the
onload event to the body section. Also add the start menu button or a link. Add the onclick event with the start menu button using the global StartMenu object created in step 3:
<BODY onload="bindOnLoad(event)">

<DIV ID="MenuButton" CLASS="MenuButton" ONCLICK="menu.show(null, event)">
Start</DIV>
That's it. The Start Menu is ready.
Creating a Context Menu
Repeat step-2 and step-3 shown above for creating a context menu. The only differentiator between the Start Menu and a Context Menu lies in the API call - menuObj.init(). The value of the third parameter in this method determines whether it's a Context Menu or not. Please refer to the below API description as well as the code in the sample3.htm as well as sample3.js files attached for further details.
Understanding the API
Create a StartMenu object using the following code:
var menuObj = new StartMenu(containerDivId);
Adding the menu items can be done in two ways:
(A) Add
menuObj.add(isSeparator, menuBarId, menuId, menuText, menuOnClick,
	menuTooltip, subMenuBarId, menuBarCSS, meta);
Meaning of the Parameters
isSeparator: (Type boolean) When set to true, the menu item is treated as a separator with no action permitted. Default is false. menuBarId: The group or menu bar to which this particular menu item belongs. It is a mandatory parameter. menuId: The unique Id to identify the current menu item. You can keep it blank if you don't require. menuText: The text to be displayed on the start menu. menuOnClick: This can be either a JavaScript function object or any string with a prefix as "javascript:" or "url:". menuTooltip: The mouse over text or tooltip to be displayed on the menu item. subMenuBarId: Provide the id of the menu bar which will be shown as the child of this menu item. menuBarCSS:Optional menu bar CSS for formatting any particular menu bar (and not the menu item). For demonstration, please refer to the Sample2.htm file provided in the source. meta: Any optional details specific to the menu item required to be stored, so as to use it while processing item click event.
When the JavaScript function binds to the menu item, you can access all this attributes using the this object. Example, this.meta, this.id, etc.
(B) MenuItemHashmap
First, create an object of MenuItemHashmap as shown below:
var itemObj = new MenuItemHashmap();
Then, set the properties of the item. These properties are the same as the parameters in above method (as shown in section (A) ). You can choose what to add and what to exclude, rest of the things will be set to default values, as shown below:
itemObj.menuBarId = 'MenuBar02';
itemObj.menuText = 'Menu item created using map';
itemObj.menuOnClick = function(e)
	{ alert('called from map.\n\n' + this.toString());}
The next step is to add this map into the StartMenu object created previously, as shown below:
menuObj.addMap(itemObj);
You can reuse the same item object for adding more menu items by resetting this object to default value using the following API:
itemObj.clear();
Once all the menu items are added using any of the APIs, the next thing you need to do is to initialize the StartMenu object as shown below:
menuObj.init(menuBarId, eventObject, isContextMenu);
Meaning of the Parameters
menuBarId: As the name depicts, the ID of the menu bar created using above API. This ID should be the first menu bar to be displayed when the start menu button is clicked. eventObject: It is the event object. isContextMenu: It determines whether the associated menu object will be used for creating a Start Menu or a Context Menu. If set to true, the associated menu object will be considered as a Context Menu. Default is false or null. When set to true, the value in menuBarId will be the ID of the first menu bar to be displayed when the context menu is activated.
After completing all these steps, the final step is to bind the menu with any link or button or image or text. This can be done by calling the following API on click or on mouseover of the DOM object as shown in step-4 above.
menuObj.show(null, event);
Points of Interest
The basic concept that I applied for designing this piece of code was using the DIV and SPAN tags. There is a main DIV tag used for handling the scrolling of menu items. The next DIV tag is used to combine all the menu items, which are build using SPAN tag. So, the overall structure will look like:
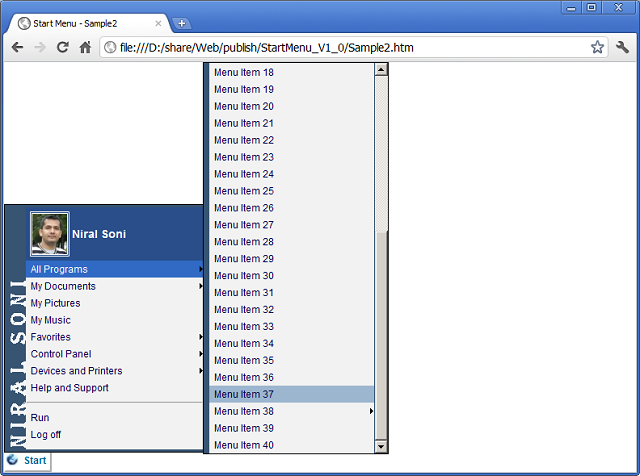
So, you can manipulate the outer DIV tag and apply any desired formatting. While the Sample1.htm is a simple start menu, the Sample2.htm file shows how the user defined formatting can be applied.
The other thing that I designed along with this is a Utility.js file having various commonly needed functions for handling the DOM objects. Below are the set of functions available for use:
function _gs(obj): Short form of Get Style
- Get the current style of specified object. It returns a map with current height, width, top, left position, border width as well as the padding.
function _gol(obj): Short form of Get Offset Left
- Get the distance of specified object in pixel from left side of the screen.
function _got(obj): Short form of Get Offset Top
- Get the distance of specified object in pixel from top side of the screen.
function _ge(id): Short form of Get Element by Id
- Get the DOM object for the specified id.
function _addEvent(target, functionref, eventType)
- Bind any event to the specified target and invoke the referred function when the event occurs.
function _getEvent(type, e)
- Get either the Source or Destination of the occurred event, based on the type specified. If type is "Src", it will return the source DOM object which generated the event. If type is "Dest", it will return the Destination DOM object where this event will end.
function _processStyle(el, tc, action)
- Check, Add, or Remove the specified CSS class for a particular DOM object. Here, "el" is the DOM object, "tc" is the css class name, and "action" can be either of - "check", "add" or "remove".
function _screenDimensions()
- Calculates the current screen dimensions (height and width) and stores the value in two global variables - _dh and _dw (meaning document height and document width).
function _disableSelection(target)
- Disables the text selection of the specified DOM object.
NOTE
There is one more JavaScript file included in the package - MessageBox.js. This is one more utility designed by me. It has been used in the Sample2.htm file. More details on this utility and its usage can be found here.
Upgrade Notes
The code upgrade (Version 2.0) is backward compatible. If anyone has already integrated Version 1.0 in their code, they can upgrade to Version 2.0 simply by replacing the StartMenu.js file.
Features in Version 2.0:
- Added a multi level, scrollable, cross browser context menu
- Backward compatible with the previous version
- Use of the same API for creating a context menu
Conclusion
Hope all of you will find this article very useful.
History
- 19th August, 2011: Initial post
- 23rd August, 2011: Added a note
- 15th September, 2011: Version 2.0 with a Multi-level, scrollable context menu added
I started my career as Java Developer. But now more inclined towards web designing, JavaScript, HTML and CSS.I have good level of expertise on Java, Oracle and JavaScript. Designing Generic components is my main expertise.


 General
  News
News  Suggestion
  Question
  Bug
Bug  Answer
  Joke
Joke  Praise
  Rant
Rant  Admin
Admin 


