Introduction
Do you sometimes need a class for a complex data type? I do, but I think it too much work to type it myself. Did you know that .NET Framework has a tool to generate classes from XSD-files? It does, but it requires a command prompt, and every time you change the XML-schema, you have to run it again. Did you know that Visual Studio can work with Custom Tools? It does, but how to create one can be quite a mystery, at least, it was to me.
This article will describe how to create a custom tool, install it, and use it. The example can generate classes from XML-schemas which you can incorporate right into Visual Studio 2005 and 2008 (tested).
Background
Visual Studio uses xsd.exe internally when creating datasets. However, it is also capable of generating strongly typed classes from other XSD-files, which I will demonstrate in this article.
In order to create a Custom Tool, you need to create a class that inherits from Microsoft.VisualStudio.Design.BaseCodeGeneratorWithSite, which, for some reason, is internal, and therefore cannot be inherited from. Gert Servranckx created a class called Microsoft.CustomTool.BaseCodeGeneratorWithSite, which can be inherited from.
Using the code
The project
First of all, I created a new class library project, which I called "xsd2class". Because a Custom Tool is a COM object, I checked COM-Visible (in Properties > Application > Assembly Information). Copy the project's GUID, because you'll need it again when we define the Custom Tool's class.
This particular COM object is, in fact, a .NET assembly that Visual Studio should be able to find, so it needs to be in the GAC. In order to do that, it needs to be signed, so I created a new key.snk and signed the assembly with it. It saves some work if the assembly is added to the GAC automatically, so I set up a Post-build event with the command line:
"C:\WINDOWS\Microsoft.NET\Framework\v2.0.50727\regasm" /codebase "$(TargetPath)"
The Custom Tool-class skeleton
As stated before, we need a class that is COM-Visible and inherits from Microsoft.CustomTool.BaseCodeGeneratorWithSite, so let's create one. Let's start off by adding a reference to the assembly "Microsoft.VisualStudio.BaseCodeGeneratorWithSite.dll". Then, add a new class as follows. (The value for the Guid attribute is the same as the GUID you copied from the Assembly info.)
namespace Xsd2Class
{
    [ComVisible(true)]
    [Guid("0e439c89-b1be-489d-a0f4-c2d191db6f9b")]
    public class Xsd2Class : Microsoft.CustomTool.BaseCodeGeneratorWithSite
    {
    }
}
The Microsoft.CustomTool.BaseCodeGeneratorWithSite.GenerateCode method is abstract, so we have to override it:
protected override byte[] GenerateCode(string inputFileName, string inputFileContent)
{
    return new byte[] { };
}
In order for the Custom Tool to be recognized by Visual Studio, it needs to be registered in the Registry (where else):
- "HKLM\SOFTWARE\Microsoft\VisualStudio\8.0\Generators" for Visual Studio 2005 and
- "HKLM\SOFTWARE\Microsoft\VisualStudio\9.0\Generators" for Visual Studio 2008.
The Generators key has subkeys with GUIDs as names. This is what they mean:
- {164B10B9-B200-11D0-8C61-00A0C91E29D5}: Visual Basic
- {E6FDF8B0-F3D1-11D4-8576-0002A516ECE8}: J#
- {FAE04EC1-301F-11D3-BF4B-00C04F79EFBC}: C#
- Other: Don't know.
We've got to register our Custom Tool for all three languages. So, in each key, we create another key with the name "Xsd2Class" and the values:
- (Default): String: Xsd2Class (This is the name of our custom tool)
- CLSID: String: {0e439c89-b1be-489d-a0f4-c2d191db6f9b} (The GUID you copied from the Project's assembly information) and
- GeneratesDesignTimeSource: DWORD: 1
For Visual Studio 2005, the reg file would be:
Windows Registry Editor Version 5.00

[HKEY_LOCAL_MACHINE\SOFTWARE\Microsoft\VisualStudio\8.0\
      Generators\{164B10B9-B200-11D0-8C61-00A0C91E29D5}\Xsd2Class]
@="Xsd2Class"
"CLSID"="{0e439c89-b1be-489d-a0f4-c2d191db6f9b}"
"GeneratesDesignTimeSource"=dword:00000001

[HKEY_LOCAL_MACHINE\SOFTWARE\Microsoft\VisualStudio\8.0\
      Generators\{E6FDF8B0-F3D1-11D4-8576-0002A516ECE8}\Xsd2Class]
@="Xsd2Class"
"CLSID"="{0e439c89-b1be-489d-a0f4-c2d191db6f9b}"
"GeneratesDesignTimeSource"=dword:00000001

[HKEY_LOCAL_MACHINE\SOFTWARE\Microsoft\VisualStudio\8.0\
      Generators\{FAE04EC1-301F-11d3-BF4B-00C04F79EFBC}\Xsd2Class]
@="Xsd2Class"
"CLSID"="{0e439c89-b1be-489d-a0f4-c2d191db6f9b}"
"GeneratesDesignTimeSource"=dword:00000001
For Visual Studio 2008, simply replace "8.0" with "9.0".
And now, we've got ourselves a working Custom Tool, doing absolutely nothing!
Doing something
Xsd.exe
As said before, xsd.exe is a command line tool. So, let's create a wrapper for it.
private void GenerateCodeFile(string inputFileName)
{
    FileInfo FI = new FileInfo(inputFileName);

    Process proc = new Process();
    proc.StartInfo.FileName = @"C:\Program Files\" +
         @"Microsoft Visual Studio 8\SDK\v2.0\Bin\xsd.exe";
    string Namespace = FI.Name.Substring(0, FI.Name.Length - FI.Extension.Length);
    string Language = GetLanguage();
    proc.StartInfo.Arguments =
                String.Format(@"/c /l:{0} /n:{1} ""{2}"" /out:""{3}""",
                Language, Namespace, inputFileName, FI.DirectoryName);
    proc.StartInfo.UseShellExecute = false;
    proc.StartInfo.CreateNoWindow = true;
    proc.StartInfo.RedirectStandardError = true;
    proc.Start();
    proc.WaitForExit();
    if (proc.ExitCode != 0)
    {
        using (StreamReader SR = proc.StandardError)
        {
            string Errors = SR.ReadToEnd();
            if (!(string.IsNullOrEmpty(Errors)))
            {
                throw new Exception(Errors);
            }
        }
    }
}
We create a new Process and let the StartInfo's FileName point to xsd.exe. xsd.exe has a few arguments:
- /c: Create a Class (not a
DataSet), - /l: Language (VB for Visual Basic, CS for C#, etc.),
- /n: namespace
- Filename
- /out: the directory in which to write the generated source code.
Usually, the Language parameter has the same value as the return value of the base class' GetDefaultExtension method. However, I noticed that if I create a new class in J#, that file has a .vjs extension, while the language attribute should be "jsl". The GetLanguage method makes this mapping.
If we were to have a Books collection with Book elements where every Book has an Author and a Title, and if we omitted the namespace parameter, the Books and Book objects would be created in the default namespace, which gets messy if you work with many objects. So, we'd better provide one. If the XSD file is called Books.xsd, I think "Books" is a nice namespace.
The filename is the inputFilename parameter of the GenerateCode method, and the output directory is the directory of the inputFile.
Because we don't want to see the command prompt appearing every time, we set UseShellExecute to false and CreateNoWindow to true.
Because we want to know if something goes wrong, we redirect the standard error.
Returning the results
The GenerateCode method needs the results as a byte array, so let's just read the XSD's output and return it as a byte array:
private byte[] GetGeneratedFileContent(string inputFileName)
{
    string DefaultExtension = GetDefaultExtension();
    string outputFilename = inputFileName.Replace(".xsd", DefaultExtension);
    FileInfo FI = new FileInfo(outputFilename);
    using (StreamReader FS = FI.OpenText())
    {
        string Contents = FS.ReadToEnd();
        return System.Text.Encoding.ASCII.GetBytes(Contents);
    }
}
Putting it together
Now, putting it together...
protected override byte[] GenerateCode(string inputFileName,
                          string inputFileContent)
{
    GenerateCodeFile(inputFileName);
    byte[] GeneratedFileContent =
           GetGeneratedFileContent(inputFileName);
    return GeneratedFileContent;
}
... and we've got ourselves a working Custom Tool that can generate source code from an XSD file!
User manual
That's all very nice, but how do I use it? Simple :-)
- Add a new XML schema to your project.

- Write the schema.
="1.0"="utf-8"
<xs:schema
id="Books"
targetNamespace="http://tempuri.org/Books.xsd"
elementFormDefault="http://tempuri.org/Books.xsd"
xmlns:mstns="http://tempuri.org/Books.xsd"
xmlns:xs="http://www.w3.org/2001/XMLSchema">
<xs:element name="Books" type="Books">
<xs:annotation>
<xs:documentation>
Collection of Books.
</xs:documentation>
</xs:annotation>
</xs:element>
<xs:complexType name="Books">
<xs:sequence>
<xs:element name="Book" type="Book">
<xs:annotation>
<xs:documentation>
A book with a title and an author.
</xs:documentation>
</xs:annotation>
</xs:element>
</xs:sequence>
</xs:complexType>
<xs:complexType name="Book">
<xs:sequence>
<xs:element name="Title" type="xs:string">
<xs:annotation>
<xs:documentation>
The Book's main title.
</xs:documentation>
</xs:annotation>
</xs:element>
<xs:element name="Author" type="xs:string">
<xs:annotation>
<xs:documentation>
The name of the main writer.
</xs:documentation>
</xs:annotation>
</xs:element>
</xs:sequence>
</xs:complexType>
</xs:schema>
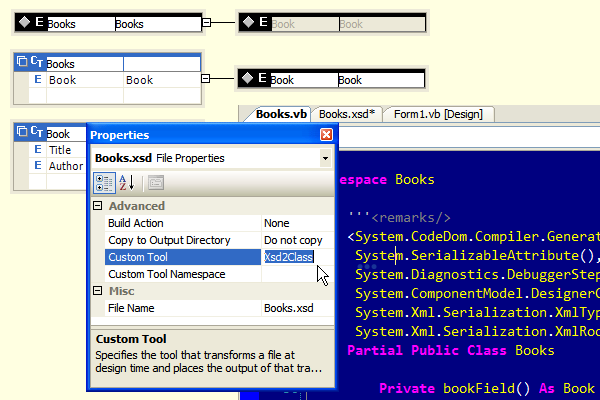
- Set the Custom Tool to use.
- Run the custom tool (or save your schema).
Et voila: your strongly typed Books class:
Conclusion
First of all, I hope you find this tool useful :-). I also hope this will inspire you to write your own Custom Tools, which you hopefully will write an article about.
History
- 2008-04-11: Initial article.
- 2008-05-05: Changed the GAC remark.
Though I graduated as an Electro Technical Engineer, I specialized myself in writing software. At this moment I work as a consultant for many clients. I get to work with a lot of different technologies: VBA, WinForms, WebForms, ADO.NET, MSAccess, eXtreme Programming and a lot more.


 General
  News
News  Suggestion
  Question
  Bug
Bug  Answer
  Joke
Joke  Praise
  Rant
Rant  Admin
Admin 


 and you have to get rid of that

 I changed the ambiguity.