Introduction
This article will help you to submit a webpage (asp, aspx, etc.) file from
the CRM Dynamics OnSave button click event with JavaScript. This article will take
the Account entity as an example and assumes that the webpage is already available to access from JavaScript.
Using the Code
The below steps need to be followed to customize the CRM Dynamics Account form.
- Select the form to customize and submit the webpage. This can be done by stepping through Settings->Customization->Account->Forms and Views-> Form.
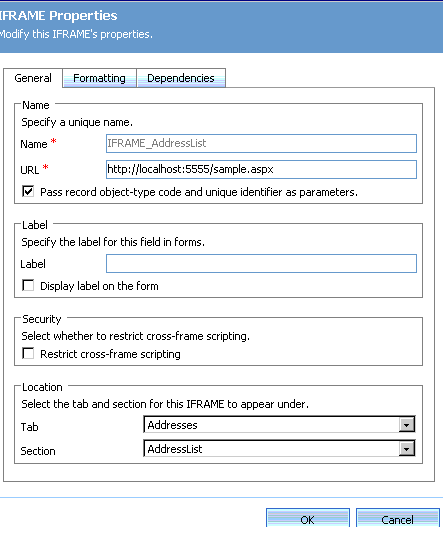
- Add the IFrame to the form.
- Select the IFrame and click Change Properties.
- Enter the name and URL of the IFrame. URL is the path of the file where the webpage resides, e.g.:
http://localhost:5555/sample.aspx.
- Check “Pass Object type****” if you would like to pass the form ObjectId as a parameter to the webpage.
The form ObjectId is nothing but
the AccountId of the Account entity which is selected from then Accounts screen.

- Now select Form Properties and select the Events tab (by default this tab will be shown).
- Select OnSave from the list and press the Edit button to write the JavaScript.
- On opening the new window select the “Event is enabled” checkbox. This will enable the CRM form to execute the
JavaScript.
- Write the following JavaScript in the edit box to submit the form:
var iframe = document.getElementById('IFRAME_AddressList');
var iframeDoc = iframe.Document;
var iframeForm = iframeDoc.getElementById('frmAddress');
iframeForm.target = '_self';
iframeForm.method = 'post';
iframeForm.action ='http://localhost:5555/sample.aspx? Id='+crmForm.ObjectId;
iframeForm.submit();
Here IFRAME_AddressList is the name of the iFrame.
frmAddress is the form name in the ASPX page. Since the submission is to the same page the target is “_self”.
crmForm.ObjectId is passed as a query string to get the AccountID in the
ASPX page. (Since we are overriding the CRM Dynamics form submission, the query string needs to be passed explicitly.)
- Now close the JavaScript window by pressing the OK button and close the form properties window.
- Save and Close the form at the top left corner of the Form.
- Now publish the form with the menu Actions->Publish.
I hope this article will help you to submit a webpage from the CRM Dynamics form.
Completed Masters in Computer Applications.


 General
  News
News  Suggestion
  Question
  Bug
Bug  Answer
  Joke
Joke  Praise
  Rant
Rant  Admin
Admin 


