Introduction
A IOT ecosystem is far more than loading a firmware in few nodes, sending information somewhere over a network protocol and maybe adding some remote control.
The key features that make an IOT solution a comprehensive IOT solution are:
- Componible hardware: a common base hardware platform with pluggable sensors/actuators of choice
- Support for a wide suite of communication protocol (from short range i.e. RFID to global range i.e., HTTP)
- Power consuming strategies (i.e. battery supplied nodes spread in the environment should be active for months/years)
- Remote deployment of firmware (the so called OverTheAir programming)
- Gateways (i.e., sensor data from a private ZigBee network to the WWW/Cloud)
- Data should be represented in a common data model for an easy third part aggregation
- One language, one API library, one development tool
The article introduces two applications for Waspmote and it shows how this hardware matches the previous features.
Waspmote introduction
Waspmote: it's an open hardware inspired by Arduino and it's oriented to the production scenario with important features such as power saving strategies and a wide set of sensors/actuators.
Waspmote's development approach: an Arduino like development tool and a high level language are available. Accessing the hardware is straightforward, thanks to a comprehensive API library. Also, a community of makers/developers is sharing their experience and code.
Waspmote is open to a wide range of communication protocols: no matter if you need to communicate using RFID, NFC, 802.15.4, ZigBee, WiFi, HTTP, FTP etc. Many antennas can be plugged to it.
Waspmote platform
Below you'll find some usefull schemas of a Waspmote platform and radio modules mentioned in the article.
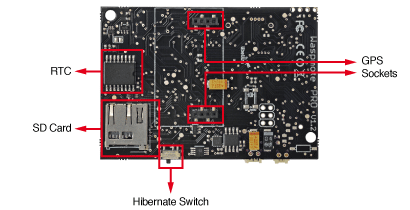
Top schema:

Bottom shema:
XBee PRO S2 antenna (ZigBee module):

SIM908 (GPRS+GPS module):

Waspmote development environment
Waspmote Pro IDE is a "branch" of the Arduino IDE with a lot of similarities (i.e., Sketch menu, Serial monitor, language based on C/C++, copiling/uploading process).
If you can't wait for some code running on the board, below you can find a first Hello world application just to warm up your fingers!

A common source skeleton looks like:
#include <WaspGPRS_SIM908.h>
float temperature = 0.0;
void setup()
{
USB.ON();
RTC.ON();
ACC.ON();
}
void loop()
{
USB.printf("%s\n", "Hello world");
delay(5000);
}
Copy and paste the code above, compile and upload the firmware. Than click on Tools/Serial monitor and guess what will happen?!
Using the Code
AppTemperature
Every hour Waspmote wakes up, gathers the temperature, joins the ZigBee network, sends the data to the coordinator and goes back in hibernate mode.
Architecture

Requirements
- Waspomote PRO V1.2
- XBee PRO S2 antenna
- ICR18650H-1S3P rechargeable battery package
-
Waspmote set-up
Looking to the Top schema above follow the steps:
- plug the XBee PRO S2 antenna to Waspomote PRO V1.2 through Radio Socket 0
- plug ICR18650H-1S3P rechargeable battery package to Waspomote PRO V1.2 through Battery Socket
Your platform now should look like:

Meshlium set-up
Since the article is focused on the End device activity we use a Meshlium gateway as a "ready to go" ZigBee coordinator but remember that, for instance, an Arduino equipped with an 802.15.4 + ZigBee antenna configured as coordinator is fine too. If the case you use a Meshlium follow the steps to receive the messages from the AppTemperature end device:
- plug the ethernet to a router
- access the management page (something like http://192.168.1.xx/ManagerSystem/login.php)
- navigate to the ZigBee section
- This gateway comes already configured as ZigBee coordinator
Source code
The complete code of AppTemperature is WaspmoteCalling_CodeProject\AppTemperature\AppTemperature.pde
The highlight of the code are:
- Sets the ZigBee coordinator MAC address.
char* MAC_ADDRESS="MESHLIUM_MAC_ADDRESS";
- Sets a weak-up trigger that invokes hibInterrupt() function every hour
PWR.hibernate("00:01:00:00",RTC_OFFSET,RTC_ALM1_MODE2);
- Retreive the temperature value
float temperature = RTC.getTemperature() - 3;
- Sends a ZigBee packet to the coordinator. As an advanced exercise you can add Router nodes between the End device and the Coordinator. In the current sample the communication is unicast and single hop.
xbeeZB.sendXBee(packet);
Run the code
ZigBee set-up:
- Check for the MESHLIUM_MAC_ADDRESS = MAC high + MAC low (see WaspmoteCalling_CodeProject\Images\meshlium_mac.png). Meshlium will act as the ZigBee coordinator.
- Click on log view (see WaspmoteCalling_CodeProject\Images\meshlium_log.png)
- Plug the Waspmote to your pc through a usb cable
- XBee PRO S2 antenna's firmware comes with a generic ZigBee configuration so it should work for the current example. However, if you want to dig or redefine some settings like the operating PAN_ID or the operating CHANNEL, a way is to configure it through Digi's XCTU tool and a Waspmote Gateway or an Arduino with the antenna module plugged. In the example a very generic configuration is used (see. WaspmoteCalling_CodeProject\Images\zb_config.png)
Upload and run the application:
- Open the AppTemperature.pde with a Waspmote Pro IDE. In the example Waspmote Pro IDE v. 04 and Waspmote Pro IDE v 012 are used
- Plug the usb cable with both Switch ON/OFF and Hibernate Switch towards the Battery Socket
- Upload the firmware WaspmoteCalling_CodeProject\AppTemperature\AppTemperature.pde
- Unplug the usb cable, reset both Switch ON/OFF and Hibernate Switch towards the Battery Socket and when the red light is on switch only the Hibernate Switch in the opposite direction (this will enable the hibernate mode). Just a tip: in order to debug the Waspmote code you can decorate with USB.println(F("some string")) your code and click on Tools/Serial Monitor.
- Open WaspmoteCalling_CodeProject\Images\meshlium_log.png and you'll see the communication that's is going on!
Highlights
- Meshlium acts as ZigBee coordinator
- Waspmote acts as ZigBee end device
- Advanced ZigBee configurations through X-CTU tool from Digi
- Waspmote hibernate mode allows node activity for months (in this example a 3.7V-6600mAh battery package is used)
- If you load the application in several End devices you'll have a first multinode ZigBee network
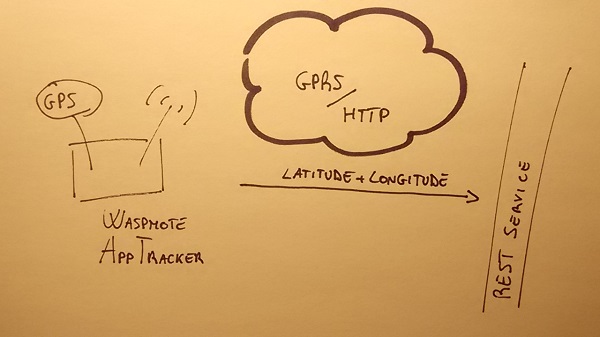
AppTracker
The Waspmote, equipped with a GPS and a GPRS module, loops in a geo location retrieving followed by common HTTP call using POST+JSON.
Architecture
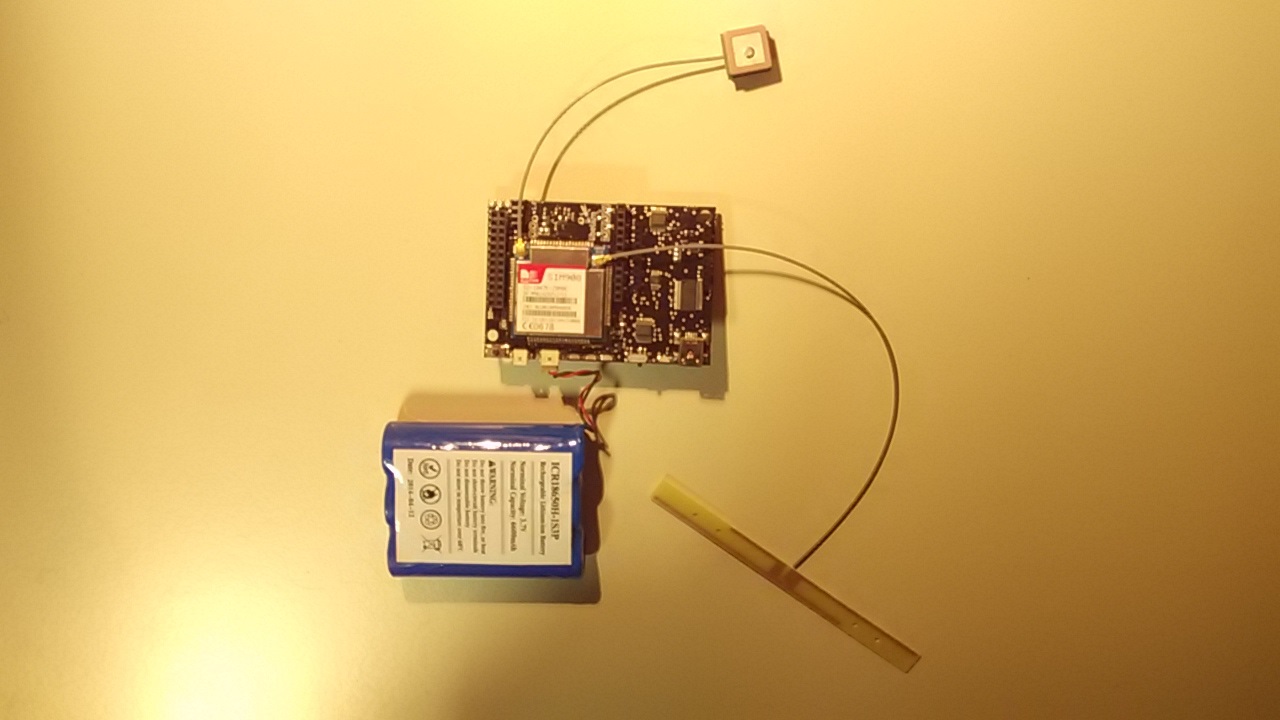
Requirements
- Waspomote PRO V1.2
- SIM908 radio board with a common SIM on board
- ICR18650H-1S3P rechargeable battery package
Waspmote set-up
Looking to the Top schema above follow the steps:
- insert a common SIM card in the SIM908 radio board
- plug the SIM908 radio board to Waspomote PRO V1.2 through SPI - UART Socket
- plug ICR18650H-1S3P rechargeable battery package to Waspomote PRO V1.2 through Battery Socket
Your platform now should look like:
REST service overview
The example consider a remote REST service listening on http://xxx.org:8080/rest and accepting POST calls with a JSON body like {"validtimestr":"xxx","framenumber":"x","sensor":"xxx","value":"gps_coordinates","nodeCod":"xxx"}. Is up to the service manage this message in some way maybe storing it to a database.
Source code
The complete code of AppTraker is WaspmoteCalling_CodeProject\AppTraker\AppTracker.pde
The highlight of the code are:
- Configures the GPRS connection according with the SIM card you'are using
GPRS_SIM908.set_APN(apn, login, password);
- Retreives GPS informations. Among them you'll get also the current latitude/longitude
GPRS_SIM908.getGPSData(BASIC, 1);
- Invokes a common POST/HTTP against the
url. GPS_data is a string that represent your JSON body
answer = GPRS_SIM908.readURL(url, GPS_data, 1 );
Run the code
Upload and run the application:
- Open the AppTraker.pde with a Waspmote Pro IDE. In the example Waspmote Pro IDE v. 04 and Waspmote Pro IDE v 012 are used
- Plug the usb cable with both Switch ON/OFF and Hibernate Switch towards the Battery Socket
- Upload the firmware WaspmoteCalling_CodeProject\AppTracker\AppTracker.pde
- Unplug the usb cable, reset both Switch ON/OFF and Hibernate Switch towards the Battery Socket and click on Tools/Serial Monitor. Just one tip: remember that the GPS signal is quite weak so better if you work outside (hope for a sunny day ;-))
- In Serial Monitor you'll see the main steps of the execution!
Highlights
- Standard web technologies are used like HTTP-POST-JSON
- GPS satellite connection and GPRS communication are accessed with few calls
Points of Interest
Let's show how Waspmote meets the key features mentioned in the Introduction section:
- Componible hardware: a common base hardware platform with pluggable sensors/actuators of choice: Waspmote can be easily plugged with a very wide range of sensors (i.e., CO2 Vibration, Noise, Video Camera), actuators and antennas (previously you've seen just a few like GPRS and ZigBee);
- Support for a wide suite of communication protocol (from short range, i.e., RFID to global range i.e., HTTP): available antennas spans from short range to wide range. In the examples, AppTemperature used ZigBee and AppTracker used GPRS;
- Power consuming strategies (i.e., battery supplied nodes spread in the environment should be active for months/years): in AppTemperature, we used an Hibernate mode strategy (roughly 0.06µA and months of activity) with just few calls. No need to dig in electrical details;
- Remote deployment of firmware (the so called OverTheAir programming): remote Waspmotes can be updated through FTP, 802.15.04 and other network protocols. Think about a scenario like AppTracker with thousand of nodes scattered in your town..;
- Gateways (i.e., sensor data from a private ZigBee network to the WWW/Cloud): in AppTemperature temperature, sensored data by the end device is sent to Meshlium (gateway) which acts as ZigBee coordinator. Also, in a transparent way, it manages these packets and stores them in an external database or against an IOT cloud platform like Axeda or ThingWorks or other services that support emerging IoT protocols like MQTT;
- Data should be represented in a common data model for an easy third part aggregation: in both AppTemperature and AppTracker without much effort, data can be represented in a common format of your choice maybe fittings the schema of a table Message from your database (i.e., {id,nodecod,framenumber,sensor,value,validtime,transactiontime})
- One language, one API library, one development tool: whatever you'll develop for Waspmote, some basic notion of C, Waspmote Pro API and Waspmote Pro IDE is all you need. Also, if you are familiar with Arduino development you can reuse your skills!
Enjoy ;-)
This member has not yet provided a Biography. Assume it's interesting and varied, and probably something to do with programming.


 General
  News
News  Suggestion
  Question
  Bug
Bug  Answer
  Joke
Joke  Praise
  Rant
Rant  Admin
Admin 


