Introduction
Office Business Applications (OBA) can be a powerful way to surface data for your users. Because nearly every worker uses Microsoft Office, your users are already familiar with the user interface. But how do you bring the data from your line of business (LOB) application into Word? In this lab, you will walk through the steps to bring data into a Word document and provide a Fluent Ribbon user interface to browse that data.
This lab is in two sequential parts. First, you will bind controls in a Word document to a data source. Next, you will customize the Ribbon with buttons to view the data.
Background
This demo assumes you have the following installed:
You can use other versions of Visual Studio with Visual Studio Tools for Office installed. But Word Content Controls are a feature of Microsoft Office 2007. This demo will also work on Windows Server 2003 and Windows Server 2008 with minor changes in how you start Visual Studio.
This article assumes you have a database in Access. But you can connect the Word Content Controls to SQL Server or to data objects or Web Services. You can use the database provided in the code or build your own.
While this lab uses C#, you can adapt this lab to Visual Basic .NET with minor changes.
Using the code
Most of this article is about how to drag and drop the controls and how a few lines of code will build a powerful application in Word.
Create a document with controls bound to a database
In this lab, you use the drag and drop functionality to add controls to a Word 2007 template and add simple data binding to a local database.
First, you will create a solution that includes a Visual Studio Tools for Office (VSTO) project. This template will allow your users to customize the Word template by selecting the content of predefined areas, based on the data in the database. While this demo is in C#, you can also use Visual Basic. The objective of this process is to open a Word template within Visual Studio.
- Click Start, type Visual Studio 2008 in the start search textbox, right-click Visual Studio 2008, click Run as administrator
- Click Continue in the User Account Control dialog
- Click the File --> New --> Project... menu
- In the New Project dialog Project types panel, expand Visual C#, expand Office, click 2007
- In the Templates panel, click Word Template
- Set the location to your Visual Studio 2008 project folder, such as C:\Users\bruce\Documents\Visual Studio 2008\Projects
- Type CCTemplate in the Name textbox
- Check Create directory for Solution
- Click OK
- In the Visual Studio Tools for Office Project Wizard, click OK
- A dialog box appears that asks if you want access to Visual Basic for Applications
- Click OK
The Visual Studio Toolbox contains Word Controls. You can now add controls to the document.
- If the toolbox is not displayed, click View --> Toolbox
- Expand Word Controls
- Click on the document
- Type Company Name followed by a space and drag a
RichTextContentControl from the toolbox to the document; press Enter - Type Company Address followed by a space and drag a
RichTextContentControl from the toolbox to the document; press Enter - Type Invitation Date followed by a space and drag a
DatePickerControl from the toolbox to the document; press Enter - Click the Save disk icon in the document pane
You can adjust the properties of the control.
- Click the
RichTextContentControl that follows the Company Name text - Press F5 to run your solution
- Click on each of the controls and type some data
- Close the document without saving
You have added controls that when bound to the data browse event handlers, will allow a user to browse a company database.
You can now reference a specific database and bind the controls to that database.
Create a database in Microsoft Office Access. Create a database named CompanyDatabase with a table named CompanyInfo with four columns:
- ID
AutoNumber - CompanyName
Text - CompanyAddress
Text - InvitationDate
DateTime
Enter some data in the database. Save the database in a known location, not necessarily in the project.
Next, you can bind the Word Content Controls to a database, as you will do in this example, or you can bind them to a Web Service or an object.
- Click Data --> Add New Data Source...
- Click Database in the Data Source Configuration Wizard
- Click Next>
- In the Choose Your Connection panel, click New Connection...
- In the Add Connection dialog, set the items as follows:
- Data Source: Microsoft Access Database File (OLE DB)
- Database file name to the location of your Access database
- Click OK
- In the Choose Your Connection panel of the Data Source Configuration Wizard, click Next>
- When asked if you want to add the database to your solution, click Yes
- In the Save the Connection String to the Application Configuration File panel, check Yes, Save the connection as and keep the default connection string; click Next>
- In the Choose Your Database Objects, expand Tables, check CompanyInfo
- Click Finish
Visual Studio automatically creates a dataset, table adapter, and a binding source. You will use these elements to bind your controls to the data and to manipulate the records in the database.
Next, bind the data to the specific controls. Use the DataBinding property in the Properties pane. Click the Text property and select the specific database record you want to associate with the content controls. You can also drag the specific data elements from the DataSources panel and drop them on the control.
- Make the property pane visible by clicking the Properties tab
- Click the
RichTextContentControl next to the Company Name text in the Properties panel - Expand the (DataBindings) property
- Expand companyInfoBindingSource
- Click CompanyName
- If the Data Sources pane is not visible, click Data --> Show Data Sources
- In the Data Sources pane, expand CompanyDatabaseDataSet
- Expand CompanyInfo
- Click CompanyAddress and drag it to the
RichTextContentControl next to the Company Address text in the document panel; the cursor will change to a plus and the control will be highlighted when you can drop the data source onto the control - Click Build --> Build Solution
Create data browse buttons for the Word Ribbon
Next, customize the Ribbon in Word with two buttons, a Next and a Previous button, for your user to browse data. Then, you add event handlers to each of the buttons.
The Ribbon Designer includes a visual designer and an extensibility object model. Office callbacks are mapped to the events on the VSTO Ribbon objects, so developers write event handlers instead of callback methods.
- In Solution Explorer, right-click the CCTemplate project. Click Add --> New Item...
- In the Add New Item dialog, click Ribbon (Visual Designer) in the Templates panel
- Type CCRibbon for the Name
- Click Add
You set properties of the ribbon in the Properties pane and drag and drop ribbon controls from the Office Ribbon Controls tab of the toolbox onto the ribbon.
- Click the Properties tab to make the Properties pane visible
- Click TabAddIns (Built-In)
- In the Label property, type Company Info
- Click group1 in the CCRibbon.cs ribbon designer
- In the Label property, type Browse Data
- Expand Office Ribbon Controls in the Toolbox if it isn't already expanded
- Drag Button from the Toolbox to the Browse Data box
- In the (Name) property, type btnNext
- In the Label property, type Next
- Drag Button from the Toolbox to the Browse Data box
- In the (Name) property, type btnPrevious
- In the Label property, type Previous
You can add icons by creating an icon and adding each one to the Resources.resx file that is part of the solution. Then, set the Image property by importing images from the resource file. Set the ShowImage property to true.
When you double-click the button in the Ribbon Designer, the code view for the Ribbon opens and enables you to add the event handler code. Use the Globals object to access the document to access the binding source for the company database.
- Double-click the Next button.
- Insert this code into the method that is created.
Globals.ThisDocument.companyInfoBindingSource.MoveNext();
- Double-click the Previous button.
- Insert this code into the method that is created.
Globals.ThisDocument.companyInfoBindingSource.MovePrevious();
Now run the solution.
- Press F5
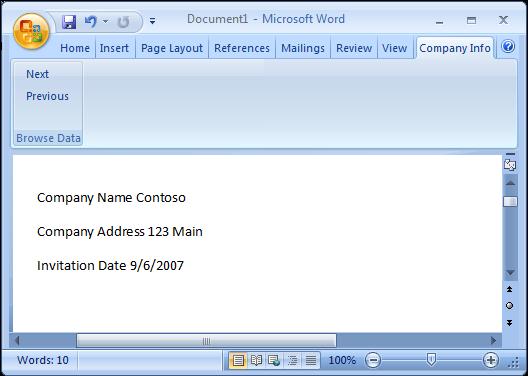
- Click the Company Data tab to view the Ribbon buttons that you created
- Click Next to view the next record
- Click Previous to view the previous record
- Close the document without saving
Points of interest
You can do a lot with Office Business Applications using very little code.
You have seen how you can browse data in a database or Web Service by binding Word 2007 Content Controls to a data source. You also added a panel in the Word Ribbon bar.
Next steps
Next, you'll want to deploy your document. For more information on the various ways for deployment, see How to: Deploy Office Solutions. You will probably choose the Publish Wizard. For more information on the Publish Wizard, see How to: Deploy Solution Files Using the Publish Wizard.
Conclusion
Special thanks to Steve Fox and Paul Stubbs for their article: Office UI: New VSTO features help you customize Word And Outlook.
Microsoft, Office, Fluent, Word, Access, Windows, Windows Vista, Visual Studio are Microsoft trademarks and registered trademarks.
Bruce is an architect evangelist for Microsoft serving independent software vendors (ISVs) in the Pacific Northwest. In earlier lives he's worked for Rogue Wave Software, Carnegie Mellon University's Human Computer Interaction Institute, John Deere, and a couple startups including one that is now part of IBM. Bruce learned programming using punch cards (do not fold, spindle, mutilate, or shuffle). On weekends Bruce often writes code with his son on a project using .NET 3.5 technologies. Bruce lives in Carnation, Washington home to Carnation Dairy which was founded there about 100 years ago.


 General
  News
News  Suggestion
  Question
  Bug
Bug  Answer
  Joke
Joke  Praise
  Rant
Rant  Admin
Admin 


 Your example works great and helped me get a grasp on Content Controls and SQL Server. We are converting all of our old Word docs to Content controls but I need to be able to pass parameters to Stored Procedures from our VS 2008 VB app to merge a specific client of ours or a participant in the 401k plan. Just putting a Ribbon Bar control to browse the data won't work for us.