Introduction
In this article, I describe how to write your Arduino programs in Visual Studio code and also how to debug your programs with stepping through the code, breakpoints, viewing variables, etc. with Arduino Uno or Mega.
This is part one of a three part series of articles on creating and debugging programs in Visual Studio Code. For part two, see here.
Background
Arduino is a very popular platform which makes it easy to create interesting gadgets controlled by a microcontroller. The platform comes with Integrated Development Environment (IDE) for writing the programs – Arduino IDE. But if you have some experience with programming, you’ll probably find this IDE too simple and limited and start looking for a replacement - something more like a real IDE.
There are some well-known alternatives, like Eclipse or Atmel Studio. I personally use Eclipse and it works fine, but I admit that Eclipse (and Atmel Studio too) are quite hard to learn for the new user. There are many windows, options, buttons… simply the IDEs are loaded with features which can be confusing.
So I was still looking for an alternative IDE which would offer the advanced features of a real IDE and still be easy to use. I think Visual Studio Code (VS Code for short) is just that.
Prepare Your Environment
There are 2 pieces of software we will need:
Download the Arduino IDE and install it, or just extract it if you prefer the no-install version.
Download and install VS Code.
Start VS Code and click the Extensions button in the Activity Bar on the left-hand side (the stripe with buttons).
Type Arduino into the Search extensions box. Select the Arduino for Visual Studio Code extension by Microsoft (version 0.2.26 as of now).
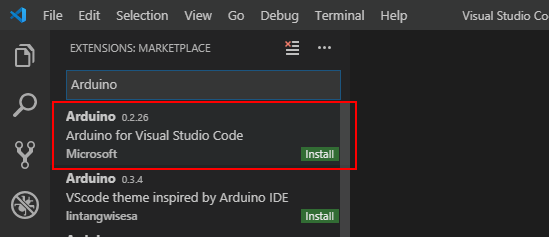
Install the extension. It will also install C/C++ extension by Microsoft (version 0.23.1 now) which is needed.
You should see both these extensions in the Extensions view on the left – see the picture.

Set the path to your Arduino installation for the extension. Open the Settings – click the gear wheel in the Action Bar (bottom left) and select Settings from the menu.
In the settings window, type Arduino.
Locate the item Arduino: Path and enter the path to the folder where you placed the Arduino IDE. For example, c:\Program Files (x86)\Arduino.
Now we are ready to create our first Arduino program.
Create Your First Arduino Program
Two notes before we start:
Note 1: Working with VS Code is somehow different from standard IDE. You perform most tasks by typing and selecting commands from so called Command Palette. This is a small text box which opens when you press Ctrl+Shift+P key combination or just F1 key.
Also many options are set by editing text files (.json files) rather than by clicking buttons in the graphical user interface (GUI).
And there is no “project” to work with, rather you work with folders. But you can just think of a folder as a project.
This different philosophy may seem annoying at the start but give it a try. Maybe you will learn to like it as I did. There are some advantages to this approach compared to the constantly changing GUIs.
Note 2: I will describe the steps to create your Arduino program from scratch. If you’d like to use an example program, the Arduino examples are available in VS Code, just open the Command Palette (Ctrl+Shift+P or F1 key) and type/select Arduino: Examples.
To Create Your Arduino Program
Create a folder for your program. Use your favorite file manager (like Windows Explorer or Total Commander).
For this tutorial, I will assume you create your folders (projects) in Documents/Arduino/vscode folder.
So create a folder test – you should now have Documents/Arduino/vscode/test.
Start VS Code and open the folder test. You can use the link in the main window or go to File > Open Folder…
Next, open Command palette (Ctrl+Shift+P or F1, last time I repeat this) and type Arduino.
Select the Arduino: Initialize command.
VS Code will tell you there is no .ino file in your folder and offer you to create app.ino file for you. Just press Enter to confirm.
Now you will see a list of Arduino boards.
Select Arduino/Genuino Uno if you have one.
It should also work if you use Arduino Mega or Nano, but you may need to adjust some steps.
You can also select/change the board later if you click the board type in the blue Status bar at the bottom right in VS Code.
Now check the Explorer view located in the left part of VS Code (in the Side bar). There should be the test folder with .vscode subfolder and the app.ino file.
In the editor, you will see the app.ino file opened. The line with void setup() line is underlined, saying “Include errors detected...”.
To fix this, expand the .vscode folder in the Explorer view. Click the c_cpp_properties.json – this will open the file in the editor.
Add the following two lines to the includePath section (but substitute your Arduino path):
"c:\\\\Program Files (x86)\\\\Arduino\\\\hardware\\\\tools\\\\avr\\\\avr\\\\include\\\\**",
"c:\\\\Program Files (x86)\\\\Arduino\\\\hardware\\\\tools\\\\avr\\\\lib\\\\gcc\\\\avr\\\\5.4.0\\\\include\\\\**"
You need to add comma (,) to the end of the previous line – see the picture.
Open the arduino.json file and add this line:
"output": ".\\build",
This will speed up the build by reusing previously compiled files and also let us find the output binary needed later for debugging.
Open app.ino and paste the following code – it is just the good old blink program.
void setup()
{
  pinMode(13, OUTPUT);
}

void loop()
{
    digitalWrite(13, HIGH);
    delay(100);
    digitalWrite(13, LOW);
    delay(500);
}
Tip: Try typing digitalW… and see how VS Code suggests to complete the name. You can also right-click the function name (try delay, for example) and select Go to definition to see how the function is written.
Build the program – well, "verify" it, if you speak the Arduino language. To do this, you can either press Ctrl + Alt + R or click the Verify button in the top action bar or Open Command Palette and select Arduino: Verify.
You should see the result in the Output view at the bottom of VS Code – see the picture below.
Now connect your Arduino board to your computer.
In VS Code, click <select serial port> in the blue bar at the bottom.
Select the port where your board is connected – e.g., COM5 on Windows.
Upload the program – use the Upload button or Command Palette > Arduino: Upload.
If all went well, your Arduino is now blinking and we are ready to move on to the interesting part – debugging your program. This is covered in Part 2.
History
- 2019-06-26: First version
Works at Tomas Bata University in Zlin, Czech Republic. Teaches embedded systems programming. Interested in programming in general and especially in programming microcontrollers.


 General
  News
News  Suggestion
  Question
  Bug
Bug  Answer
  Joke
Joke  Praise
  Rant
Rant  Admin
Admin 


