Introduction
Scan anything, anywhere, any time. That is the dream for many people, and today's technology is making that a reality. Using a camera such as those on smartphones to capture information provides flexibility and can do things that a traditional scanner cannot. With the right image processing tools, a camera can capture receipts, documents, business cards, whiteboards, large format drawings, periodical pages and of course snapshots of business associates and friends with extremely high quality.
Before telling clients to stop using receipt and business card scanners and exclusively use cameras, developers need to understand the major differences between cameras and scanners as well as the effects of those differences on the captured images.
Differences between Cameras and Scanners
Positioning is one major difference between cameras and scanners. Using a scanner, the user does not control the position, distance or angle to the object whereas with a camera the user does. This added control when using a camera provides the user the flexibility to capture anything, but creates a set of issues that are not inherent when using a traditional scanner. For example, depending on how the user positions the camera, a rectangular paper document may take the shape of a trapezoid or some other quadrilateral shape. In contrast, a scanner consistently captures documents as their original geometric shape every time.
Another major difference between cameras and scanners is lighting. When using a camera, different light sources cause variations in lighting. This can affect the saturation, intensity and temperature of colors in the photo. Inconsistent lighting makes some areas of the photo darker than other areas. The temperature of lighting can change a white background to shades of off-white. Using a flash can help, but can also create glare. On the other hand, scanners consistently provide the same lighting source and conditions with every scan, so colors are consistent, backgrounds are white, and glare is non-existent.
Most Common Issues and Solutions
The only way developers can overcome these differences is through the proper use of image processing. LEADTOOLS is an imaging SDK for Windows, WinRT, Windows Phone, iOS, OS X, Android, Linux and web that includes more than 200 image processing functions. In some cases, a developer may want to implement processing during the live capture preview before the image is taken. Alternatively, if the user is using a smartphone or digital camera with a Wi-Fi enabled memory card, then the processing may occur on any computer or device that can access the images.
Blurry Images
Most of the time cameras do a great job with auto-focus and capture clear images. However, there are circumstances that affect all cameras such as low light, holding the camera too close, movement or even tapping the wrong place on the screen that may cause the image to be out of focus. Because cameras have small screens and capture high-resolution images, the user may not realize that the photo is out of focus unless they stop and zoom in on the image. To solve this issue, developers may use the LEADTOOLS Blur Detection function to determine if an image is blurry without slowing the user down.
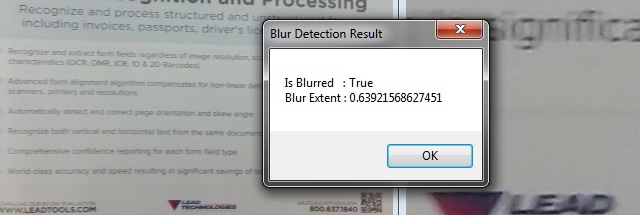
The photo on the left is zoomed to fit the screen and appears to be legible. On the right, it is easy to see that the image is blurry when viewed at actual size. With a couple simple lines of code, LEADTOOLS removes the need for the user to zoom in the photo:
bool IsBlurry( RasterImage image )
{
   var cmd = new BlurDetectionCommand();
   cmd.Run( image );
   return cmd.Blurred;
}
Glare Detection
Glossy paper and glass are some common causes of glare and can make a photo unusable. LEADTOOLS includes a Glare Detection function to automatically find and highlight glare. A developer may do glare detection in the capture preview and not allow capture or highlight the glare to make it more obvious to the user to allow them to decide if the glare is acceptable.

With the following code, LEADTOOLS detects the glare, adds a region of interest and marks the region with a dashed rectangle as shown in the photo above:
bool DetectGlare( RasterImage image )
{
new GlareDetectionCommand().Run( image );
return image.HasRegion;
}
Perspective Distortion
If the user does not position the camera on a parallel plane with the object, then the photo will have perspective distortion. This distortion warps a rectangular document into a non-regular quadrilateral. Additionally, this distortion skews text and lines in the photo.
Perspective Deskew
The LEADTOOLS Perspective Deskew function automatically corrects this type of distortion and crops out the background.
In the unprocessed photo on the left, perspective distortion makes the top of the receipt narrower than the bottom. The image on the right is the result of LEADTOOLS Perspective Deskew and the receipt is a perfect rectangle. Amazingly, all that is required to fix this issue and remove the background is one line of code. LEADTOOLS handles the rest and does not require any user input other than the image.
void FixPerspectiveDistortion( RasterImage image )
{
   new PerspectiveDeskewCommand().Run( image );
}
Keystone
If the photo is too distorted or if there is little contrast between the object and the background, then the LEADTOOLS Perspective Deskew function may not be able to automatically correct the distortion. In that case, the LEADTOOLS Keystone image processing function may be used with user input to correct and crop the photo.
In the photo on the left, the user provides the four corners of the document. Those points are passed to the LEADTOOLS Keystone function to produce the image on the right.
RasterImage FixKeyStone( RasterImage image, LeadPoint[] polyPoints )
{
   var command = new KeyStoneCommand( polyPoints );
   command.Run( image );
   return command.TransformedBitmap == null ?
      null : command.TransformedBitmap.Clone();
}
Lighting and Color Correction
Variations of lighting can affect the saturation, intensity and temperature of colors in photos. To correct and normalize color photos, LEADTOOLS includes many color correction image processing functions.
Stretch Intensity
Stretch Intensity is a great automatic image processing function to use on photos when the light is low and the image is too dark. The function automatically increases the contrast of a photo by centering, maximizing and proportioning the range of intensity values.
The photo on the left was taken in low light. The resulting image on the right is brighter and easier to read.
void StretchIntensity( RasterImage image )
{
   new StretchIntensityCommand().Run( image );
}
More Color Correction
LEADTOOLS includes a host of additional color correction image processing functions. These include several basic functions to change brightness, contrast, gamma, hue and temperature, and advanced functions including color level and lighting adjustments. For more information including links to before and after images, review the LEADTOOLS Color Correction SDK technology page.
Auto Binarize
Most documents are black and white. However, variations in lighting can add colors to the image of a black and white document and make the image less readable by human and machine. A developer can use the LEADTOOLS Auto Binarize function to remove the colors introduced when taking the picture and return the document back to black and white. Auto Binarize makes the photo easier to read by humans and OCR.
The photo on the left is converted to the image on the right with the following line of code:
void AutoBinarize( RasterImage image )
{
   new AutoBinarizeCommand().Run( image );
}
Other Specialized Processing and Detection Functions
LEADTOOLS also has specialized detection functions that look for specific types of artifacts in photos including barcodes, MICR lines and Machine Readable Zones (MRZ). These image processing functions make a camera more than just a picture taker and extend the functionality beyond that of a traditional scanner. In a crowded app store, these functions set an app apart and end-users will notice an application that implements these functions.
Barcode Detection and Reading
Barcodes are on almost everything. Decoding a barcode can open the door to many possibilities such as opening a web link encoded in a QR code or looking up product information based on the UPC barcode on the product. The LEADTOOLS Barcode SDK comprehensively supports decoding more than 100 different barcode types and sub-types such as UPC, EAN, Code 128, QR Code, Data Matrix and PDF417 in photo and scanned images.
To determine if a photo has a barcode, the LEADTOOLS Barcode Read Preprocess function quickly preprocesses photos and finds a barcode. It detects the position and type of the barcode and converts the image to black and white.
The following code will find the barcode and set the location of the barcode as a region of interest in the image:
void FindBarcode( RasterImage image )
{
   var barcodeCommand = new BarCodeReadPreprocessCommand();
   barcodeCommand.Run( image );
   if ( barcodeCommand.BarcodeLocation != null )
   {
      image.AddRectangleToRegion(
         null,
         barcodeCommand.BarcodeLocation,
         RasterRegionCombineMode.Set );
   }
}
MICR Detection and Check Processing
MICR (Magnetic Ink Character Recognition) is the accepted and standardized technology used in many negotiable documents such as checks, money orders and WIC vouchers. Banks and clearing houses are replacing or augmenting old MICR scanners with OCR-based scanners to improve accuracy and reduce keystrokes. Additionally, banks are allowing customers to deposit checks with photos taken from a smartphone. Developers with LEADTOOLS can find and parse the MICR line in photos and scanned images.
LEADTOOLS detected and highlighted the MICR line in the photo above, and can perform additional recognition including OCR to extract information such as routing, account, check numbers, payee and amount. For more information on processing check photos or scanned images and link to a live web MICR demo, visit the LEADTOOLS MICR and Check Processing SDK technology page.
MRZ Detection and Passport Processing
The International Organization for Standardization has standardized Machine Readable Zones (MRZ) and most countries use them on passports and other travel documents. With LEADTOOLS, a developer can convert a camera into a passport-processing scanner.
LEADTOOLS detects the MRZ field and makes it a region of interest as demonstrated in the photo above. LEADTOOLS can also decode the MRZ information. For more information on passport processing, visit the LEADTOOLS Passport Processing SDK technology page, which includes a link to a live passport processing HTML5 demo.
Passport image from: https://commons.wikimedia.org/wiki/File:Czech_passport_2006_MRZ_data.jpg
Conclusion
LEADTOOLS is an imaging toolkit, which provides more than 200 image processing functions, for many platforms including desktop, mobile and web. With this kind of power and flexibility available, developers can quickly develop applications or systems that enable end-users to utilize almost any camera as feature-enhanced scanner and “scan” anything, anywhere, any time with excellent image quality.
Download Detailed Examples
You can download the fully functional evaluation SDK and demos with source, which include the features discussed above:
- LEADTOOLS free 60 day evaluation
- Browse to the LEADTOOLS Examples folder (e.g. C:\LEADTOOLS 19\Examples\) where you can find example projects for these and many more technologies in LEADTOOLS
Support
Do you need help getting up and going? Contact our support team for free technical support! For pricing or licensing questions, you can contact our sales team (sales@leadtools.com) or call us at +1-704-332-5532.
Since 1990, LEAD has established itself as the world's leading provider of software development toolkits for document, medical, multimedia, raster and vector imaging. LEAD's flagship product, LEADTOOLS, holds the top position in every major country throughout the world and boasts a healthy, diverse customer base and strong list of corporate partners including some of the largest and most influential organizations from around the globe. For more information, contact sales@leadtools.com or support@leadtools.com.


 General
  News
News  Suggestion
  Question
  Bug
Bug  Answer
  Joke
Joke  Praise
  Rant
Rant  Admin
Admin 


