Contents
In the previous Learn AngularJS Step by Step (Lab 1) series, we saw a simple hello world example and while doing so we learnt the basics of Angular. Let us continue with Lab 2 of Learn AngularJs step by step series and in this Lab, we will see how to create events and do validations in AngularJS.
In Lab 1, we executed 5 steps, so let us continue in this Lab with step 6.
So let us add a simple function “Fun1” to the same “Hello” class we created in Lab 1. “Fun1” function will display whatever data is entered into “txthello” variable using alert.
function Hello($scope) {
        $scope.txthello = "";
        $scope.Fun1 = function(){
            alert($scope.txthello);
            }
        }
    }
Now, if you are thinking that the above method “Fun1()” can be called by simple JavaScript, then you are on a very wrong track. Instances created by Angular can only be accessed by angular events. So the below code will not work.
<input type="button" onclick="Fun1()" name="name" value="Alert" />
We need to use angular events to make a call to the function. So, if we want to call “Fun1”, we need to use “ng-click” of Angular.
<input type="button" ng-click="Fun1()" name="name" value="Alert" />
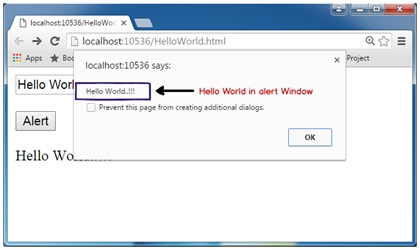
Once done, you should be able to see the click event in action as shown in the below figures:
Below is the complete source code of angular event as described in the above steps:
<!DOCTYPE html>
<html xmlns="http://www.w3.org/1999/xhtml">
<head>
<title></title>
</head>
<script src="Scripts/angular.js"></script>
<script>
    function Hello($scope) {
        $scope.txthello = "";
        $scope.Fun1 = function(){
            alert($scope.txthello);
            }
        }
    }
    var myApp = angular.module("myApp", []);
    myApp.controller("HelloWorld", Hello);
</script>
</script>
<body ng-app="myApp">
<div id=" HelloWorldScreen" ng-controller="HelloWorld">
<input ng-model="txthello" id="txthello" type="text" /><br /><br />
<input type="button" ng-click="Fun1()" name="name" value="Alert" /><br /><br />
<div id="div1">{{txthello}}</div>
</div>
</body>
</html>
Angular validations use HTML 5 validators internally. So let’s say we want to make sure that “txthello” cannot be null. So we need to apply three steps:
- Decorate the input type text with HTML validators. For example, in the below code, we have applied “
required” attribute. There are lots of other validators in HTML 5 as well, I would suggest you go through the complete list from this article. In this article, we will just use “required” for now. - The input text which has validators has to be enclosed in a
form tag which has to named and also the textbox has to be named. For example, we have named the form as “frm1” and textbox as “texthello”. Please note ID does not matter for Angular validation it should have names. - Now HTML validators are processed by the browsers automatically. When the end users hit submit button, they would get errors in the following way in chrome. Now we do not want to use the Chrome or Internet Explorer validation display messages, but we want angular to take control.

Below is the code which has the above three steps applied.
<form name="frm1" novalidate>
<input name="texthello"ng-model="txthello" id="txthello" type="text" required />
</form>
So now, we are all set. We have the HTML validators in place. We would like to achieve two things when the end user types data in the input fields:
- Disable and enable button if there are validation issues.
- Show/Hide error message of the “
DIV” tag.
For that, we need to use “ng-disabled” and “ng-show” directives of Angular. When any validation fires, “$valid” property of angular is evaluated and set to true and false depending on data. Using this property, we can enable/disable and show/hide HTML elements.
See the below code where we have set “$valid” to the button for enabling and disabling and to hide/show the “DIV” tag we have used “ng-show”.
Also, very closely observe we have negated (“!”) the results.
<input type="button" name="name" value="Alert" ng-disabled="!(frm1.$valid)"/>
<div ng-show="!(frm1.texthello.$valid)"> Text is required</div>
Once all things are done, press control + F5 and enjoy your hardwork. Below is an animated GIF which shows how the program looks like when it’s running.
Below is the full code till Lab 2 with basics, events and validation.
<!DOCTYPE html>
<html xmlns="http://www.w3.org/1999/xhtml">
<head>
<title></title>
</head>
<script src="angular.js"></script>
<script>
    function Hello($scope) {
        $scope.txthello = "";
        $scope.Fun1 = function() {
            {
                alert($scope.txthello);

            }

        }
    }
    var myApp = angular.module("myApp", []);
    myApp.controller("HelloWorld", Hello);
</script>
<body ng-app="myApp">

<div id=" HelloWorldScreen" ng-controller="HelloWorld">

<form name="frm1" id="frm1" novalidate>

<input name="texthello" ng-model="txthello" id="txthello" type="text" required /><br />
<div ng-show="!(frm1.texthello.$valid)"> Text is required</div>
<br />
<input type="button" ng-click="Fun1()" name="name" value="Alert" ng-disabled="!(frm1.$valid)"/><br /><br />
</form>
<div id="div1">{{txthello}}</div>
</div>

</body>
</html>
In the next lab 3 of Learn AngularJS step by step, we will see how to post Angular data to WebAPI.
CodeProject
For further reading do watch the below interview preparation videos and step by step video series.


