Introduction
This article will show how to implement a very simple application that uses Oauth protocol for integrating with an external system. This is a showcase to demonstrate how it is easy for a developer to create something useful in few quick steps and how it could be convenient for a company to open some of their services to allow the birth of applications like this. If you want to skip all the articles and see the final result, simply try the github analytics application.
All the code is available from github.
Background
With this project, I would make something tangible and at the and have something useful for the community. So I started for a need not yet satisfied by the market. Of course, I’m a developer, and my experience helped my finding a little leak on github. When I released wlog project, one of my open source projects, I could see how many people downloaded my application but there isn’t any feature like this in github UI. I’m not speaking about number of clones or source code downloads, but simply number of releases. On searching, I found many tools, and lot of people that say that we simply have to invoke APIs. Well, this will be the main feature of this application. I also want to share it with others for free so I need a free hosting system to make it feasible. Moreover, I would reach the end of the project ASAP to place it on the market and get some feedback from it.
Goals
So, summarizing, my goals were:
- Make a simple application, but fully functional and ready to use
- Integrate as much external system as I can, to maximize non-done work
- Solve a concrete problem (show asset download on GitHub)
- Demonstrate how easy it is to integrate an app with Oauth system
Ingredients
| | Solution | Note |
|---|
| Platform | NET 4.5 ASP.NET MVC | |
| Hosting | AppHarbor | Free ASP.NET hosting, supports CI |
| GitHub API | Octokit | Do all the hard work! |
| Draw badges | Shields.io | Great project that produces svg badges |
Oauth Protocol
OAuth 2 protocol is an authorization framework adopted by almost all systems that need to give limited access to their resources to user. This is usually consumed by HTTP and it found a large usage in API or Integration scenarios. The main principle is to delegate to an authorization server to trust user and allow third-party access.
Oauth protocol is very easy to understand and I think nowadays most developers have heard about it, so I’ll spend only a few words about it, just to remind the newbies.
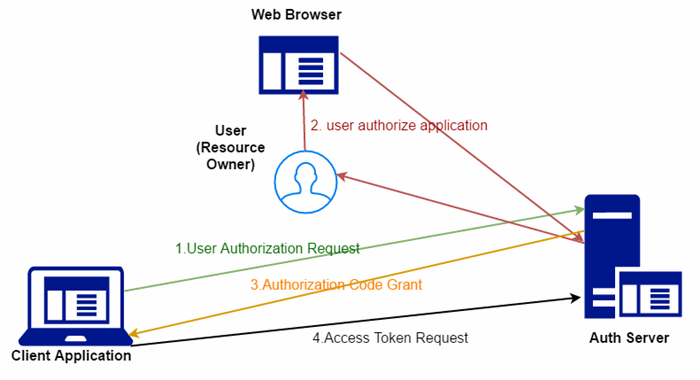
Basically, we need to implement five simple steps.
Oauth Step 1: Authentication
When a user tries to authenticate, a request is sent to the auth server. This can be done by simply composing a URL and making a redirect to it. This is the code snippet for this project.
public ActionResult Login()
{
var client = AppConfig.Current.GetClient();
string csrf = Membership.GeneratePassword(24, 1);
Session["CSRF:State"] = csrf;
var request = new OauthLoginRequest(AppConfig.Current.ClientId)
{
Scopes = { "user", "notifications" },
State = csrf
};
var oauthLoginUrl = client.Oauth.GetGitHubLoginUrl(request);
return Redirect(oauthLoginUrl.ToString());
}
Oauth Step 2: User Authorization
User will be prompted from authorization server to give permission to the external app. This step is completely done by the user and the auth server, so we have to just wait until this operation will be completed: after all, we will be notified by a redirect.
Oauth Step 2: The Code
After user approves the authorization request, we will get the code parameter that can be used by an additional call to get the real token. Code parameter usually is one-shot and expires in a little time. We can also add a state parameter in the redirect URL build in step 1. This can be useful because it is returned by the server and can be checked to thrust the source of the request.
Oauth Step 3: The Token
The last call about authentication is to (finally) take the token. In this example, it is stored in session according to the octokit documentation.
This snippet covers step 2 and 3.
public ActionResult Authorize(string code, string state)
    {
            var client = AppConfig.Current.GetClient();

            if (String.IsNullOrEmpty(code))
                return RedirectToAction("Index");

            var expectedState = Session["CSRF:State"] as string;
            if (state != expectedState)
            throw new InvalidOperationException("SECURITY CHECK FAIL!");

            Session["CSRF:State"] = null;

            var request = new OauthTokenRequest(AppConfig.Current.ClientId
                                               , AppConfig.Current.ClientSecret
                                               , code);
            var token = client.Oauth.CreateAccessToken(request).Result;
            Session["OAuthToken"] = token.AccessToken;

           return new RedirectResult("~/Stats/");
    }
GitHub API Integration
Git Hub integration is mostly done with octokit.net library. It is a great framework, it is well documented and you can find lot of stuff inside the official site. All Oauth flow in this application was made using what the library provides, just following the tutorial. The client model wraps all services and it is clearly very easy to employ GitHub API to develop some app. So I don’t want to waste more time telling how cool it is and how easy it is to use: just one snippet to show how to access GitHub information.
public ActionResult Index()
{
var accessToken = Session["OAuthToken"] as string;
if (accessToken != null)
{
var phv=new ProductHeaderValue(AppConfig.Current.AppName);
GitHubClient client = new GitHubClient(phv);
client.Credentials = new Credentials(accessToken);
var repositories = client.Repository.GetAllForCurrent().Result;
var user = client.User.Current().Result;
var totalDownload = 0;
var totalStars = 0;
var repoDownload = 0;
var releasesCount = 0;
List<repostats> repoList = new List<repostats>();
foreach (var currentRepo in repositories)
{
repoDownload = 0;
releasesCount = 0;
var relase = client.Repository.Release.GetAll(currentRepo.Id).Result;
if (relase.Count > 0)
{
for (int i = 0; i < relase.Count; i++)
{
for (int k = 0; k < relase[i].Assets.Count; k++)
{
var currentCount= relase[i].Assets[k].DownloadCount;
totalDownload += currentCount;
repoDownload += currentCount;
releasesCount++;
}
}
}
repoList.Add(new RepoStats()
{
Repo = currentRepo,
TotalDownload = repoDownload,
ReleasesCount= releasesCount
});
}
return View(new UserStats()
{
Repositories = repoList,
User= user,
TotalDownload= totalDownload,
TotalReleases=repoModel.Sum(x=>x.ReleasesCount),
TotalStars=repoModel.Sum(x=>x.Repo.StargazersCount),
DiskUsage= repoModel.Sum(x=>x.Repo.Size)
} );
}
return new RedirectResult("~/");
}
Shields.IO
Shields.io is an interesting tool that converts URLs in badges like this  . The cool thing is that every image is generated as vectorial, so on the server side (sorry to be so simplistic), all that is needed is to generate text. In this way, the load about rendering image to produce them on the fly is no more needed and reduced to XML manipulation. On client side, like this example, this makes things a lot simpler, because just composing a URL, the badges are automatically generated. Here a piece of code to produce a badge with the number of assets downloaded per repository.
const string badgeTemplate = "https://img.shields.io/badge/{0}-{1}-{2}.svg";
public ActionResult RepositoryDownloads( long id=0)
{
if (id == 0) throw new Exception("Repository Id Missing");
int total= GetDownloadCountForRepository(id);
string url = string.Format(badgeTemplate, "downloads", total, "orange");
return DownloadFile(url, "repositoryDownload.svg", true);
}
private int GetDownloadCountForRepository(long id)
{
int total = 0;
GitHubClient client = GetClientForRequest(this);
var repository = client.Repository.Get(id).Result;
foreach (var rel in client.Repository.Release.GetAll(id).Result)
{
foreach (var asset in rel.Assets)
{
total += asset.DownloadCount;
}
}
return total;
}
private ActionResult DownloadFile(string url, string filename, bool inline)
{
WebClient client = new WebClient();
var bytes = client.DownloadData(url);
string contentType = MimeMapping.GetMimeMapping(filename);
var cd = new System.Net.Mime.ContentDisposition
{
FileName = filename,
Inline = inline,
};
Response.AppendHeader("Content-Disposition", cd.ToString());
return File(bytes, contentType);
}
AppHarbor
Finally, I need to find a solution for hosting. Also, I would like to find a solution that can help me with deployments and could make some continuous integration. For this, I chose the free version of AppHarbor, that can be easily configured to connect with github code and deploy on each commit of a predefined branch. In this way, I will manage all the publishing part. AppHarbor has many limitations, (i.e., disk writeable but cleared periodically, application shutdown if inactive,...) but in my case, when I needed only to run code, it is a very good solution, especially because it allowed me to start without any fee.
About hosting part, some interesting point:
- Continuous deployment: GitHub repo is attached to AppHarbor so on all commit on production branch, a new version is deployed on the server. In my past OS project, I preferred to keep separated Continuous Integration from Continuous Deployment, and I used AppVeyor that's a great tool. In this case, to simplify, I use only AppHarbor to manage the deployment part. I found that in a simple application, this can be a good option, that can be changed as application will grow.
- Variable override: Because this application contains some sensitive data like client secret for API (the one inside repository is fake, if you are asking...) I used the variable override feature of appArbor. This means that application keys are overridden after artifact generation, so that the running application will use the production settings.
- Pricing: It is very cool to have such stuff for free, so it is a very interesting option for developing and making experiments. Without cost and time of setup, it was easy for me to set up everything in half an hour, so I have a very positive experience in this case. What about pricing? I'm sorry, you can look at the pricing page and make your assessment. To make a pricing comparison is not the focus of this article.
The "GitHub Analytics" Application
After this long introduction, what remains to be said about the application? After explaining how single bricks work, I just needed just some glue to keep together. What I’ve done is simply find a nice HTML template to create the home page, place a button to the login action, redirect it to the private area after user is authenticated and create a simple dashboard using the API. Here, it is a sample of the application working. If you want to try it by yourself, simply click this link to download the code.
Conclusion
Nowadays, we are using hundred of apps and I think that in the future, this pattern will be adopted from a growing number of companies to encourage third party applications. Oauth2 is the most common way to share authentication between system and in my opinion should be an option that every open system has to embrace (... and statistics confirm I’m right).
In this case, I would show how, simply integrating an already working element, is simple to create a standalone solution. Of course, as Rome wasn’t built in a day, neither can an application. If you look inside, over nice graphic, you will see a very long list of issues (performance, API rate limit, dirty code, missing features...). But this is not the time to see those details. This is simply a POC, and its main purpose is to validate an idea, maybe teach something useful.
Integration is important to optimize time to market and grant performances, using already done\working items.
History
- 2017-04-08: Added code snippets
- 2017-03-23: First version
I'm senior developer and architect specialized on portals, intranets, and others business applications. Particularly interested in Agile developing and open source projects, I worked on some of this as project manager and developer.
My programming experience include:
Frameworks \Technlogies: .NET Framework (C# & VB), ASP.NET, Java, php
Client languages:XML, HTML, CSS, JavaScript, angular.js, jQuery
Platforms:Sharepoint,Liferay, Drupal
Databases: MSSQL, ORACLE, MYSQL, Postgres


 General
  News
News  Suggestion
  Question
  Bug
Bug  Answer
  Joke
Joke  Praise
  Rant
Rant  Admin
Admin 


