Introduction
In a default MVC application, everything is organized by Controllers and Views. The controller name determines the first part of your URL, and the controller method, the second part. By default, the view that will be rendered has the same name as the method in the controller, although this isn't required.
So when you create a HomeController in your application, with a method About() you have defined the URL Home/About for your application. Easy. For small web applications, this is sufficient, but when things start to get bigger, you may want to add another level in your URL.
Areas
This is done by creating separate areas in the application. You can create as many areas as you like, and you can consider each area as a separate part of your application, with its own controllers, views and models. So now, you can make an "Admin" area for user management and other "admin stuff." The nice thing is that now your URL will have an additional level, such as Admin/Users/Create.
This allows organizing your project in a logical way, but don't exaggerate. I have seen projects where areas only contain 1 controller. In that case, the advantage of using an area is gone, and worse yet: you haven't simplified your application, but added an extra layer for nothing. The KISS principle is still one of the most important principles in software engineering!
The Problem
In the old ASP.NET MVC, all you have to do is:
- Right-click on the project level, select "Add area"
- Enter the name of the area
- Everything is done for you: you get a nice solution folder for your area, routing is set up.
Looking for this menu item in ASP.NET Core was disappointing, it is not there anymore. I couldn't imagine that areas would have disappeared, so I consulted my friend Google. This led me to this page in Microsoft Docs.
So How Does It Work in ASP.NET Core?
I want to create a new area in my application, called "Reports". We already know that right-clicking doesn't work anymore, so here are the steps.
Create a Folder "Areas"

Right-click on the project > Add > Folder, enter "Areas".
MVC will by default search for /Areas/ which is why you need this folder. If you want to give it a different name, you also need to configure your RazorViewEngineOptions. More information can be found here.
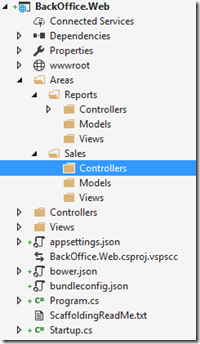
Now right-click the Areas folder and add a new folder called "Reports". And under Reports, create the 3 folders, "Controllers", "Models" and "Views".
Caveat
The views under your area don’t share the _ViewImports.cshtml and _ViewStart.cshtml. This means that your site layout will not be automatically applied to your area’s views. The solution is simple: copy both files under the corresponding Views folder.
The standard _ViewStart.cshtml looks like this:
@{
 Layout = "_Layout";
}
If you want to use the same layout in your areas, you should change the copied file to:
@{
 Layout = "~/Views/Shared/_Layout.cshtml";
}
Of course, if you want your area to have a different layout, you don’t have to do this. You can then create a “Shared” folder under the Views folder and create a new _Layout.cshtml there.
We're ready to add some code now.
Create a HomeController in the Reports Area
Right-click on the newly created Controllers folder > Add > Controller. This takes you to the known "Add Scaffold" dialog box; we choose to add an empty controller.
Name the controller "HomeController" and let VS2017 do its scaffolding work for you. We now have a controller with the Index() method already implemented. This controller is created under the areas folder structure, but for ASP.NET Core, this isn't enough. We need to indicate which area it belongs to. This is easy:
I added line 11, which does the trick. This means that areas and folder structure are now decoupled.
As you notice, I also changed the return type to string on line 12, and on line 14, I return a string ;). This string will be literally returned to the browser when this page is requested. Of course, we could have gone through the trouble of creating a view, but let's keep things simple in this demo.
Inform ASP.NET Core that Areas Are Involved
MVC determines which controller to instantiate, and which method in the controller to call by means of routing. Routing is implemented by templated routing tables, as you can see below. By default, there is 1 route template defined:
routes.MapRoute(
       name: "default",
       template: "{controller=Home}/{action=Index}/{id?}");
In the template, we see {Controller=Test}, which will interpret the URL (example: http://localhost:12345/Test/index). Test is now used to determine that the class TestController must be instantiated. The second part is easy to explain too: the method Index() will be called, and that's how routing works basically.
When we start the site, we don't want (our users) to type http://localhost:12345/Home/Index, which is why a default value is foreseen: when we just type http://localhost:12345, the default HomeController will be instantiated, and the default Index() method will be called.
URLs are mapped against the routes in the routing table, and the first match will be used. This means that the "areaRoute" (in yellow below) best comes first in the routing table. This is all defined in the Startup.cs file in the project folder. Go to the Configure method and find where the routes are mapped. Add the lines in yellow:
Now we can try if our work has paid off:
- Start the application (ctrl + F5). This will show the default home page (no areas involved).
- Browse to http://localhost:12345/Reports/Home/Index. Of course, 12345 depends on your configuration. We now see the
string that we returned from the area controller. And of course http://localhost:12345/Reports/Home/ and http://localhost:12345/Reports/ returns the same, because Home and Index are indicated as default values in the route mapping (lines 54 and 55).
Generating a Link to the Reports/Home Controller
Somewhere in the application, we'll want to refer to the newly created controller. This is typically done from the _Layout.cshtml view; which serves as a template for all your pages. By default, a top menu is created for easy navigation between your pages.
We don't want to hard-code links, because then part of the advantage of using the MVC framework disappears (and we have to think about the link, which always provides room for error). In the navigation, we find links like this:
<ul class="nav navbar-nav">
<li><a asp-area=""
asp-controller="Home" asp-action="Index">
Home
</a>
</li>
<!--
</ul>
The TagHelpers clearly indicate the intent of this line: a link to Home/Index is created.
So for our Reports home page, we just need to fill in the area:
<li><a asp-area="Reports" asp-controller="Home" asp-action="Index">
	Reports
    </a>
</li>
This will do the trick. We have created a new (top-level) menu that will open our great Reports page. The link will be http://localhost:12345/Reports. The /Home/Index part is left out because MVC knows from its routing tables that these are default values.
Conclusion
Adding an area is slightly more complex now, but the documentation was quite clear. I will need to do this more than once, hence this post. :)
References
Gaston Verelst is the owner of Faq.be, an IT consultancy company based in Belgium (the land of beer and chocolate!) He went through a variety of projects during his career so far. Starting with Clipper - the Summer '87 edition, he moved on to C and mainly C++ during the first 15 years of his career.
He quickly realized that teaching others is very rewarding. In 1995, he became one of the first MCT's in Belgium. He teaches courses on various topics:
• C, C++, MFC, ATL, VB6, JavaScript
• SQL Server (he is also an MSDBA)
• Object Oriented Analysis and Development
• He created courses on OMT and UML and trained hundreds of students in OO
• C# (from the first beta versions)
• Web development (from ASP, ASP.NET, ASP.NET MVC)
• Windows development (WPF, Windows Forms, WCF, Entity Framework, …)
• Much more
Of course, this is only possible with hands-on experience. Gaston worked on many large scale projects for the biggest banks in Belgium, Automotive, Printing, Government, NGOs. His latest and greatest project is all about extending an IoT gateway built in MS Azure.
"Everything should be as simple as it can be but not simpler!" – Albert Einstein
Gaston applies this in all his projects. Using frameworks in the best ways possible he manages to make code shorter, more stable and much more elegant. Obviously, he refuses to be paid by lines of code!
This led to the blog at https://msdev.pro. The articles of this blog are also available on https://www.codeproject.com/script/Articles/MemberArticles.aspx?amid=4423636, happy reading!
When he is not working or studying, Gaston can be found on the tatami in his dojo. He is the chief instructor of Ju-Jitsu club Zanshin near Antwerp and holds high degrees in many martial arts as well.
Gaston can best be reached via https://www.linkedin.com/in/gverelst/.


 General
  News
News  Suggestion
  Question
  Bug
Bug  Answer
  Joke
Joke  Praise
  Rant
Rant  Admin
Admin 


