This program will solve a Rubik’s cube using algorithms for beginners. It is a WPF open source application written in C# for VS 2022 .Net6 using 3D graphics and animation. The .NET framework name spaces used are: System.Windows.Media and System.Windows.Media.Media3D and System.Windows.Media.Animation.
Introduction
The latest revision 2.0.0 is an upgrade to VS 2022 and .NET6.
The algorithms used to solve the cube came from RubiksPlace.com website How to Solve a Rubik's Cube, Guide for Beginners. And from Ruwix.com website How to solve the Rubik’s Cube.
The article and the application can be viewed in three different ways.
- A demo program to help a Rubik’s cube beginner understand the solution process.
- An example of C# source code for solving Rubik’s cube.
- An example of WPF C# source code for 3D graphics and animation.
You can play with the cube on the screen or you can scramble your own real cube and paint the screen’s cube to match yours. Then press the Solve Step button and see the rotation steps needed to move one block at a time to achieve progress. The instructions are given in both relative rotation codes U, F, R, B, L, D (Up, Front, Right, Back, Left and Down). And, in color codes Y, R, G, O, B, W (Yellow, Red, Green, Orange, Blue and White).
The cube is solved layer by layer from the white face to the yellow face. Each layer is divided between corners and edges. The major groups are:
- White Edges
- White Corners
- Mid Layer Edges
- Yellow Cross
- Yellow Corners Position
- Yellow Corners Orientation
- Yellow Edges
Each group is divided into steps. Each step typically will move one block to its position.
When you debug the program in Visual Studio environment, the program will produce a trace file RubiksCubeTrace.txt. The file is stored in the current directory. If you keep the directory structure stored in the “Downlod source” zip file (RubiksCube_src.zip), the current directory will be “..\RubiksCube\Work” . If you want the visual studio default behaviour, delete the Work folder. The file will be saved in “..\RubiksCube\bin\Debug”. If you want a different working directory go to debug tab in project properties and change it to your directory. The change from revision 1.0.0 is that the working directory in the project properites is now blank.
Terminology
It is a fair assumption that anyone reading this article is familiar with Rubik’s Cube. There are many articles on the Internet about how to solve the Rubik’s cube. The terminology given here is for those who want to understand the code.
The cube is made of 27 blocks. Twenty of these blocks are movable. Six are fixed and their face color represents the cube face color. One block is invisible. The 20 movable blocks are divided into 8 corner blocks and 12 edge blocks. Corner block has 3 visible faces and edge block has 2 visible faces. There are six sided to the cube and each side has 8 movable faces. In total there are 48 movable faces. The 3D graphics part of the code displays and animates these blocks and block faces. The solution part of the code, manipulates the block faces numbers.
The source code classes can be divided into classes that deals with the display of the cube on the screen and classes that solve the puzzle. The display classes have 3D in their name. All the others deal with the logic of rotating faces and solving the cube. The main class for display is Cube3D and the main class for solution is Cube.

Demo program
To test the demo program, create a new folder, copy the attached RubiksCube.exe into this folder and run the program.
Control Buttons
Side Rotations: There are 18 buttons to rotate each of the six sides of the Rubik’s cube in three ways 90 deg CW, 180 deg or 90 deg CCW.
Up Face: Six color buttons to rotate the full cube such that the Up face matches the selected color.
Front Face: Six color buttons to rotate the full cube such that the front face matches the selected color.
User Cube Selected Color: Six color buttons to select a color for painting the Rubik’s cube on the screen to match your real Rubik’s cube. These buttons are active after the User Cube button is pressed. See User Cube notes below.
Solve Step: Pressing the Solve Step button will make the program run one algorithm to advance the solution by one solution step.
Auto Solve: Pressing the Auto Solve button will make the program solve the cube by repeating solve step action until the cube is in solved state.
Save Solution: Pressing Save Solution button will save the cube’s definition and solution steps in a text file. Example of such file is given at the end of this section. The program creates SolutionSteps.txt file in the default directory. The file will override existing file if there is one. After the file is created, the default program in your computer for .txt file will be called. Normally it is Notepad. If you want to save the file permanently, go to Save As in Notepad and save it under another name. The cube definition is made of six lines, one for each face. Each line has eight colors for the movable faces. The first one is the top left corner. The others are in clock wise sequence. The solution is one line per solution step. The solution is given in two ways: relative codes to up and front faces and color codes.
Load Solution: Pressing the load solution will load a cube definition text file. It can be a file saved with Save Solution button. Or, it can be any text file with six lines delimited by [ and ]. Each line consists of eight letters or words. The program reads the first letter of each word. The letter must be W B R G O Y upper or lower case.
Reset: Reset cube to solved state.
Scramble: Scramble the cube by performing 10 random rotations.
Undo: Undo last rotation.
User Cube: Pressing the User Cube button allows you to paint the cube on the screen to match your real cube. Make sure both cubes are oriented the same way. Select color from the User Cube Selected Color six buttons. Rotate the screen cube with the up face and front face buttons. Once you are done press End Coloring button. The program will check that you have entered a valid cube. If the cube is not valid, an error message will be displayed. Correct the error and press again on End Coloring. If you do not want to correct the error, your only choice is Reset.
Mouse Actions
Full cube rotation: Left click the screen outside the cube picture. Hold the left button and move it. The whole cube image will rotate.
One side rotation: Click on any face of the side you want to rotate. If you clicked on a corner face, click again on any of the other three corner faces on the same side. The same thing for edge faces. The face will rotate to bring the first face to the position of the second face.
User cube painting. If you are in user cube painting mode the mouse can only be used to paint faces. To rotate the cube you must use the Up Face and Front Face buttons.
2017/07/31 20:08:30
Rubik’s Cube definition
Front  Up
White  Red     [White  Blue   White  Orange Red    Green  Green  Blue  ]
Blue   Yellow  [Orange White  Green  Orange Red    Red    Orange Green ]
Red    Yellow  [White  Yellow White  Red    Blue   Orange Green  White ]
Green  Yellow  [Blue   Yellow Green  Green  Blue   Yellow Red    White ]
Orange Yellow  [Yellow Green  Yellow Orange Yellow White  Yellow Red   ]
Yellow Orange  [Blue   Yellow Red    Red    Orange Blue   Orange Blue  ]
Rubik’s Cube solution steps
White Edges. White Red Edge. Move to position. White, Red, F, Color: R
White Edges. White Green Edge. Move to position. White, Green, L F, Color: O G
White Edges. White Orange Edge. Move to position. White, Orange, D L’ F, Color: Y B’ O
White Edges. White Blue Edge. Move to position. White, Blue, F’, Color: B’
White Corners. White Blue Red Corner. Rotate and move to position. White, Red, D’ F D - F’, Color: Y’ R Y - R’
White Corners. White Blue Orange Corner. Move to position. White, Blue, R’ D’ R, Color: O’ Y’ O
White Corners. White Green Orange Corner. Rotate and move to position. White, Orange, D’ R’ D’ - R, Color: Y’ G’ Y’ - G
White Corners. White Red Green Corner. Rotate and move to position. White, Green, D2 R’ D’ - R, Color: Y2 R’ Y’ - R
Mid Layer Edges. Green Orange Edge. Move to position (remove first step). Yellow, Green, R U’ R’ - U’ F’ U - F, Color: O Y’ O’ - Y’ G’ Y - G
Mid Layer Edges. Blue Red Edge. Move to position (adjust first step). Yellow, Red, U L’ U - L U F - U’ F’, Color: Y B’ Y - B Y R - Y’ R’
Mid Layer Edges. Blue Orange Edge. Move to position (remove first step). Yellow, Blue, L’ U L - U F U’ - F’, Color: O’ Y O - Y B Y’ - B’
Mid Layer Edges. Red Green Edge. Move to position (adjust first step). Yellow, Red, U2 R U’ - R’ U’ F’ - U F, Color: Y2 G Y’ - G’ Y’ R’ - Y R
Yellow Cross. Yellow Green Edge. Move from L shape to cross. Yellow, Green, F U R - U’ R’ F’, Color: G Y O - Y’ O’ G’
Yellow Corners Position. Yellow Red Green Corner. Rotate yellow face to position. Yellow, Red, U2, Color: Y2
Yellow Corners. Yellow Green Orange Corner. Shuffle three yellow corners. Yellow, Blue, L U L’ - U L U2 - L’ U2, Color: O Y O’ - Y O Y2 - O’ Y2
Yellow Corners. Yellow Green Orange Corner. Rotate 3 yellow corners into their place. Yellow, Blue, R’ U’ R - U’ R’ U2 - R U2, Color: R’ Y’ R - Y’ R’ Y2 - R Y2
Yellow Edges. Yellow Blue Edge. Rotate 3 edges to position. Yellow, Orange, R2 U R - U R’ U’ - R’ U’ R’ - U R’, Color: B2 Y B - Y B’ Y’ - B’ Y’ B’ - Y B’
Cube is Solved
Total number of steps: 86
Solving the Rubik’s Cube
The Cube class is the main class controlling the solution process. The cube has six sides. Each side has eight movable faces. In total there are 48 movable faces. The Cube class has an integer array (FaceArray) of 48 integers representing the movable faces. The Cube class and other classes associated with the Cube class manipulate this face array. There are methods to reset the array, to load it, to save it, to rotate it, to test it and to solve the cube.
Face numbers are 0 to 47. The diagram below shows all the face numbers. They have the following properties.
- Face numbers associated with corners are even numbers.
- Face numbers associated with edges are odd numbers.
- Face color (0-white, 1-blue, 2-red, 3-green, 4-orange, 5-Yellow) is obtained from face number FaceColor = FaceNo / 8.
- Face position on the side of the cube is FacePos = FaceNo % 8. Face position on each side starts at top left corner and goes clock wise around the face.
- When all face numbers are equal to their position in FaceArray the cube is solved. FaceArray[FaceNo] == FaceNo.
Reset. Reset FaceArray to solved state.
public void Reset()
Get color array. Return integer array of face colors.
public int[] ColorArray {get}
Set color array. The software tests the color array for a valid Rubik’s cube. If test is successful, the color array is converted to face array. If the test fails, ApplicationException will be raised.
public int[] ColorArray {set}
Cube status test properties. There are 8 properties to test the solution level of the cube.
public bool AllBlocksInPlace
public bool AllWhiteEdgesInPlace
public bool AllWhiteCornersInPlace
public bool AllMidLayerEdgesInPlace
public bool YellowEdgesInCrossShape
public bool AllYellowEdgesInPlace
public bool AllYellowCornersInPosition
public bool AllYellowCornersInPlace
Rotate array. Rotate FaceArray by one rotation or by an array of rotation.
public void RotateArray(int RotationCode)
public void RotateArray(int[] RotationSteps)
Solution step. To solve the cube, the next solution step method must be executed repeatedly until the cube is solved.
Cube FullCube = new Cube();
try
{
FullCube.ColorArray = ScrambledArray;
For(;;)
{
SolutionStep SolveStep = FullCube.NextSolutionStep();
if(SolveStep.StepCode == StepCode.CubeIsSolved) break;
FullCube.RotateArray(SolveStep.Steps);
}
}
catch (Exception Ex)
{
}
Cube’s 3D View and Camera Initialization
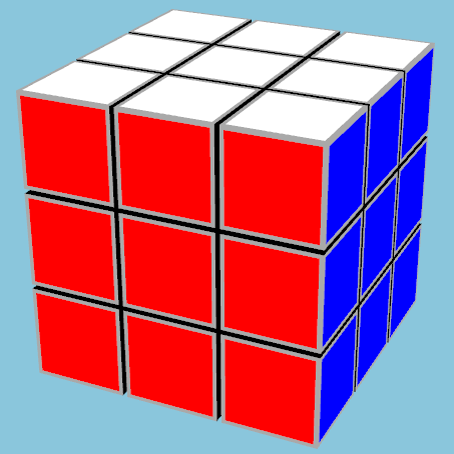
The initialization code below creates a 3D view port, a 3D model of our Rubik’s cube and a perspective camera. The 3D model of our cube is represented by Cube3D class. The Cube3D class creates 27 blocks represented by Block3D class. Each block creates 6 block faces represented by BlockFace3D. Each block face is divided into triangles represented by MashGeometry3D. Invisible block faces are black. Visible block faces have a gray edge and one of the six colors of the Rubik’s cube. The source code for the 3D objects is part of the attached source code of this article. To view the cube on the screen we create a camera looking at the cube. The camera is positioned above and to the right of the cube. The result is we can see the front face, up face and right face.
<span id="ArticleContent">
CubeViewPort3D = new Viewport3D()
{
Name = "mainViewport",
ClipToBounds = true
};
CubeGrid.Children.Clear();
CubeGrid.Children.Add(CubeViewPort3D);
ModelVisual3D ModelVisual = new ModelVisual3D();
CubeViewPort3D.Children.Add(ModelVisual);
Model3DGroup ModelGroup = new Model3DGroup();
ModelGroup.Children.Add(new AmbientLight(Colors.White));
ModelVisual.Content = ModelGroup;
RubiksCube3D = new Cube3D();
CubeViewPort3D.Children.Add(RubiksCube3D);
double PosZ = Cube3D.CameraDistance * Math.Sin(Cube3D.CameraUpAngle);
double Temp = Cube3D.CameraDistance * Math.Cos(Cube3D.CameraUpAngle);
double PosX = Temp * Math.Sin(Cube3D.CameraRightAngle);
double PosY = Temp * Math.Cos(Cube3D.CameraRightAngle);
CubeViewPort3D.Camera = new PerspectiveCamera(new Point3D(PosX, -PosY, PosZ),
new Vector3D(-PosX, PosY, -PosZ), new Vector3D(0, 0, 1), Cube3D.CameraViewAngle);
Transform3DGroup FullCubeMotion = new Transform3DGroup();
RubiksCube3D.Transform = FullCubeMotion;
FullCubeZRotation = new AxisAngleRotation3D(new Vector3D(0, 0, 1), 0);
FullCubeMotion.Children.Add(new RotateTransform3D(FullCubeZRotation));
FullCubeXRotation = new AxisAngleRotation3D(new Vector3D(1, 0, 0), 0);
FullCubeMotion.Children.Add(new RotateTransform3D(FullCubeXRotation));
FullCubeYRotation = new AxisAngleRotation3D(new Vector3D(0, 1, 0), 0);
FullCubeMotion.Children.Add(new RotateTransform3D(FullCubeYRotation));
</span>
Rotating the Full Rubik’s Cube
Rotating the full cube is very simple. During initialization we created 3 AxisAngleRotation3D objects. One object for each axis. To rotate the cube set the Angle property of these three objects. The angles are in degrees. The program keeps the range to -180 to +180.
FullCubeXRotation.Angle = XAngle;
FullCubeYRotation.Angle = YAngle;
FullCubeZRotation.Angle = ZAngle;
Rotating One Side of the Cube with Animation
Rotating one side of the cube is done by grouping all 9 blocks of this side and rotating the group. The rotation is done with DoubleAnimation object. The rotation is from zero degrees to rotate angle degrees. The animation duration is RotateDuration. It is 0.25sec for 90 deg and 0.5 sec for 180 deg
int RotateFace = RotateCode / 3;
RotateTransformGroup = new Transform3DGroup();
for(int Index = 0; Index < Cube.BlocksPerFace; Index++)
{
RubiksCube3D.CubeFaceBlockArray[RotateFace][Index].Transform = RotateTransformGroup;
}
AxisAngleRotation3D AxisRot = new AxisAngleRotation3D(Cube3D.RotationAxis[RotateFace], 0);
RotateTransformGroup.Children.Add(new RotateTransform3D(AxisRot));
AxisRot.BeginAnimation(AxisAngleRotation3D.AngleProperty, AnimationArray[RotateCode % 3]);
Once the animation has been completed, we clear all the objects that were created above.
RotateTransformGroup.Children.Clear();
RubiksCube3D.FullCube.RotateArray(RotateCode);
RubiksCube3D.SetColorOfAllFaces();
for(int Index = 0; Index < Cube.BlocksPerFace; Index++)
RubiksCube3D.CubeFaceBlockArray[RotateCode / 3][Index].Transform = null;
Other Open Source Software Published by the Author
History
- 2017/08/01 Version 1.0 Original version.
- 2017/08/30 Version 1.0.1 Debug working directory is not saved as part of the project
- 2022/02/20 Version 2.0.0 Upgrade to VS 2022 .Net6.
This member has not yet provided a Biography. Assume it's interesting and varied, and probably something to do with programming.


 General
  News
News  Suggestion
  Question
  Bug
Bug  Answer
  Joke
Joke  Praise
  Rant
Rant  Admin
Admin 


