Introduction
This project tests interaction between Home Assistant and Docker containers. Previous texts from this series include:
- IoT.Starter.Pi.Thing: Embryos for Home Intelligence using Raspberry Pi with Linux, Docker & .NET Core. This project is based on a Raspberry Pi model 3B equipped with Raspbian GNU/Linux 9.1 Stretch Lite and a web service, generated almost automatically by Swagger Hub. The embryo platform includes API and UI in separated containers to boost the start phase of IoT initiatives.
- IoT.Home.Thing: Home of Things added Raspberry# IO to the platform. It is a .NET/Mono IO Library for Raspberry Pi, initiative of the Raspberry# Community. First updated to .NET Standard 1.6 by Ramon Balaguer, then upgraded to .NET Core 2.1 and integrated to the
IoT.Starter.Pi embryo.
Since we are building an embryo for an IoT starter, an empty MVC website has been provided until now as the seed for the user interface (UI). Now, this empty user interface will be substituted by the Home Assistant application, allowing faster and productive results immediately after the project is launched.
Home Assistant is an open-source home automation platform running on Python 3. It is used to track and control all devices at home and has many utilities to help us with automation control. You can check at Home Assistant blog how dynamic is the community with constant updates and upgrades for the platform. We expect to interact Home Assistant with the embryo API available at the IoT.Starter.Pi thing device.
Generate Image Disk
There are many ways to install Home Assistant, since it supports many different hardware platforms. This project focus on Haspbian, a disk image that contains all needed to run Home Assistant on a Raspberry Pi.
The Haspbian image is built with the same script that generates the official Raspbian image's from the Raspberry Pi Foundation. The same tool used to create the raspberrypi.org Raspbian images was forked from home-assistant/pi-gen repository. The final stages were ripped off and a new stage-3 was replaced to install Home Assistant. With the exception of git, all dependencies are handled by the build script.
For this project, this pi-gen tool was forked again from home-assistant/pi-gen to josemotta/pi-gen and a new thing branch added a stage-4 to include Lirc installation and other initial setup for the IoT.Starter.Pi embryo. Please check the run.sh script below, showing some useful dependencies added to the disk image.
install -d "${ROOTFS_DIR}/var/run/lirc"
install -m 666 -d "${ROOTFS_DIR}/home/pi/config"
install -m 666 -d "${ROOTFS_DIR}/home/pi/backup"
rm -f "${ROOTFS_DIR}/etc/lirc/lircd.conf.d/devinput.lircd.conf"
install -m 644 files/i2c1-bcm2708.dtbo "${ROOTFS_DIR}/boot/overlays"
install -m 644 files/config.txt "${ROOTFS_DIR}/boot/config.txt"
install -m 644 files/lirc_options.conf "${ROOTFS_DIR}/etc/lirc/lirc_options.conf"
install -m 644 files/ir-remote.conf "${ROOTFS_DIR}/etc/modprobe.d/ir-remote.conf"
install -m 644 files/lirc24.conf "${ROOTFS_DIR}/etc/lirc/lircd.conf.d/lirc24.conf"
install -m 644 files/lirc44.conf "${ROOTFS_DIR}/etc/lirc/lircd.conf.d/lirc44.conf"
install -m 644 files/Samsung_BN59-00678A.conf
"${ROOTFS_DIR}/etc/lirc/lircd.conf.d/Samsung_BN59-00678A.conf"
install -m 644 files/AppConfig.json "${ROOTFS_DIR}/app"
install -m 755 files/setup.sh "${ROOTFS_DIR}/home/pi/setup.sh"
rm -f "${ROOTFS_DIR}/etc/default/keyboard"
install -m 644 files/keyboard "${ROOTFS_DIR}/etc/default/keyboard"
cat << EOF >> ${ROOTFS_DIR}/etc/samba/smb.conf
[config]
path = /home/pi/config
available = yes
valid users = pi
read only = no
browsable = yes
public = yes
writable = yes
[backup]
path = /home/pi/backup
available = yes
valid users = pi
read only = no
browsable = yes
public = yes
writable = yes
EOF
As you can see, the stage-4 also installs and configures the Samba server to expose a couple folders:
- /home/pi/config: folder for the Home Assistant configuration
- /home/pi/backup: folder to backup/restore the embryo setup
After running pi-gen for half an hour on a virtual Debian machine created on my development PC, a SD disk image is generated with all dependencies installed. Burn the image with Etcher and get the heart of the embryo, ready to be implanted at the Raspberry Pi drive. The image was tested on RPI 2B/3B with success. Keep the SD disk for a while because we will build the project first.
Build at Developer Machine
According to IoT.Starter.Pi.Thing strategy, build is done outside RPI, using a fast x64 micro equipped with Windows 10, Visual Studio, Docker and Hyper-V. At the development machine, we should build the project with docker-compose command, according to api.yml file.
Please see the file below including api, hass, mosquitto and portainer services.
version: "3"

services:
  api:
    image: josemottalopes/home-api
    build:
      context: .
      dockerfile: src/IO.Swagger/api.dockerfile
    ports:
    - "5000:5000"
    network_mode: bridge
    privileged: true
    restart: always
    devices:
      - /dev/mem:/dev/mem
      - /dev/i2c-1:/dev/i2c-1
      - /dev/gpiomem:/dev/gpiomem
    volumes:
      - /var/run/lirc:/var/run/lirc
    environment:
      - ASPNETCORE_ENVIRONMENT=Release

  hass:
    image: homeassistant/raspberrypi3-homeassistant:0.80.3
    ports:
      - "8123:8123"
    network_mode: bridge
    volumes:
      - /home/pi/config:/config
    restart: always
    devices:
      - /dev/i2c-1:/dev/i2c-1
      - /dev/gpiomem:/dev/gpiomem
    environment:
      - TZ=America/Sao_Paulo
    depends_on:
      - mosquitto
      - api

  mosquitto:
    build:
      context: ./Mosquitto
    restart: unless-stopped
    ports:
     - "1883:1883"
    network_mode: bridge
    volumes:
     - ./Mosquitto/auth.conf:/etc/mosquitto/conf.d/auth.conf:ro
     - ./Mosquitto/users.passwd:/etc/mosquitto/users.passwd:ro

  portainer:
    image: portainer/portainer
    ports:
      - "9000:9000"
    command: -H unix:///var/run/docker.sock
    restart: always
    volumes:
      - /var/run/docker.sock:/var/run/docker.sock
      - portainer_data:/data

volumes:
  portainer_data:
Following is a brief description of each service:
api: This is the API generated by Swagger Hub, it contains the embryo messages.hass: This is the Home Assistant application, used as UI for the embryo.mosquitto: A MQQT broker to be used by Home Assistant logic.portainer: This is a simple management solution for Docker.
Building the solution is a long run that includes compiling the API generated by Swagger Hub and the Raspberry# IO library. The current solution also includes the empty UI MVC website that was used previously in this series. Below a shortcut of the build session:
jo@CANOAS24 MINGW64 /c/_git/IoT.Home.Pi/home (master)
$ docker-compose -f api.yml build
Building api
Step 1/35 : FROM microsoft/dotnet:2.0.7-runtime-stretch-arm32v7 AS base
 ---> 87595eb7f1f4
Step 2/35 : ENV DOTNET_CLI_TELEMETRY_OPTOUT 1
 ---> Using cache
 ---> 9e6c62851cc6
Step 3/35 : ENV ASPNETCORE_URLS "http://*:5000"
 ---> Using cache
 ---> c290db537f12
Step 4/35 : WORKDIR /app
 ---> Using cache
 ---> 7dccd40b712f
Step 5/35 : RUN   apt-get update   && apt-get upgrade -y   && apt-get install -ylirc
            --no-install-recommends &&   rm -rf /var/lib/apt/lists/*
 ---> Using cache

... big build including all projects from solution

  IO.Swagger -> /src/src/IO.Swagger/bin/Release/netcoreapp2.0/linux-arm/IO.Swagger.dll
  IO.Swagger -> /app/
Removing intermediate container e98edde9e6b1
 ---> 37f4b8ed2042
Step 32/35 : FROM base AS final
 ---> 055ee036885d
Step 33/35 : WORKDIR /app
 ---> Using cache
 ---> 79c8c71c098b
Step 34/35 : COPY --from=publish /app .
 ---> f0e36a46b8d2
Step 35/35 : ENTRYPOINT ["dotnet", "IO.Swagger.dll"]
 ---> Running in 9d100e734c07
Removing intermediate container 9d100e734c07
 ---> 46b9b656c5e2
Successfully built 46b9b656c5e2
Successfully tagged josemottalopes/home-api:latest
Building mosquitto
Step 1/3 : FROM resin/raspberry-pi-debian:stretch
 ---> ced6fc5da205
Step 2/3 : RUN   apt-get update   && apt-get upgrade -y   && apt-get install
-ymosquitto mosquitto-clients   --no-install-recommends &&   rm -rf /var/lib/apt/lists/*
 ---> Using cache
 ---> 66afe7dadb46
Step 3/3 : CMD [ "/usr/sbin/mosquitto", "-c", "/etc/mosquitto/mosquitto.conf" ]
 ---> Using cache
 ---> d20ea9daf328
Successfully built d20ea9daf328
Successfully tagged home_mosquitto:latest
hass uses an image, skipping
portainer uses an image, skipping
Final build step should use again the docker-compose command, this time to push API image to Docker Hub. See it in action below:
jo@CANOAS24 MINGW64 /c/_git/IoT.Home.Pi/home (master)
$ docker-compose -f api.yml push
Pushing api (josemottalopes/home-api:latest)...
The push refers to repository [docker.io/josemottalopes/home-api]
5b74c38596fb: Pushed
63edb82122c7: Pushed
08c704bc3c1a: Pushed
bf8666defb3a: Pushed
1f48f9c632fb: Pushed
3ae6b6a37d49: Pushed
0bbaa93801e6: Pushed
28d327b91985: Pushed
2917ff0f1d45: Pushed
420a4cbda8df: Layer already exists
53c3793bdb6b: Layer already exists
002111fc932d: Layer already exists
2e9c4696ffa4: Layer already exists
latest: digest: sha256:779b47a4c1f9757c8abf3f137df19261e4e335c3b18cff1d16b94ddd1a92efba
                size: 3037
Now, we can go to RPI to deploy the embryo.
Deploy to RPI
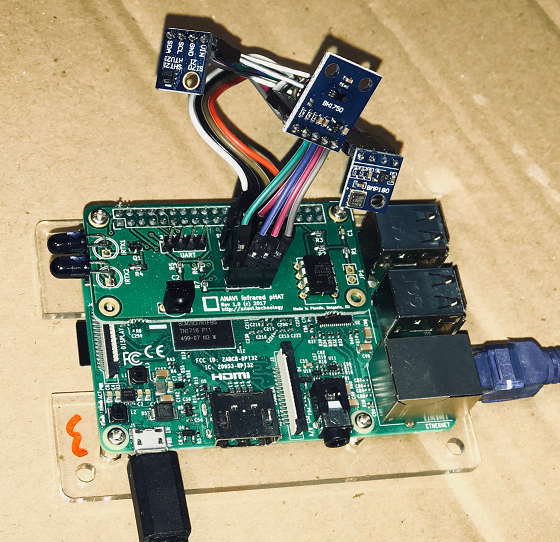
The SD disk with the embryo heart is inserted into Raspberry Pi driver slot. The board is already equipped with an Anavi Infrared pHat, an add-on board that converts your Raspberry Pi to a smart remote control. It also supports sensor modules for temperature, humidity, barometric pressure, and light. Please check the RPI below with three sensors attached and at top left the double infrared leds that provide strong IR signals. Anavi Infrared pHat is attached through the RPI GPIO connector. Raspberry Pi also has 5V power and is connected to a Internet router by the RJ-45 network cable.
On the very first run, the file system is initialized. After boot, we should login to the Raspberry Pi for the first time and change the initial password for pi user. Please note it was kept "raspberry", the same from raspberrypi.org Raspbian image. Since SSH is available, it is possible to use the headless RPI, opening a bash terminal from another micro computer. Otherwise, just plug the USB keyboard and HDMI connectors to interact directly with the embryo.
Clone the Repo
Let's start a bash session from the development PC, using ssh. Check below pi@copa, the chosen hostname for this demo.
jo@CANOAS24 MINGW64 ~
$ ssh pi@copa
pi@copa's password:
Linux copa 4.14.70-v7+ #1144 SMP Tue Sep 18 17:34:46 BST 2018 armv7l

The programs included with the Debian GNU/Linux system are free software;
the exact distribution terms for each program are described in the
individual files in /usr/share/doc/*/copyright.

Debian GNU/Linux comes with ABSOLUTELY NO WARRANTY, to the extent
permitted by applicable law.
Last login: Mon Oct 29 13:17:49 2018 from 192.168.20.113
Let's clone the Iot.Home.Pi repository locally at Raspberry Pi. Thanks to the modified pi-gen, there should already be a script for that at pi default folder.
pi@copa:~ $ cat setup.sh
set -e
REPO="https://github.com/josemotta/IoT.Home.Pi.git"
HOME="/home/pi/IoT.Home.Pi"
git clone $REPO $HOME
Then, staying at default /home/pi folder, and you just need to run:
./setup.sh
Please note that this is the same repo used to build the project at development machine. The difference is that we are now at the RPI side. We expect to use the docker-compose command twice, always based on same api.yml file used before at build:
- First to pull the images from Docker Hub and
- Second to orchestrate the respective containers
The folder ~/IoT.Home.Pi/home should contain the essential files for the embryo project.
pi@copa:~ $ cd I*/home
pi@copa:~/IoT.Home.Pi/home $ ls -l
total 60
-rw-r--r--  1 pi pi 1017 Oct  6 20:10 api.yml
-rw-r--r--  1 pi pi  257 Oct  6 20:10 _clear.bat
drwxr-xr-x  3 pi pi 4096 Oct  6 20:10 Docker
-rw-r--r--  1 pi pi 1385 Oct  6 20:10 docker-compose.dcproj
-rw-r--r--  1 pi pi  458 Oct  6 20:10 docker-compose.yml
drwxr-xr-x  2 pi pi 4096 Oct  6 20:38 Hass
-rw-r--r--  1 pi pi 1490 Oct  6 20:10 home-api.yml
-rw-r--r--  1 pi pi  905 Oct  6 20:10 home-compose.yml
-rw-r--r--  1 pi pi 5870 Oct  6 20:10 Home.sln
drwxr-xr-x  4 pi pi 4096 Oct  6 20:10 Lirc
-rw-r--r--  1 pi pi  579 Oct  6 20:10 NuGet.Config
drwxr-xr-x  3 pi pi 4096 Oct  6 20:10 Proxy
drwxr-xr-x  2 pi pi 4096 Oct  6 20:10 Raspberry.IO
drwxr-xr-x 11 pi pi 4096 Oct  6 20:10 src
Install Docker
There is a setup.sh script in the Hass folder to install Docker and docker-compose. As explained before, the latest version of docker-compose for RPI was built manually and is installed by the setup script. Also, a password should be set to protect the exposed config & backup folders.
set -e
DOCKER_COMPOSE="$HOME/Docker/docker-compose"
KEY_USER="josemotta@bampli.com"
KEY_FILE="/home/pi/.ssh/id_rsa"
CONFIG_FOLDER=/home/pi/config/
BACKUP_FOLDER=/home/pi/backup/
DEFAULT_CONFIG=*_hassconfig_*
USERNAME=pi
PASSWORD=password
chmod 0777 $BACKUP_FOLDER
chmod 0777 $CONFIG_FOLDER
cp ${HOME}/Hass/${DEFAULT_CONFIG} ${BACKUP_FOLDER}
curl -fsSL get.docker.com -o get-docker.sh
sh get-docker.sh
usermod -aG docker pi
cp $DOCKER_COMPOSE /usr/local/bin
chown root:root /usr/local/bin/docker-compose
chmod 0755 /usr/local/bin/docker-compose
echo -e "$PASSWORD\n$PASSWORD" | smbpasswd -a -s -c /etc/samba/smb.conf $USERNAME
ssh-keygen -t rsa -b 4096 -C $KEY_USER -q -N "" -f $KEY_FILE
Change directory to Hass and run sudo ./setup.sh to finish RPI setup. Then check if Docker is running fine.
pi@copa:~ $ docker version
Client:
 Version:           18.06.1-ce
 API version:       1.38
 Go version:        go1.10.3
 Git commit:        e68fc7a
 Built:             Tue Aug 21 17:30:52 2018
 OS/Arch:           linux/arm
 Experimental:      false

Server:
 Engine:
  Version:          18.06.1-ce
  API version:      1.38 (minimum version 1.12)
  Go version:       go1.10.3
  Git commit:       e68fc7a
  Built:            Tue Aug 21 17:26:37 2018
  OS/Arch:          linux/arm
  Experimental:     false

pi@copa:~ $ docker-compose version
docker-compose version 1.19.0-rc2, build dfcb02c
docker-py version: 2.7.0
CPython version: 2.7.13
OpenSSL version: OpenSSL 1.0.1t  3 May 2016
Pull Images
The docker-compose pull command is used to download the latest josemottalopes/home-api image from Docker Hub.
pi@copa:~/IoT.Home.Pi/home $ docker-compose -f api.yml pull
Pulling portainer (portainer/portainer:latest)...
latest: Pulling from portainer/portainer
Digest: sha256:07c0e19e28e18414dd02c313c36b293758acf197d5af45077e3dd69c630e25cc
Status: Image is up to date for portainer/portainer:latest
Pulling api (josemottalopes/home-api:latest)...
latest: Pulling from josemottalopes/home-api
5483105d0916: Already exists
4a08fa0bd267: Already exists
5db6c48919a3: Already exists
4ed51a05c924: Already exists
be01d4da0224: Pull complete
9902b97c6ff4: Pull complete
d45a0684105a: Pull complete
2fd83b49817b: Pull complete
9036c0edc62a: Pull complete
f66a27b68370: Pull complete
5e974242185a: Pull complete
ae3b66331312: Pull complete
4d4cbdc4d968: Pull complete
Digest: sha256:779b47a4c1f9757c8abf3f137df19261e4e335c3b18cff1d16b94ddd1a92efba
Status: Downloaded newer image for josemottalopes/home-api:latest
Pulling hass (homeassistant/raspberrypi3-homeassistant:0.78.3)...
0.78.3: Pulling from homeassistant/raspberrypi3-homeassistant
Digest: sha256:f06dc1d1bea815f50aa8244df31593e13d953d1b650427423375d9fc43443625
Status: Image is up to date for homeassistant/raspberrypi3-homeassistant:0.78.3
Run Them All
Again another docker-compose command, now use docker-compose up -d to orchestrate containers properly:
pi@copa:~/IoT.Home.Pi/home $ docker-compose -f api.yml up -d
Creating network "home_default" with the default driver
Pulling portainer (portainer/portainer:latest)...
latest: Pulling from portainer/portainer
d1e017099d17: Pull complete
a9e4458c8fdc: Pull complete
Digest: sha256:07c0e19e28e18414dd02c313c36b293758acf197d5af45077e3dd69c630e25cc
Status: Downloaded newer image for portainer/portainer:latest
Creating home_portainer_1 ... done
Creating home_api_1       ... done
Creating home_hass_1      ... done

pi@copa:~/IoT.Home.Pi/home $ docker ps
CONTAINER ID        IMAGE                                             COMMAND                  CREATED             STATUS              PORTS                    NAMES
fdd60b1edf87        portainer/portainer                               "/portainer -H unix:�"   48 seconds ago      Up 34 seconds       0.0.0.0:9000->9000/tcp   home_portainer_1
c1163bb370db        homeassistant/raspberrypi3-homeassistant:0.78.3   "/bin/entry.sh pytho�"   48 seconds ago      Up 36 seconds       0.0.0.0:8123->8123/tcp   home_hass_1
71cf17d6af66        josemottalopes/home-api                           "dotnet IO.Swagger.d�"   48 seconds ago      Up 36 seconds       0.0.0.0:5000->5000/tcp   home_api_1
pi@copa:~/IoT.Home.Pi/home $
The containers are running and we can check ports 5000, 8123, and 9000 to view respective UIs from all services.
Viewing Results from Embryo
The Home Assistant dashboard shows the available status, including available sensors.

Portainer manager screens show all details about containers and running images:
There is also the embryo API generated by Swagger Hub, showing sensor data collected using the Raspberry# IO library.
The Remote API can issue infrared commands using curl, for example:
jo@CANOAS24 MINGW64 /c/_git/IoT.Home.Pi/home (master)
$ curl -X GET "http://192.168.20.105:5000/motta/home/1.0.3/remotes" -H "accept: text/plain"
Samsung_BN59-00678A
LED_24_KEY
LED_44_KEY

jo@CANOAS24 MINGW64 /c/_git/IoT.Home.Pi/home (master)
$ curl -X GET "http://192.168.20.105:5000/motta/home/1.0.3/remotes/LED_24_KEY"
       -H "accept: text/plain"
0000000000000001 BRIGHT_DOWN
0000000000000002 BRIGHT_UP
0000000000000003 OFF
0000000000000004 ON
0000000000000005 RED
0000000000000006 GREEN
0000000000000007 BLUE
0000000000000008 WHITE
0000000000000009 ORANGE
000000000000000a PEA_GREEN
000000000000000b DARK_BLUE
000000000000000c 7_JUMP
000000000000000d DARK_YELLOW
000000000000000e CYAN
000000000000000f BROWN
0000000000000010 ALL_FADE
0000000000000011 YELLOW
0000000000000012 LIGHT_BLUE
0000000000000013 PINK
0000000000000014 7_FADE
0000000000000015 STRAW_YELLOW
0000000000000016 SKY_BLUE
0000000000000017 PURPLE
0000000000000018 3_JUMP
The Swagger UI can also be used to issue IR commands, as shown below:
Conclusions
The IoT.Home.Pi embryo is ready to be customized, using the automatic code generator from Swagger Hub to help with API design. The Home Assistant should be properly configured to show information and control available devices. The Portainer manager allows checking all containers and their related info. It is also possible to stop and run containers using both portainer and docker-compose methods.
Have fun and a nice job in your IoT initiative!
Did you like it? Please give me a ⭐️!
History
Electronic Engineer UFRJ 1977, M.Sc. Computer Systems COPPE 1982, CEPEL Researcher until 1985, Mira Informatica CEO until 1995, TRENDnet Brazil CEO until 2015, IoT Systems & Architecture.


 General
  News
News  Suggestion
  Question
  Bug
Bug  Answer
  Joke
Joke  Praise
  Rant
Rant  Admin
Admin 


