Overview
This project aims to illustrate how easy it is to build a connected device using nanoFramework C#. The device will connect to Azure IoT Hub using AMQP.
Azure IoT Hub
If you are not familiar with Azure IoT Hub, you can find out all about it in the product page. You'll need an Azure account to make this project work. In case you don't have one, you can open a free account on the product page above.
AMQP
This is an open standard for passing business messages between applications or organizations. It stands for Advanced Message Queuing Protocol. It's an International Standard (ISO/IEC 19464) and one of the widely accepted protocol standards available for IoT.
More can be found at the official web page of the standard or right in Azure documentation portal.
We'll be using the AMQP.Net Lite C# library, which is a lightweight AMQP 1.0 library for the.NET Framework.
Setup Azure IoT Hub
If you already have an Azure IoT Hub setup, you can skip this step.
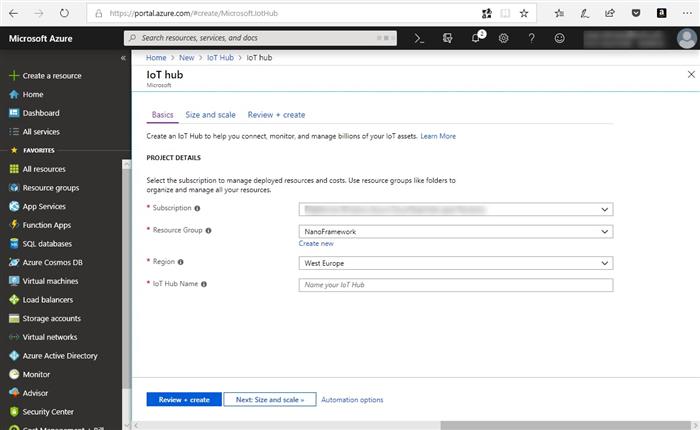
Login to the Azure Portal and create an IoT Hub instance. You'll see something similar to this:
After successfully creating one of these, you'll need the access keys. On the IoT Hub page, navigate to Shared access policies page and grab the connection string for the iothubowner policy.

Managing the IoT Hub
For basic management operations of the IoT Hub, monitoring and even sending data to devices, you should install the Device Explorer app which is part of the Azure IoT C# SDK. Follow the instructions on the readme to download a pre-build setup or you can choose to clone the repo and build it yourself.
After launching the Device Explorer app, enter the connection string that you got from the Azure Portal in the appropriate field and click the Update button.
The next step will be creating a device. Go to the Management tab and click the Create button.
You just need to enter the device ID and the app is creating random authentication keys for the device. You don't have to worry with these.
Back to the Management tab view, click on the SAS Token button which will open the tool that creates a Shared Access Signature token for this device.
Copy the generated SaS token to use in the C# app in a moment.
A few aspects worth mentioning here: the token is generated specifically for this device, belonging to this IoT Hub instance and it's valid for the duration set in the TTL field. You can read more about security and access control on IoT Hub here.
The IoT Hub Client Hardware
I've used a STM32F769IDISCOVERY board for this project flashed with a nanoFramework image. This will work exactly the same for any other board that is running an up to date nanoFramework image and has networking capabilities.
The C# IoT Client
I'm assuming you have a Visual Studio properly setup with the nanoFramework extension installed.
Grab the code from nanoFramework samples repo and open the solution in Visual Studio. After the solution loads, set Azure.IoTHub has the start project.
Next edit Program.cs and replace the constants at the top of file related with IoT Hub.
const string iotHubName = "my-hub";
const string device = "COFFEEMACHINE001";
const string sasToken = "SharedAccessSignature sr=my-hub.azure-devices.net%2Fdevices%
2FCOFFEEMACHINE001&sig=%2FjXfhNvUpxtIM0%2F%2Bb8fCc5l0QWfmEGliSkGqQm3cds4%3D&se=1547902598";
Make sure you that:
- You enter exactly the IoT Hub name. Just the name, not the full URL.
- The SaS token
string is exactly the part that shows after the initial "SharedAccessSignature=".
The application will send a random temperature to the IoT Hub when the blue user button on the board is pressed and outputs a message to the debug console when a message arrives from the IoT Hub. This illustrates the bidirectional communication capabilities of the AMQP device.
Continuing exploring the code the next interesting part is at the beginning of the worker thread where the IoT Hub settings are parsed.
You can see the full URL for the IoT Hub host being computed there.
The application authenticates with Azure IoT Hub using SASL PLAIN and using the Sas token that was generated by the Device Explorer tool. The purpose of this is that the device keys are never sent over the wire thus eliminating a potential security flaw.
The user name for AMQP authentication will be composed by the device id and the IoT Hub name. Like this: {deviceId}@sas.{iothubname}.
The password is the SaS Token string as described above. Make sure that you enter only the relevant part, otherwise the authentication will fail.
The last interesting bit of this code block is the send and receive endpoints. These are composed with the device id according to the following patterns.
Send device-to-cloud messages: devices/{deviceId}/messages/events
Receive cloud-to-device messages: devices/{deviceId}/messages/devicebound
Now let's setup the device to understand messages that have a property named settemp which contains an integer value with the new temperature set point. This is the code of the OnMessage and the OnAction handlers.
private static void OnMessage(IReceiverLink receiver, Message message)
{
int setTemperature = int.Parse((string)message.ApplicationProperties["settemp"]);
OnAction(setTemperature);
}
private static void OnAction(int setTemperature)
{
Console.WriteLine($"received new temperature setting: {setTemperature}");
}
Final note to mention that the nanoFramework device is expected to have its network interface properly configured either by using the Network Configuration window or adjusting the relevant code in the NetworkHelpers class.
Connecting to IoT Hub
To see this actually doing something, just launch a debugging session on Visual Studio. The C# application will be deployed to the device and will start running.
Because the AMQP trace level was set to Frame and Information, you can check Visual Studio debug output window to understand what is happening with the AMQP connection.
Highlighted below are: the authentication step and the attachment of the receive and send endpoints.
When the user button is clicked, an AMQP message is sent to the IoT Hub:
The IoT Hub Device Explorer has a monitoring feature that you can use to watch data flowing from a device to the cloud. Go to the Data tab and click the Monitor button
To test the cloud to device communication, go to the Messages To Device tab, select the device in the drop down list, add a property settemp with a value of 70 and click the Send button.
The message is queued up on the IoT Hub and the output shows the message id. Because the device is connected, the message is received instantly.
This is what we get on Visual Studio debug output window:
Wrapping It Up
This is a very simple demonstration on what can be done with an IoT Hub connected device. The basic parts like authentication, send and receiving messages are covered here.
This code can easily be extended to add improvements such as:
- Adding error handling and retry
- Use message properties to make more complex processing
- Implement processing of IoT Hub cloud to device commands
History
- 16th January, 2019: Initial version
This member has not yet provided a Biography. Assume it's interesting and varied, and probably something to do with programming.


