When the United States Air Force developed the Global Positioning System (GPS), its objective was to enable someone with a GPS receiver to receive geolocation and time information anywhere on or near the earth. It’s obvious how GPS could be useful in a military context. Once GPS technology became available to the public at large, companies like TomTom began leveraging it to do many other useful things, including developing complex consumer applications. And thanks to TomTom’s recent decision to release APIs to developers, integrating GPS technology into complex consumer applications is easier than ever.
TomTom’s APIs provide developers with simple access to powerful mapping and geolocation solutions. The solutions are the result of years of engineering innovation by TomTom, and decades of information about traffic patterns and trends.
To demonstrate how powerful TomTom’s APIs are, this article shows how to use the TomTom Android SDK to build an application for truck drivers. Specifically, we’ll use the SDK to determine the best route to the destination, and we’ll tell the driver when they need to leave to get there on time.
(Note that this article focuses on the Android SDK, but SDKs are also available for the Web and IOS. Also note that if you prefer, you can connect to the APIs directly from your application, rather than using the SDKs.)
Getting Started: The TomTom SDKs
Let's start by investigating how to create a developer account with TomTom and get access to the SDKs.
The TomTom Developer Portal is where you’ll find everything you need to get up and running with the TomTom APIs. The first thing you’ll want to do is create an account on the portal. From the home page, enter your email address and click on the "Get a free API key" button.

Fig. 1 The TomTom Developer Portal
The next step in the process is to select a username and read through the terms and conditions. Your free account supports up to 2,500 free transactions per day. It should be noted that should 2,500 API transactions per day not be enough, more transactions can be purchased by visiting the My Credits screen in the developer dashboard.
An email contains a link to set the password for your account, and with that, you’ll be ready to go. You need to configure an application before you can request an API Key. From your dashboard, click on the "+ Add a new App" button.

Applications require a name, and you’ll need to enable the APIs that the application needs to access. For this example, the products we’ll be using are the Search API, the Routing API, and the Maps API. If you’re following along, select the Search API, Routing API, and Maps API products and click on Create App.
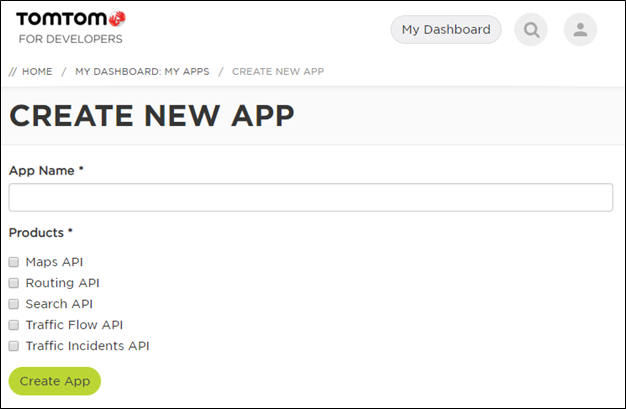
Fig. 2 Creating a New Application
Applications are approved quickly and appear on your dashboard. The entry shows the Consumer API Key, and information about your application, including the approval status of the application, and each of the products it uses.

Fig. 3 Application Details
We’ll need the Consumer API Key when we configure the TomTom dependencies in our application.
Setting Up Our Project
I used Android Studio to build this application and began with a blank activity screen. Our object is to build a simple application to demonstrate the following concepts:
- Address completion with a "fuzzy" search (meaning a search whose results are not limited to the specific keywords or phrases used in the search query, but also extend to related terms)
- Determining the current location of the device
- Finding the best route
I’ll include links at the end with more information on each component and a more complex example which you can download, and explore this functionality more comprehensively.
What we’ll do first is create input fields for the driver to enter their destination and arrival time. Once we have that information, we’ll find coordinates of the destination, and determine the best route. We’ll display the time the driver needs to leave and display the route.

Fig. 4 Initial Layout for the App
The <fragment> at the bottom of the screen has an android:name of com.tomtom.online.sdk.map.MapFragment.
Permissions, Access, and Build Configuration
Before we start coding our solution, we need to take care of some administrative tasks. This includes adding the TomTom SDKs as dependencies and setting up device permissions. We’ll start by adding the TomTom repository to our project’s build.gradle file. Locate the allprojects object within the file and add the TomTom repository to this object.
allprojects {
    repositories {
        google()
        jcenter()
        maven {
            url "https://maven.tomtom.com:8443/nexus/content/repositories/releases/"
        }
    }
}
Fig. 5 Adding the TomTom Repository
Now that we can access the repository, open the app’s build.gradle file and add the following dependencies to the dependencies object. While you’re in this file, you’ll also want to make sure that the compileOptions set the Source and Target Compatibility to at least 1.8.
dependencies {
    implementation fileTree(dir: 'libs', include: ['*.jar'])
    implementation 'com.android.support:appcompat-v7:28.0.0'
    implementation 'com.tomtom.online:sdk-maps:2.+'
    implementation 'com.tomtom.online:sdk-search:2.+'
    implementation 'com.tomtom.online:sdk-routing:2.+'
    testImplementation 'junit:junit:4.12'
    androidTestImplementation 'com.android.support.test:runner:1.0.2'
    androidTestImplementation 'com.android.support.test.espresso:espresso-core:3.0.2'
}
Fig. 6 Adding the TomTom Maps, Search and Routing SDK
Finally, you need to open the AndroidManifest.xml file and make the following additions. First, add user permission to allow the app access to the device location service.
<uses-permission android:name="android.permission.ACCESS_FINE_LOCATION" />
Fig. 7 Adding Permissions to the Location Service on the Device
Second, add the following meta-data objects to the application object. Ensure that you replace ReplaceWithAPIKey with your API Key.
<meta-data
    android:name="OnlineSearch.Key"
    android:value="ReplaceWithAPIKey" />
<meta-data
    android:name="OnlineMaps.Key"
    android:value="ReplaceWithAPIKey" />
<meta-data
    android:name="OnlineRouting.Key"
    android:value="ReplaceWithAPIKey" />
Fig. 8 Adding the API Keys for the TomTom SDKs
Now that we have the housekeeping taken care of, it’s time to build out the solution.
Using a Fuzzy Search to Autocomplete the Address
The control for the Delivery Address is an AutoCompleteTextView Object. We can add a listener to this control, which can react to changes to the text, and suggest possible addresses using the SearchAPI.
Let’s start by initializing some helper objects and a couple of constants that we’ll need to use. We’re also going to initialize the TomTom APIs we’ll be using in this example and create an initialization function for them.
private AutoCompleteTextView txtAddress;

private List<String> addressAutocompleteList;
private Map<String, LatLng> searchResultsMap;
private ArrayAdapter<String> searchAdapter;
private Handler searchTimerHandler = new Handler();
private Runnable searchRunnable;

private SearchApi searchApi;
private RoutingApi routingApi;
private TomtomMap tomtomMap;

private static final int MIN_LEVEL_OF_FUZZINESS = 2;
private static final int MIN_AUTOCOMPLETE_CHARACTERS = 3;
private static final int AUTOCOMPLETE_SEARCH_DELAY_MILLIS = 600;

private void initTomTomAPIs() {
    searchApi = OnlineSearchApi.create(getApplicationContext());
    routingApi = OnlineRoutingApi.create(getApplicationContext());
    MapFragment mapFragment = (MapFragment) getSupportFragmentManager().findFragmentById(R.id.mapFragment);
    mapFragment.getAsyncMap(this);
}
Fig. 9 Supporting Objects for the Autocomplete Functionality
Let’s look at the constants in more detail. Each of these values can be adjusted to tune how the autocomplete functionality works.
MIN_LEVEL_OF_FUZZINESS - A fuzzy search finds exact and similar matches to the text we enter. Different levels of "fuzziness" affect the types of results you get.MIN_COMPLETE_CHARACTERS - We won’t start searching for matches until at least 3 characters have been entered.AUTOCOMPLETE_SEARCH_DELAY_MILLIS - We’ll wait 600ms after a user stops typing before we return results. This delay limits the number of calls to the API and provides a better user experience.
We’ll implement the Autocomplete functionality in two steps. The first step is to configure the autocomplete functionality on the field, and the second step is to create the search function. The autocomplete functionality is boilerplate autocomplete code, and it calls addressAutoComplete, which we’ll explore next.
public void configureAutocomplete(final AutoCompleteTextView autoCompleteTextView) {
    addressAutocompleteList = new ArrayList<>();
    searchResultsMap = new HashMap<>();
    searchAdapter = new ArrayAdapter<>(this, android.R.layout.simple_dropdown_item_1line, addressAutocompleteList);

    autoCompleteTextView.setAdapter(searchAdapter);
    autoCompleteTextView.addTextChangedListener(new BaseTextWatcher() {
        @Override
        public void onTextChanged(CharSequence s, int start, int before, int count) {
            if (searchTimerHandler != null) {
                searchTimerHandler.removeCallbacks(searchRunnable);
            }
        }

        @Override
        public void afterTextChanged(final Editable s) {
            if (s.length() > 0) {
                if (s.length() >= MIN_AUTOCOMPLETE_CHARACTERS) {
                    searchRunnable = () -> addressAutoComplete(s.toString());
                    searchAdapter.clear();
                    searchTimerHandler.postDelayed(searchRunnable, AUTOCOMPLETE_SEARCH_DELAY_MILLIS);
                }
            }
        }
    });
    autoCompleteTextView.setOnItemClickListener((parent, view, position, id) -> {
        String item = (String) parent.getItemAtPosition(position);
        if (autoCompleteTextView == txtAddress) {
            destination = searchResultsMap.get(item);
        } else if (autoCompleteTextView == txtAddress) {
            destination = searchResultsMap.get(item);
        }
        hideKeyboard(view);
    });
}

private void hideKeyboard(View view) {
    InputMethodManager in = (InputMethodManager) getSystemService(Context.INPUT_METHOD_SERVICE);
    if (in != null) {
        in.hideSoftInputFromWindow(view.getApplicationWindowToken(), 0);
    }
}

private abstract class BaseTextWatcher implements TextWatcher {
        @Override
        public void beforeTextChanged(CharSequence s, int start, int count, int after) { }
}
Fig. 10 Function to Add Autocomplete Functionality to an AutoCompleteTextView Control
You’ll see that we added an ItemClickListener to the Autocomplete functionality. When a user clicks on the address they would like, the response from the API also includes the GPS coordinates. We save these in the destination parameter to use later.
The addressAutoComplete function takes address text and an AutoCompleteTextView control, and performs a fuzzy search using the TomTom SearchAPI object. We’ll first create the object, using the ApplicationContext, which passes our API Keys from the manifest file. Then, we’ll build a SearchQuery, subscribe to the response, and when it returns, we’ll update the autocomplete list on the text control.
public void addressAutoComplete(final String address, final AutoCompleteTextView autoCompleteTextView) {
    searchApi.search(new FuzzySearchQueryBuilder(address)
        .withLanguage(Locale.getDefault().toLanguageTag())
        .withTypeAhead(true)
        .withMinFuzzyLevel(MIN_LEVEL_OF_FUZZINESS).build()
    )
    .subscribeOn(Schedulers.io())
    .observeOn(AndroidSchedulers.mainThread())
    .subscribe(new DisposableSingleObserver<FuzzySearchResponse>() {
        @Override
        public void onSuccess(FuzzySearchResponse fuzzySearchResponse) {
            if (!fuzzySearchResponse.getResults().isEmpty()) {
                addressAutocompleteList.clear();
                searchResultsMap.clear();
                for (FuzzySearchResult result : fuzzySearchResponse.getResults()) {
                    String addressString = result.getAddress().getFreeformAddress();
                    addressAutocompleteList.add(addressString);
                    searchResultsMap.put(addressString, result.getPosition());
                }
                searchAdapter.clear();
                searchAdapter.addAll(addressAutocompleteList);
                searchAdapter.getFilter().filter("");
            }
        }

        @Override
        public void onError(Throwable e) {
            Toast.makeText(MainActivity.this, e.getLocalizedMessage(), Toast.LENGTH_SHORT).show();
        }
    });
}
Fig. 11 Performing a Fuzzy Search Using the TomTom Search API
The final step is to add the autocomplete functionality to the text field. Inside the onCreate function, add the following lines.
initTomTomAPIs();
initCurrentLocation();

txtAddress = findViewById(R.id.txtAddress);
configureAutocomplete(txtAddress);
txtAddress.setAdapter(searchAdapter)
Fig. 12 Adding the Autocomplete Functionality to the Text Field
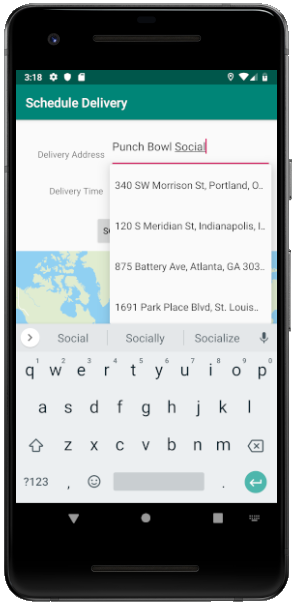
Fig. 13 Autocomplete Functionality in Action
We’ll create the initCurrentLocation function next.
Determining the Current Location
Now that we know where we’re going, we need to know our starting position. We’ll use the current location of the device, giving us a chance to explore the TomTom LocationSource object. Step one is to implement the LocationUpdateListener interface on the Java class. We’ll then create a LocationSource object, a currentLocation object to store the current location, and a constant to hold the location of the Location Service Permission.
public class MainActivity extends AppCompatActivity implements LocationUpdateListener {

    private LocationSource locationSource;
    private LatLng currentLocation;

    private static final int PERMISSION_REQUEST_LOCATION = 0;
Fig. 14 Creating Objects We’ll Need to Find the Current Location
The LocationUpdateListener interface requires that we implement an onLocationChanged function. We’ll also create a function to initialize the LocationSource and handle the permissions check.
private void initCurrentLocation() {
    PermissionChecker permissionChecker = AndroidPermissionChecker.createLocationChecker(this);
    if(permissionChecker.ifNotAllPermissionGranted()) {
        ActivityCompat.requestPermissions(this, new String[]{Manifest.permission.ACCESS_COARSE_LOCATION,
                Manifest.permission.ACCESS_FINE_LOCATION}, PERMISSION_REQUEST_LOCATION);
    }
    LocationSourceFactory locationSourceFactory = new LocationSourceFactory();
    locationSource = locationSourceFactory.createDefaultLocationSource(this, this,  LocationRequest.create()
            .setPriority(LocationRequest.PRIORITY_HIGH_ACCURACY)
            .setFastestInterval(2000)
            .setInterval(5000));
    locationSource.activate();
}

@Override
public void onRequestPermissionsResult(final int requestCode, @NonNull final String[] permissions, @NonNull final int[] grantResults) {
    super.onRequestPermissionsResult(requestCode, permissions, grantResults);
    switch (requestCode) {
        case PERMISSION_REQUEST_LOCATION:
            if(grantResults.length >= 2 &&
                    grantResults[0] == PackageManager.PERMISSION_GRANTED &&
                    grantResults[1] == PackageManager.PERMISSION_GRANTED) {
                locationSource.activate();
            }
            else {
                Toast.makeText(this, "Location permissions not granted.", Toast.LENGTH_SHORT).show();
            }
            break;
    }
}

@Override
public void onLocationChanged(final Location location) {
    currentLocation = new LatLng(location);
}
Fig. 15 Checking Permissions, Creating the Location Source and Setting the Current Location
The LocationSource object enables us access to the Location Service on the Android device. This service returns the GPS coordinates and can be configured to update the app as the location changes. If our app becomes too chatty, we can increase the interval between updates, and even deactivate the LocationSource object. Initialization of the LocationSource object depends on the user granting permission to the app to use the Location Service on the device.
After the LocationSource object is activated, the currentLocation is updated with the current location. We can use this location, and the location from the destination address to determine a route.
Finding the Route
Now that we have our current location, our destination location, and the delivery time, we have everything we need to ask TomTom to create a route for us. We’ll start from the onCreate function and then build out the functions we need from there.
txtDepartureTime = findViewById(R.id.txtTime);
btnScheduleDelivery = findViewById(R.id.btnScheduleDelivery);

btnScheduleDelivery.setOnClickListener(v -> {
    String time[] =  txtDepartureTime.getText().toString().split(":");
    LocalDateTime deliveryTime = LocalDate.now().atTime(new Integer(time[0]), new Integer(time[1]));
    requestRoute(currentLocation, destination, TravelMode.TRUCK, Date.from(deliveryTime.atZone(ZoneId.systemDefault()).toInstant()));
    hideKeyboard(v);
    tomtomMap.zoomToAllMarkers();
});
Fig. 16 Adding the Click Listener to Find the Route
The first thing we do is get a reference to the text field with the delivery time and the Schedule Delivery button. We add a click listener on the button, which gets the text from the delivery time field and splits it. Ideally, we’d validate these values, but for the sake of brevity, we’ll assume that the input format is hour:minute.
We call the requestRoute function with our current location, the destination, the travel mode, which we hardcode to Truck, and the delivery time. The delivery time allows TomTom to compensate for typical traffic conditions based on the time of day.
private void requestRoute(final LatLng departure, final LatLng destination, TravelMode byWhat, Date arriveAt) {
    RouteQuery routeQuery = new RouteQueryBuilder(departure, destination)
            .withRouteType(RouteType.FASTEST)
            .withConsiderTraffic(true)
            .withTravelMode(byWhat)
            .withArriveAt(arriveAt)
            .build();

    routingApi.planRoute(routeQuery)
            .subscribeOn(Schedulers.io())
            .observeOn(AndroidSchedulers.mainThread())
            .subscribe(new DisposableSingleObserver<RouteResponse>() {
                @Override
                public void onSuccess(RouteResponse routeResponse) {
                    if (routeResponse.hasResults()) {
                        FullRoute fullRoute = routeResponse.getRoutes().get(0);
                        int currentTravelTime = fullRoute.getSummary().getTravelTimeInSeconds();
                        LocalDateTime departureTime = arriveAt.toInstant().atZone(ZoneId.systemDefault()).toLocalDateTime().minusSeconds(currentTravelTime);
                        Toast.makeText(getApplicationContext(), "Depart at " + departureTime.format(timeFormatter), Toast.LENGTH_LONG).show();
                        displayRouteOnMap(fullRoute.getCoordinates());
                    }
                }

                @Override
                public void onError(Throwable e) {
                    Toast.makeText(getApplicationContext(), "Error finding the route.", Toast.LENGTH_LONG).show();
                }

                private void displayRouteOnMap(List<LatLng> coordinates) {
                    RouteBuilder routeBuilder = new RouteBuilder(coordinates)
                            .isActive(true);
                    tomtomMap.clear();
                    tomtomMap.addRoute(routeBuilder);
                    tomtomMap.displayRoutesOverview();
                }
            });
}
Fig. 17 The RequestRoute Function
The RouteAPI allows you to set different parameters. For our query, we’re looking for the fastest route, and we want consideration given to traffic at the time of day. Additional options available are the ability to select the most economical route, shortest route, and you can even submit fuel consumption information and receive an estimate for the amount of fuel required.
Once the route is generated, we display it on the Map, and then we calculate the required departure time and display it to the user as a pop-up within the app.

Fig. 18 Final Result. The Route is Shown with the Departure Time
Learning More and Moving Beyond This Example
This application provides a basic introduction to the APIs for TomTom Search API, Routing API and Maps API, as well as the Android SDK. If you would like to look at the source code in its entirety, you can download it from GitHub.
TomTom provides a more extensive example which you can learn more about here.
For more information about the APIs used in this example, including additional options and capabilities, you can review the documentation through the links below:
Mike Mackrory is a Global citizen who has settled down in the Pacific Northwest - for now. By day he works as a Senior Engineer on a Quality Engineering team and by night he writes, consults on several web based projects and runs a marginally successful eBay sticker business. When he’s not tapping on the keys, he can be found hiking, fishing and exploring both the urban and the rural landscape with his kids. Always happy to help out another developer, he has a definite preference for helping those who bring gifts of gourmet donuts, craft beer and/or Single-malt Scotch.


 General
  News
News  Suggestion
  Question
  Bug
Bug  Answer
  Joke
Joke  Praise
  Rant
Rant  Admin
Admin 


