Introduction
Microsoft's Starter Kits provide a great hands on experience for developers and
make the learning process of the .Net technology real fun. One of them is Microsoft
Personal Web Site Starter Kit. It provides a complete, ready to run, ready to customize,
interactive Web site for sharing photos, posting your résumé, categorized links
and more.
Below are listed some links related to Personal Web Site Starter Kit:
This article will show you how to customize the existing code by creating a web user control to
show a random photo on the home page. It does not add new functionality but rather provides a different
solution for selecting a random photo that I personally think is more effective.
For simplicity I am going to use the abbreviation PWS to refer to Personal Web Site Starter Kit.
Using the code
The ZIP file contains only the files that have been modified. In order to try the
code you first need to download,
install and configure the original PWS package from Microsoft's web site. Then you can just overwrite the
existing files with the files from the ZIP file provided here. I highly recommend creating a backup copy
of the original files before applying the changed code.
If you prefer to do it the hard way keep reading the following paragraphs. I will
guide you step by step on creating the web control providing you have PWS installed
properly and you have the solution opened in your Visual Studio 2005.
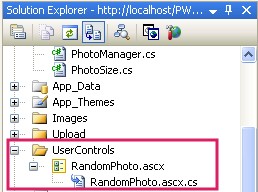
Right-click the project and choose New Folder from the context
menu. Change the default folder name to UserControls. Right-click
the newly created folder and choose Add New Item. Navigate to
Web User Control, name it RandomPhoto.ascx and press
Add button. This will add two files to your project that will contain
the user interface and the code for the user control:
The next step is to adjust Default.aspx page to use our new control
instead of existing code. Open Default.aspx page and add the following just below
the <@ Page directive:
<%@ Register Src="UserControls/RandomPhoto.ascx" TagName="RandomPhoto" TagPrefix="uc1" %>
Replace the following code:
<asp:formview id="FormView1" runat="server" datasourceid="ObjectDataSource1" ondatabound="Randomize" cellpadding="0" borderwidth="0" enableviewstate="false">
 <ItemTemplate>
 ....
 </ItemTemplate>
</asp:formview>
with this one:
<uc1:RandomPhoto ID="RandomPhoto1" DataSourceID="ObjectDataSource1" runat="server" />
It is time to put some content to our user control. The RandomPhoto.ascx
page will contain a code very similar to those we just deleted from our Default.aspx
page. Below you can find it:
<%@ Control Language="C#" AutoEventWireup="true" CodeFile="RandomPhoto.ascx.cs" Inherits="Admin_UserControls_RandomPhoto" %>
<asp:formview runat="server" ID="FormView" cellpadding="0" borderwidth="0" enableviewstate="false">
<ItemTemplate>
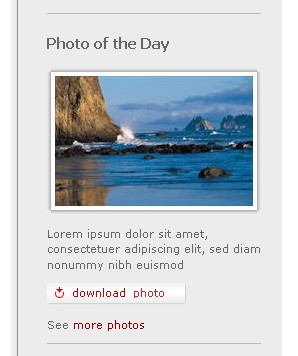
<h4><%# Title %></h4>
<table border="0" cellpadding="0" cellspacing="0" class="photo-frame">
<tr>
<td class="topx--"></td>
<td class="top-x-"></td>
<td class="top--x"></td>
</tr>
<tr>
<td class="midx--"></td>
<td><a href="Details.aspx?AlbumID=<%# Eval("AlbumID") %>&Page=<%# Eval("Page") %>">
<img src="Handler.ashx?PhotoID=<%# Eval("PhotoID") %>&Size=M" class="photo_198" style="border:4px solid white"
alt='Photo Number <%# Eval("PhotoID") %>' /></a></td>
<td class="mid--x"></td>
</tr>
<tr>
<td class="botx--"></td>
<td class="bot-x-"></td>
<td class="bot--x"></td>
</tr>
</table>
<p><%# Text %></p>
<p><a href="Download.aspx?AlbumID=<%# Eval("AlbumID") %>&Page=<%# Eval("Page") %>">
<asp:image runat="Server" id="DownloadButton" AlternateText="download photo" skinid="download"/></a></p>
<p>See <a href="<%# "Albums.aspx" %>">more photos </a></p>
<hr />
</ItemTemplate>
</asp:formview>
Our control will expose three properties that will make it easier for customizations:
- DataSourceID - stores the ID of ObjectDataSource
object through which data is retrieved from database
- Title - a line of text above the photo
- Text - the text to be displayed below the photo
The code <%# Title %> will be replaced with the value of the
Title property.
Another interesting point here is the following code:
<a href="<%# "Albums.aspx" %>">more photos </a>
We cannot use the simpler <a href="/KB/aspnet/Albums.aspx"">more photos </a> because Visual Studio
will complain it cannot find Albums.aspx
in the folder where user control resides. Instead we have to use the code shown
above which is executed at run time and does not cause any troubles at design time.
Now lets have a look at the code behind page for our user control. The content of
the RandomPhoto.ascx.cs is shown below:
using System;
using System.Data;
using System.Configuration;
using System.Collections;
using System.Web;
using System.Web.Security;
using System.Web.UI;
using System.Web.UI.WebControls;
using System.Web.UI.WebControls.WebParts;
using System.Web.UI.HtmlControls;
using System.ComponentModel;

public partial class Admin_UserControls_RandomPhoto : System.Web.UI.UserControl
{
    #region Properties

    [CategoryAttribute("Data")]
    [Description("The ID of the ObjectDataSource")]
    public string DataSourceID
    {
        get
        {
            return _DataSourceID;
        }

        set
        {
            _DataSourceID = value;
            this.FormView.DataSourceID = _DataSourceID;
        }
    } private string _DataSourceID = string.Empty;

    [CategoryAttribute("Data")]
    [Description("The text above the photo")]
    [DefaultValue("Photo of the Day")]
    public string Title
    {
        get
        {
            return _Title;
        }

        set
        {
            _Title = value;
        }
    } private string _Title = "Photo of the Day";

    [CategoryAttribute("Data")]
    [Description("The text below the photo")]
    [DefaultValue("This is the photo of the day")]
    public string Text
    {
        get
        {
            return _Text;
        }

        set
        {
            _Text = value;
        }
    } private string _Text = "This is the photo of the day";

    #endregion

    protected void Page_Load(object sender, EventArgs e)
    {

    }
}
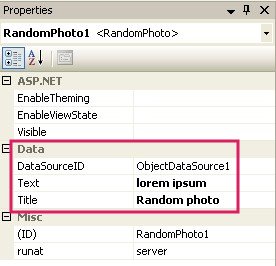
There is nothing special about the code. We define the three properties I mentioned about earlier. These properties can be set up manually in the code like this:
<uc1:RandomPhoto ID="RandomPhoto1" DataSourceID="ObjectDataSource1" Title="Random photo" Text="lorem ipsum" runat="server" />
The other way is to use the Properties Window:
Most probably you already are wondering how we are going to get the image and how we can make sure it is randomly selected. We are going to add a new method to
PhotoManager.cs.
Here is the code:
public static PhotoExt GetRandomPhoto()
{
    using (SqlConnection connection = new SqlConnection(ConfigurationManager.ConnectionStrings["Personal"].ConnectionString))
    {
        using (SqlCommand command = new SqlCommand("GetRandomPhoto", connection))
        {
            command.CommandType = CommandType.StoredProcedure;
            bool filter = !(HttpContext.Current.User.IsInRole("Friends") || HttpContext.Current.User.IsInRole("Administrators"));
            command.Parameters.Add(new SqlParameter("@IsPublic", filter));
            connection.Open();
            List<PhotoExt> list = new List<PhotoExt>();
            using (SqlDataReader reader = command.ExecuteReader())
            {
                reader.Read();
                PhotoExt photo = new PhotoExt((int)reader["PhotoID"], (int)reader["AlbumID"], (string)reader["Caption"], (int)reader["Page"]);
                return photo;
            }
        }
    }
}
This method will return an object of type PhotoExt. PhotoExt inherits Photo class by adding a property Page. Add the following code at the end of Photo.cs file.
public class PhotoExt : Photo
{

    private int _page;

    public int Page { get { return _page; } }

    public PhotoExt(int id, int albumid, string caption, int page)
        : base(id, albumid, caption)
    {
        _page = page;
    }
}
GetRandomPhoto() method uses a stored procedure GetRandomPhoto to get the data from the database.
This is the place where randomization takes place. The SQL script is provided with create_GetRanomPhoto.sql file that is part of the ZIP file
attached to this article. The SQL script is shown below:
CREATE PROCEDURE [dbo].[GetRandomPhoto]
  @IsPublic bit
AS
  SELECT TOP 1
    [Albums1].AlbumID
    , [Photos1].PhotoID
    , [Photos1].Caption
    , Page = COUNT(*) - 1
  FROM [Albums] Albums1, [Photos] Photos1, [Albums] Albums2, [Photos] Photos2
  WHERE
        [Albums1].AlbumID = [Photos1].AlbumID
    AND [Albums2].AlbumID = [Photos2].AlbumID
    AND [Photos1].PhotoID >= [Photos2].PhotoID
    AND [Albums1].AlbumID = [Albums2].AlbumID
    AND ([Albums1].IsPublic = @IsPublic OR [Albums1].IsPublic = 1)
  GROUP BY [Albums1].AlbumID, [Photos1].PhotoID, [Photos1].Caption
  ORDER BY NEWID()

RETURN
You have to run this script against the Personal.mdf database to create the stored procedure.
It returns exactly one record with information about the photo, album and page number which is calculated field.
The use of NEWID() guarantees the record is randomly selected.
We still have some work to be done with the Default.aspx page and its code behind. Change the ObjectDatasource to use
the new method we added to PhotoManager:
<asp:ObjectDataSource ID="ObjectDataSource1" Runat="server" TypeName="PhotoManager" SelectMethod="GetRandomPhoto" />
The last thing is to comment or completely remove Randomize method from Default.aspx.cs file:
using System;
using System.Data;
using System.Configuration;
using System.Web;
using System.Web.Security;
using System.Web.UI;
using System.Web.UI.WebControls;
using System.Web.UI.WebControls.WebParts;
using System.Web.UI.HtmlControls;
public partial class Default_aspx : System.Web.UI.Page {
}
Congratulations! You are done. Compile the project, cross your fingers and see if it works.
Conclusion
I hope this article will give some ideas to people using Microsoft Personal Web Site Starter Kit
on how to customize their web sites using custom controls.
I would love to hear your opinion and suggestions.
History
- 8 March 2006 - Initial version
Angel Anichin is experienced .Net developer living in Canada.
Expertise: ASP.NET, C#, MS Content Management Server, MS SQL Server, Oracle, HTML, JavaScript, CSS
Hobbies: Digital Photography, Skiing


 General
  News
News  Suggestion
  Question
  Bug
Bug  Answer
  Joke
Joke  Praise
  Rant
Rant  Admin
Admin 


