Note that you need Visual Studio 2005/Visual C# Express with .NET 3.0 installed. This code is tested with the June CTP. You also need to install the Extensions for Visual Studio (June CTP!) in order to open the project I included.
Introduction
In this tutorial, I'm going to explain several 2D effects that can be performed on images, using only XAML code. By the end of this tutorial, you'll know:
- how to create image reflections
- how to skew images
- how to drop shadows
Create an empty WinFX application. We'll use the Window1.xaml. Make the background of the image somewhat darker, so we can better see the effects we'll create later on. For this, simply use the Window.Background property. Also, set the Height to 600 and Width to 800.
<Window x:Class="Reflection.Window1"
   xmlns=http://schemas.microsoft.com/winfx/2006/xaml/presentation
   xmlns:x="http://schemas.microsoft.com/winfx/2006/xaml
  Title="Reflection" Height="600" Width="800"
  Background="#CCCCCC" >
Select an image to include in your project. I'll do this tutorial with the image included in my project, but you can of course use any image you want. The image has to be included in your project. Once included, go to the properties window, and with the image selected in the solution explorer, set the "Build Action" to "Content" and "Copy to output directory" to "Copy always". This ensures that the image will be available when running the project.
Let's XAML
Finally, we're ready to do some XAML'ing (don't know if that is already a word, but I vote it should become one though!).
Since we will not be needing any advanced layout of the window, we'll use a simple StackPanel. By default, a StackPanel places all content it receives in one invisible vertical column. That's enough for this sample.
So, delete the <Grid> and </Grid> and replace them with <StackPanel> and </StackPanel>.
For the image effects, we'll need ... an image. Add an simple image element to begin with. Also, give it a name, we'll be needing this name later on. Use the following code:
<Image Source="image.jpg" Width="200" Height="300" x:Name="myImage"></Image>
We'll now start adding the reflection effect. For reflections, the VisualBrush is very handy. What is the VisualBrush? It's a brush, like DrawingBrush, but it can paint with the contents of any other visual element that derives from Visual. Since Visual is the base class of all UI elements in WPF, you can paint with almost any markup in a VisualBrush.Before we can reflect our image, we must add an element in which we can make the reflection appear. You can do this with a Rectangle, a Border...For now, I'll use the Border. Add the Border element to the same StackPanel where you put the image. Since it's a StackPanel, the border is put below the Image (you can visualize this by setting the Background to some color).
<Border Width="210" Height="300"></Border>
Now, we'll use the recently introduced VisualBrush to fill the background of the Border with the contents of the image (this is why we needed to name the image!). Add a VisualBrush to the Border like this:
<Border.Background>
   <VisualBrush Visual="{Binding ElementName=myImage}">
   </VisualBrush>
</Border.Background>
You should now see something like this:

Of course, for a reflection, we need a mirror effect. This can be achieved by adding a ScaleTransform on the VisualBrush. By providing a value of -1, the image will be flipped around the Y-axis.
<VisualBrush.Transform>
   <ScaleTransform ScaleX="1" ScaleY="-1" CenterX="200" CenterY="150">
   </ScaleTransform>
</VisualBrush.Transform>
Now, to complete the reflection-part of this tutorial, we'll add an OpacityMask to the Border. With this in place, we can make the reflected image fade out into the background, creating a nice effect.
<Border.OpacityMask>
   <LinearGradientBrush StartPoint="0,0" EndPoint="0,1">
      <GradientStop Offset="0" Color="Black"></GradientStop>
      <GradientStop Offset="0.6" Color="Transparent"></GradientStop>
   </LinearGradientBrush>
</Border.OpacityMask>
This again uses a LinearGradientBrush, with the color being Transparent from 0.6 on. This means that at 60% of the reflected image, nothing can be seen anymore. We'll also add a border around the original image in this code. Add the following code around your image element:
<Border BorderBrush="White" BorderThickness="5"
    HorizontalAlignment="Center" VerticalAlignment="Center">
...
</Border>
Your code should now look like the following:
<StackPanel>
   <Border BorderBrush="White" BorderThickness="5"
        HorizontalAlignment="Center" VerticalAlignment="Center">
      <Image Source="image.jpg" Width="200" Height="300"
            Stretch="Fill" x:Name="myImage"></Image>
   </Border>
   <Border Width="210" Height="300">
      <Border.Background>
         <VisualBrush Visual="{Binding ElementName=myImage}">
            <VisualBrush.Transform>
               <ScaleTransform ScaleX="1" ScaleY="-1" CenterX="200"
                    CenterY="150"></ScaleTransform>
            </VisualBrush.Transform>
         </VisualBrush>
      </Border.Background>
      <Border.OpacityMask>
         <LinearGradientBrush StartPoint="0,0" EndPoint="0,1">
            <GradientStop Offset="0" Color="Black"></GradientStop>
            <GradientStop Offset="0.6" Color="Transparent"></GradientStop>
         </LinearGradientBrush>
      </Border.OpacityMask>
   </Border>
</StackPanel>
And the result should resemble this:
Skew and Shadows
In the last part of this tutorial, I'm going to add a shadow to the original image, and skew both the images, to create a 3D effect.
First, the shadow. Shadows are created using a BitmapEffect. A BitmapEffect takes visual content as input and produces a new surface by applying one or more image filters, such as a blur or a drop shadow. Currently, there are, among other, the DropShadowEffect, the BlurBitmapEffect and the EmbossBitmapEffect. More might be added later. We'll focus on the DropShadowEffect for now. Information on the other effects can be found in the Windows SDK.
Add the following code to the Border where the original image resides:
<Border.BitmapEffect>
   <BitmapEffectGroup>
      <DropShadowBitmapEffect Color="Black" Direction="20"
        ShadowDepth="25" Softness="1" Opacity="0.5"/>
   </BitmapEffectGroup>
</Border.BitmapEffect>
This adds the dropshadow to the white border containing the image. These properties are self-explanatory, so I'm not going any deeper into this.
Now, to finish, we have to skew both the image and the reflection to create the effect of depth. For this, we'll again use a transformation, this time a RenderTransform. The Angle-properties provided indicate the angle for the rotation.
The following code has to be added to the original image.
<Border.RenderTransform>
   <SkewTransform CenterX="0" CenterY="0" AngleX="0" AngleY="10" />
</Border.RenderTransform>
The reflection needs a re-centering, so we provide a value for the CenterX and CenterY properties.
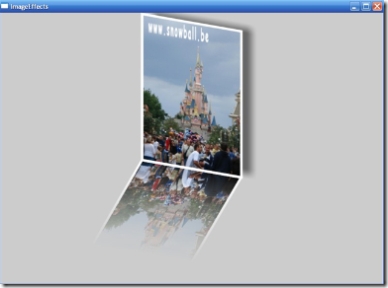
The result you get should look like the following:
I hope this WPF example can help you in creating great layouts with this fantastic new language!


 General
  News
News  Suggestion
  Question
  Bug
Bug  Answer
  Joke
Joke  Praise
  Rant
Rant  Admin
Admin 


 ="http://schemas.microsoft.com/expression/blend/2008"