Introduction
This project presents an Access Database Editor written in C#. The solution
consists of two projects One of which the GenericOLEDB dll provides the access
to the database through using the Ole Db classes available in C#. As the title
suggests the dll code is completely generic and all the main database code that
is specific to Access is contained in the project files that call the code. The
main project and the consumer of the GenericOLEDB project contains two files
the main file takes care of the specific creation and opening of the database
as well as the database operations where there is no further information
required, and the second file presents and editor that allows the editing of a
row of data for insertions or deletions.
This article will have the following format. At first the details
of the code will be presented, starting with the GenericOLEDB project and the
OLE DB code and then move on to the control code for the demo touching on how
the grid and the list are used and how to access the data within them. The
final section will take a look at the abilities and the limitations of the
program.
This project was developed using Developer Studio.NET beta2 and
Developer Studio.NET Professional on win2000 and XP Home
The GenericOLEDB Project
The GenericOLEDB project is a dynamic link library that contains a
single C# class. This class is a wrapper class that contains the OLE DB
functionality for the program. The aim of the class is to generically provide a
reusable database interface that can be used whatever database technology
is required. For this reason the class is created by hand and not generated
through the Developer Studio Seven Wizards.
The class is written to follow the same development format as
the wizard would generate if it was used. This means that the access technique
is to use a OleDbDataAdapter as the main bridge to the database
and four OleDbCommand objects that all use the same OleDbConnection
object to talk to the database
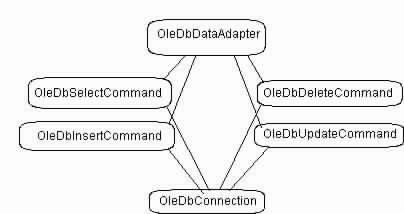
This follows the same set up as the wizard generated code in that the adapter
has a command variable for the update, insert, delete and select commands,
these are set in the code through,
oleDbDataAdapter.DeleteCommand = oleDbDeleteCommand;
oleDbDataAdapter.InsertCommand = oleDbInsertCommand;
oleDbDataAdapter.SelectCommand = oleDbSelectCommand;
oleDbDataAdapter.UpdateCommand = oleDbUpdateCommand;
Once the commands are set on the OleDbDataAdapter the Connection is set on the
commands.
oleDbSelectCommand.Connection = oleDbConnection;
oleDbDeleteCommand.Connection = oleDbConnection;
oleDbUpdateCommand.Connection = oleDbConnection;
oleDbInsertCommand.Connection = oleDbConnection;
The main code within the GenericOLEDB dll is the ExecuteCommand function which
executes the currently selected command. The command is selected within the dll
by keeping track of the last set command string which it takes as being the
command that is required to be executed. If the command to be executed is a
select command the function simply returns true as the main part of the command
will be executed when the GetReader function is called which calls the
ExecuteReader function on the select command regardless of which operation
is called.
Transactions
This brings us to the part of the ExecuteCommand function that requires the
database to be directly updated. This is required for the insert, delete and
the update commands. A transaction is simply a way of locking off a section of
the database so that a write or delete operation can be performed without
corrupting the database integrity. Anything trying to access the section of the
database that is covered by the transaction will be blocked until the
transaction is finished. A transaction is finished in one of two ways, either
by performing a commit which writes the changes to the database or a rollback
which resets the database back into the state it was in before the transaction
started.
Transactions in C# work in a top down manner first you must get the transaction
from the OleDbConnection which is the top level
OleDbTransaction trans = oleDbConnection.BeginTransaction();
This is then the parent transaction that allows us to create a child
transaction for the specific command. This is done by calling the
OleDbTransaction
begin function. In this case we'll use the
DeleteCommand.
case COMMAND.DELETE: oleDbDeleteCommand.Transaction = trans.Begin(); break;
As you can see from the above each OleDbCommand Object contains a Transaction
member that must be connected to the same OleDbConnection as the
OleDbCommand
Object. If this is not the case an exception will be thrown and database
operations will not work as expected.
Once the command is executed using the OleDbCommand::ExecuteNonQuery function
which is used to execute commands that do not return a set of records. If the
ExecuteNonQuery
function succeeds the transaction can be committed to the
database.
case COMMAND.DELETE: oleDbDeleteCommand.Transaction.Commit(); break;
If however the ExecuteNonQuery function fails then the transaction will
need to be rolled back to its previous state.
case COMMAND.DELETE: oleDbDeleteCommand.Transaction.Rollback(); break;
The success or failure of the ExecuteNonQuery function is checked by the value
that it returns. A positive value indicates that it has carried out the
operation on the database successfully, while a negative value or and exception
indicates a failure to carry out the operation on the database. Once the child
transaction has committed or rolled back the operation on the database the same
action must be carried out on the parent or the OleDbConnection object.
The CSHARPOLEDB3 Project

The main file for the project is the Form1.cs file that controls the data entry
and the responses and binds the project to Access type databases. The original
values for the access database are hard coded in the constructor for the form
class
textBox1.Text = "Microsoft.Jet.OLEDB.4.0";
textBox2.Text = "Admin"; textBox3.Text = "";
Mode = "ReadWrite";
OpenFileDialog
These are the default settings for an access database with only the path to the
database file needing to be added through the browse button, that initialises
an OpenFileDialog that is entered into the project from the toolbox and then
initialised in the code.
openFileDialog1.InitialDirectory = Directory.GetCurrentDirectory();
openFileDialog1.Filter = "Access Files ( *.mdb )| *.mdb";
openFileDialog1.FilterIndex = 1;
if( openFileDialog1.ShowDialog() == DialogResult.OK )
{
    DatabaseName = openFileDialog1.FileName;
    textBox4.Text = DatabaseName;
}
As you can see there are operations to be performed before using the OpenFileDialog. The
InitialDirectory member is set to the current directory by
using the static Directory.GetCurrentDirectory function. Then the filter is set
to access type files. This is done through the use of a string that is divided
into two parts by the "|". The first part is the description of the file that is
to be opened and the second part is the string that is used to look through the
directory files, in this case "*.mdb". Because an OpenFileDialog does not
actually open the file it can point to as many different file types as are
required, which is why the FilterIndex property needs to be set to the required
filter before the dialog is displayed.
Once this is done the dialog can be displayed and it controls all the
necessary path finding to the database that will be selected. As long as the user finds
the file and presses the OK button everything will be fine as the
OpenFileDialog
will return a value of
DialogResult.OK. All that is then left to
do is store the
OpenFileDialog FileName property which will return the full
path and name of the file.
The Select button then brings up a dialog that has two edit fields the first is
the fields that you want to select from the table. This is set by default to
"*" which will return all the fields from the selected table. The second edit
field is the space to type in the name of the required table. This is a normal
edit field and the user must know the name of the one of the database tables in
the field. This is a requirement of the program although one idea for an
improvement would be to get the data from the database parameters and display a
list of the tables that are in the database at this point.
When the right database has been selected the "Open Database " button is pressed
which creates an gets the parameters from the appropriate boxes before creating
a GenericOLEDB object and calling open with the parameters.
dbAccess = new GenericOLEDBClass();
dbAccess.Open( Provider, UserID, Password, DatabaseName, Mode );
The Select Command is then set up using the table that was entered in to the
select dialog. The Command is the executed by calling dbAccess.ExecuteCommand, Although as this is the first command that is a
generated the function will just return true at this point. The select function
isn't called until the dbAccess.ExecuteReader function is called in the
DisplayList
function is called with the
dbAccess.Reader variable used as a
parameter.
Displaying Data in the ListBox
The DisplayList function does exactly what it says on the box, it clears the
listbox of any current data and then sets up a number of columns depending on
the field count that is returned by the reader.
for( int i=0; i<nCount; i++ )
{
ColumnHeader header = new ColumnHeader();
header.Width = 100;
header.Text = reader.GetName( i );
listView1.Columns.Add( header );
stringCol.Add( reader.GetName( i ) );
}
When the columns ave been created all that remains for the code to do is add the
data to the list.
ListViewItem lvItem = new ListViewItem();
while( reader.Read() == true )
{
lvItem = listView1.Items.Add( reader.GetValue( 0 ).ToString() );
for( int i=1; i<nCount; i++ )
{
lvItem.SubItems.Add( reader.GetValue( i ).ToString() );
}
}
The data is entered into the table by creating a new ListViewItem which as the
name suggests controls the data and the display properties for an item that is
displayed within the Listbox. As you can see from the above code though the
actual use of a ListViewItem is a little more complicated in that the
ListViewItem
for a row should be thought of as being the first cell of the row,
as well as being the container from which all the other cells of the row are
accessible. This is done through the SubItems member of the
ListViewItem class
that is of the type
ListViewItem.ListViewSubItemCollection
We'll look at getting the data back out of a list view next but first we have to
know how to put it into the list. The Initial value in the first cell of the
list is added by calling ListView1.Items.Add with the required parameters. The
ListViewItem.Item
member is a
ListViewItemCollection that holds all the cells
for the row. The Add function creates and returns the
ListViewItem for the row
that in turn holds the subitem collection that holds the rest of the cells in
the row. Which means that the actual row is created by first of all adding a
ListViewItem
to the view and then by adding the rest of the cells for each of
the columns to the
ListViewItem.SubItem member.
Getting Data from the ListBox
Once the data is added to the list box it is required that we get it back out
again so that the database can be updated. The following code comes from the
OnDelete
function.
ListView.SelectedListViewItemCollection col = listView1.SelectedItems;
IEnumerator colEnum = col.GetEnumerator();
colEnum.MoveNext();
ListViewItem item = ( ListViewItem )colEnum.Current;
ListViewItem.ListViewSubItemCollection subItemsCol = item.SubItems;
IEnumerator subEnum = subItemsCol.GetEnumerator();
StringEnumerator stringEnum = stringCol.GetEnumerator();
bool bFirst = true;
OleDbDataReader reader = dbAccess.GetReader;
reader.Read();
int nColumn = 0;
string strType;
while( subEnum.MoveNext() == true && stringEnum.MoveNext() == true )
{
ListViewItem.ListViewSubItem subItem =
( ListViewItem.ListViewSubItem )subEnum.Current;
strType = reader.GetDataTypeName( nColumn++ );
}
The code starts by getting the selected items in the list view. In this code the
ListBox
is set for single selection so that there will only ever be one. The
selected items are returned to a
ListView.SelectedListViewItemCollection which
we are going to need to be able to traverse in some form or another. The way to
do this is to use the
GetEnumerator function that from appearances comes with
all instances of a collection class. The
GetEnumerator function is inherited
from the
IEnumerable interface so as long as a collection inherits from this
interface the
GetEnumerator function will be present.
Whenever, the GetEnumerator function is called it returns an IEnumerator object
that is positioned before the start of the whatever type of object it is that
is being enumerated. This is why the IEnumerator.MoveNext function must be
called before anything can be done with the objects that are being enumerated.
The IEnumerator interface has only three functions these are
MoveNext which
moves to the next object in the enumeration, Reset which sets the enumerator
back to just before the first object in the enumeration and Current which
returns the object being enumerated. The call to IEnumerator.Current must be
cast to the object of the type that is being enumerated.
ListViewItem item = ( ListViewItem )colEnum.Current;
Once the ListViewItem has been extracted from the collection we can then get the
SubItems
from the
ListViewItem by getting the
ListViewItem.ListViewSubItemCollection
from the
ListViewItem.SubItem member.
Each
SubItem in the collection is itself a
ListViewSubItem which means that as
we cycle through the subitems getting each piece of cell data from the
ListViewSubItemCollection.Current
member, the SQL statement can be built using
the
StringEnumerator for the string collection that contains the column
headings for the
ListBox and the value for each cell can be returned using the
ListViewSubItem.Text
member variable.
The Edit Box Dialog
Insert and update commands are accessed through the EditBox Dialog this is a
simple box that allows the editing and inserting of a single line of code. The
EditBox
is called using its constructor that takes four arguments the first is
the IWin32Window interface that is used as the parent of the dialogbox once
ShowDialog
is called. The second parameter is the current
OleDbDataReader, The
third is the name of the table that the update or insert command will be
carried out on and the final parameter is a
bool value
bInsert which indicates
if the
EditBox is being used to insert or update a record in the table.
Displaying Data in a DataGrid
As with the ListBox the DataGrid is created at runtime, only this time the
information is taken directly from the OleDbDataReader that is passed to the
constructor as a parameter. In the case of the EditBox being used for the
inserting of a new record just the column information is taken from the reader.
But in the case of the EditBox being used to edit an existing record the
EditBox
gets the row information from the reader as well.
Because we are setting up the DataGrid on the fly we need to create a new
DataSet
and a new
DataTable. The
DataSet is effectively a database object that
we are creating. It will work as a container that holds the information that
will be displayed in the
DataGrid. Although in this example we are only using
the one
DataTable we could include any number of
DataTables within the
DataSet.
As with displaying data in the ListBox we start by building the set of columns
that are required for the table.
DataColumn dataCol = dataTable.Columns.Add( reader.GetName( i ), reader.GetFieldType( i ) );
if( reader.GetSchemaTable() != null )
{
DataTable tempTable = reader.GetSchemaTable();
DataColumnCollection colCollect = tempTable.Columns;
IEnumerator colEnum = colCollect.GetEnumerator();
colEnum.MoveNext();
for( int count=0; count<i; count++ )
{
colEnum.MoveNext();
}
DataColumn tempCol = ( DataColumn )colEnum.Current;
if( tempCol.Unique == true )
{
dataCol.Unique = true;
}
if( tempCol.AutoIncrement == true )
{
dataCol.ReadOnly = true;
dataCol.AutoIncrement = true;
}
dataCol.MaxLength = tempCol.MaxLength;
}
First of all the Column is added to the DataTable object by calling the
DataTable.Columns.Add
function on the
DataTable. This creates the column
on the table and returns the
DataColumn object so that we specify further
options on it. We then check that the reader will return a valid
SchemaTable
when we call it as if the call to
OleDbDataReader.GetSchemaTable
returns a null value then we can't to anything with it. Once we've asserted
that the Schema Table is valid we call the
OleDbDataReader.GetSchemaTable
function again and store the result in a
DataTable object. From the
DataTable
object the columns can be extracted from the Columns member and stored into a
DataColumnCollection object. The
DataColumnCollection is used in the same way
as the other collections in that an
IEnumerator interace is made equal to the
return value of the
IEnumerator.GetEnumerator function. The enumerator is then
moved through the columns until it is equal with the column number that we
require. We then test the column for various properties.
It should be noted here that the original idea for this was that the test for
the DataColumn.AutoIncrement doesn't work the way I expected is that it is
always false even when the column is actually an autoincrement column. I
thought the way around this would be to check the value by which the
autoincrement column is updated. This didn't work either as if there is an
autoincrement value all columns contain the amount by which the autoincrement
column is updated. This is the reason why the demo project specifies that the
user manually indicates which fields are to be ignored for an edit or insert as
the code isn't able to correctly determine which fields if any should
automatically be disqualified from the sql statement.
This gives us a set of columns but so far no data. The way to add data is
slightly odd in that it breaks with the get an enumerator and cycle through it
routine and returns to a more traditional, at least from a C++ perspective,
idea of get an array and fill out the values.
DataRow dataRow = dataTable.NewRow();
if( bInsert == false )
{
object[] itemArray = dataRow.ItemArray;
for( int i=0; i<nCount; i++ )
{
itemArray[ i ] = reader.GetValue( i ).ToString();
}
dataRow.ItemArray = itemArray;
}
The above code shows how the EditBox adds data into the row so that it can be
displayed in the DataGrid. The row is returned from the DataTable through the
DataTable.NewRow
function which creates a new row in the table with the correct
or the same as the table schema. The information for the
row is set by getting the
ItemArray from the
DataTable and
cycling through the returned array filling each item with strings from the
reader. The final line makes sure that the
DataRow.ItemArray holds the data
that we want in it.
The saving of the data once it has been edited is the same no matter if there is
an edit or an insert going on and is exactly the reverse in that we drill down
to the ItemArray and then copy the data out of the array using the returned
values to build up an sql string.
Using The Database Editor
The Editor has one major flaw when it comes to editing all databases
and this is where the database itself, be it Access or any other
database maintains a relationship between two or more tables. One example of
this is the Microsoft sample database Nwind.mdb. If you open this database and
select the Suppliers table the editor will display the data as normal and as
long as you exclude the SupplierID field it is possible to edit and insert
fields into the table. The problem arises when a delete operation is attempted
this will throw an exception that says "The record cannot be deleted or changed
because the table 'Products' includes related records." The reason for this
error is that the database itself is maintaining the relationship rather than
it being a purely logical or relational relationship.
Another area for improvement is the way in which the editor deals with types at
the moment only support for basic types is included and to be honest the sample
database uses strings only to represent the data which will mean that if the
Editor is used to access database tables which include different data types
then there will need to be some code modifications.
Conclusion
The GenericOLEDB should allow access to any access database using the
code
provided and as it is a seperate dll it will be easy to use it to access other
databases. the may require a slight change to the connection string within the
GenericOLEDB dll but that should be the end of it. The remaining code shows how
to use the dll to deal with Access databases, although most of the provided
code should be reusable for any database type as the majority of the code is
dealing with the reader and is not concerned with database types.
This member has not yet provided a Biography. Assume it's interesting and varied, and probably something to do with programming.


 General
  News
News  Suggestion
  Question
  Bug
Bug  Answer
  Joke
Joke  Praise
  Rant
Rant  Admin
Admin 


