
Introduction
The Time Picker is an Ajax Extender Control which can be used to input time. It tries to fill the gap of such extender not available under the Ajax Control Toolkit.
Extender controls can be used to enhance the client functionality of ASP.NET Web server controls. You do not use extender controls by themselves. Instead, you attach them to another ASP.NET Web server control. Extender controls are attached to a Web server control by setting the TargetControlID property of the extender control to the ID of the server control being extended.
The library download includes:
- Help File
- Binaries
- Source with Demo Application
This article contains source and binaries for both Framework 2.0 and Framework 3.5.
Background
While working for a project, I came across a need to have users enter time the way they can choose a date from the Calendar Control. Being aware of the fact that Microsoft does not provides any such control out of the box, I started looking out for other options. There were some good solutions available but most of them were using client scripting (Jquery/JavaScript).
This is when I stumbled upon these two articles:
Since I have very little experience on ASP.NET, I decided to take it as a learning opportunity to build on such a control, based on the above two examples.
My objective was to build a control that must be simple to use/configure, provide useful feature set and should be similar to the Ajax Control Toolkit Calendar control.
Using the Code
To use the control:
- Add a reference to the control assembly Ajaxified.dll. Also add the assembly to the toolbox. The
TimePicker control will be added to the toolbox. - Add a textbox control that you need to extend to behave as a Time Picker. Drag the
TimePicker control from the toolbox. It will add the following page directive and the control on the page.
<%@ Register TagPrefix="Ajaxified" Assembly="Ajaxified" Namespace="Ajaxified" %>
The final markup will be:
<asp:TextBox ID="TextBox1" runat="server" Text=""></asp:TextBox>
<Ajaxified:TimePicker ID="TimePicker1" runat="server" TargetControlID="TextBox1">
</Ajaxified:TimePicker>
The Time Picker control exposes the following properties:
| Property Name | Type | Comments |
CloseOnSelection | boolean | Specify whether the pop should automatically close when a specific time is selected. The default is false. |
MinuteStep | Int32 | Specify the minute interval between two values. The default value is 15 min. |
OnClientShowing | string | Client event when the popup starts to open. |
OnClientShown | string | Client event when the popup has opened completely. |
OnClientHiding | string | Client event when the popup starts to close. |
OnClientHidden | string | Client event when the popup is completely closed. |
OnClientSelectionChanged | string | Client event when the time selection is done. |
CssClass | string | The Css class Name for the control. |
HeaderCssClass | string | The Css class Name for the header part. |
TitleCssClass | string | The Css class Name for the title text. |
TabCssClass | string | The Css class Name for the am/pm tab. |
ItemCssClass | string | The Css class Name for the item cell. |
SelectedItemCssClass | string | The Css class Name for the item cell that is selected. |
SelectedTabCssClass | string | The Css class Name for the tab that is selected. |
The markup illustrating the use of these properties:
<asp:TextBox ID="TextBox2" runat="server" Text=""></asp:TextBox>
<Ajaxified:TimePicker runat="server" TargetControlID="TextBox2"
   	  CssClass="timepicker"
           HeaderCssClass="header"
           TitleCssClass="title"
           ItemCssClass="item"
           SelectedItemCssClass="selecteditem"
           TabCssClass="tab"
           SelectedTabCssClass="selectedtab"
           OnClientShowing="clientShowing"
           OnClientShown="clientShown"
           OnClientHiding="clientHiding"
           OnClientHidden="clientHidden"
           OnClientSelectionChanged="selectionChanged"
           MinuteStep="10"
           CloseOnSelection="true">
</Ajaxified:TimePicker>
and to handle the events:
<script language="javascript" type="text/javascript">
function clientShowing(sender) {
}
function clientShown(sender) {
}
function clientHiding(sender) {
}
function clientHidden(sender) {
}
function selectionChanged(sender) {
alert(sender._selectedTime);
}
</script>
Styling
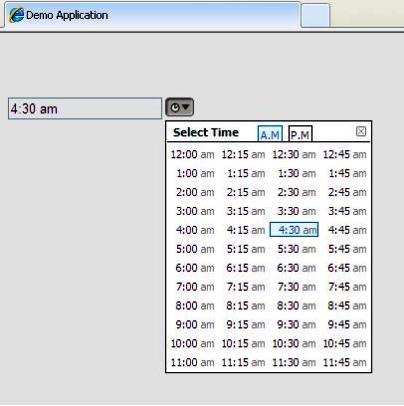
The basic layout of the control is defined as illustrated in the image below:
Each section has a CssName property attached to it to handle all the styling needs for the control. If the user does not assign these properties, the control renders with default style as shown in the introductory image. It is advisable to play only with the color and font schemes to maintain the layout consistency. The demo application contains a Style Sheet to illustrate how to override the default style for the control.
| Section Name | CSS Property Name |
CssClass | Whole Control |
HeaderCssClass | Header |
TitleCssClass | Title Text |
TabCssClass | AM/PM tab |
ItemCssClass | Item Cell |
SelectedItemCssClass | Selected Item Cell |
SelectedTabCssClass | Selected Tab |
Validation
The control is also capable of basic input validation.
If the user keys in invalid time format, the control will provide a visual cue that something is wrong as shown in the image above.
Points of Interest
This exercise has been of great value to me, especially when it came to client side scripting. The most important thing I came to learn was how to use JavaScript in an object oriented way. There were however minor hiccups when trying out in various browsers.
I have tested the component on IE8, Firefox 4 and Chrome. There is an issue in the layout when used in IE7.0 but the whole idea of this exercise was creating an extender control rather than learning about cross browser issues. So I left it out there.
References
Appreciations for these authors for providing such nice examples.


 General
  News
News  Suggestion
  Question
  Bug
Bug  Answer
  Joke
Joke  Praise
  Rant
Rant  Admin
Admin 


