Introduction
In a forthcoming article I will be describing a DirectSound based Wave Player-Recorder, with some unusual features.
The GUI will include a simple volume control for playback. Since I wanted that control to be synchronized with the system Volume Control utility, I needed to use WinMM.DLL functions and I thought this interim article outlining how those functions are used, and showing in particular how such a control can be synchronized with the system Volume Control, might be of general interest.
What the Demo Application Does
I will show two controls – a sound card input volume control (Line in) and an output volume control (Speakers). From a programming point of view they are treated identically, so where I speak of 'the control' you should understand that what I say applies equally to both input and output controls.
Everything here is directly relevant to other fader controls such as bass, treble, independent left and right channel controls, and so on – including external capture devices such as the microphone in your webcam.
You will also see how to mute/unmute those controls (if they are able to be muted) without disturbing settings, as you can see in this screen shot:
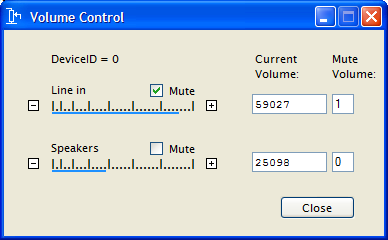
Synchronization requires that changes to a volume control are accurately reflected in the system Volume Control, and vice versa. Likewise with muting and un-muting of lines.
The controls are quasi-logarithmic (as are those in the system utility) meaning successive volume steps up and down follow what is a rough approximation to a logarithmic law. This is necessary because of the way we perceive changes in sound level. It is desirable that each step represent a just noticeable increase (or decrease) in level and that is the way the controls shown here function. And indeed this is the way your keyboard buttons are designed to operate.
A Simple Experiment
You might like to perform the following experiment with your sound card. Launch both the demo application and the system Volume Control utility.
Now reduce the speaker volume on your sound card to zero (not by muting, but by dragging the slider on the Speakers control to its minimum position) and then, using the increase volume button on your keyboard, step through the full span of the control, noting volume levels on the demo screen as you go.
You should find that there are 25 steps and that they are very close to the values in the array shown in the source, which is derived from my own keyboard:
int[] volSteps =    {       0,   2621,   5242,   7863,
                        10484,  13105,  15726,  18347,
                        20968,  23589,  26210,  28831,
                        31452,  34073,  36694,  39315,
                        41936,  44557,  47178,  49799,
                        52420,  55041,  57662,  60283,
                        62904,  65535 };
While this is happening you will see the demo Speakers control and the system Speakers control moving in sync. When you are done, move the line and speaker sliders in the system Volume Control and you will see the demo controls follow.
The +/- buttons alongside the demo Speakers control, when clicked, will match the pressing of the up and down buttons on your keyboard, delivering a just noticeable increase or decrease in volume. The steps will correspond to the volSteps array values (the least significant digit will wander). You can otherwise click anywhere on the scale to change volume and you will be taken to a volume level corresponding to where you clicked the scale. The system control will at all times reflect these changes.
The Demo Screen
Behind the demo screen lies a fairly complex piece of code, or so it will seem to readers who have not had dealings with these WinMM functions before. Well, maybe also to some who have.
I chose these two particular controls – the Line in input and the Speakers output – because they happen to correspond to my desk, where I listen to the radio through my sound card, with the radio’s low impedance output connected to Line in. It has therefore always been easy to test the code as it developed. In exercising this code, you are able to substitute or add in any other controls which suit your purpose.
To make things easier to follow, I will illustrate here just the Line in control. Everything I say about that control applies equally to the Speakers control.
The graphics are extremely simple. The scale is just an ASCII label and the bar a thin rectangle. The non-linear appearance of the scale is intended to do no more than suggest a logarithmic scale – it should not be thought to be based on anything mathematical.
As already mentioned, volume levels are changed, not by dragging a pointer, but by clicking anywhere on the scale. You can otherwise click the up or down buttons and each click will change the level by one step.
Changes in volume level, initiated either via the demo screen or the system Volume Control, lead to the new level ( 0 .. 65535 ) appearing in the control’s adjacent text box. I also show the mute status of the control as a Mute Volume, which will always be 0 or 1. Zero corresponds to un-muted and the Mute volume level will, of course, follow checking or un-checking of the Mute check box.
Some writers mute a control by reducing the volume slider to zero but this is neither appropriate nor in any way necessary.
The mute status of a control can be set and read in exactly the same way as the line volume can be set and read.
Some Comments on Painting of the Form
Because I rarely have use for dynamic graphics, I had forgotten that care needs to be taken to ensure those graphics are included whenever a form is repainted, for example when a form is restored after being minimized. You can otherwise be left wondering where your graphics have gone!
Unless you have a preferred way of achieving this, the following overridden OnPaint arrangement should be adhered to:
protected override void OnPaint( PaintEventArgs e )
{
base.OnPaint(e);
}
private void scaleLine_Paint(object sender, PaintEventArgs e)
{
Graphics gLine = e.Graphics;
gLine.FillRectangle(brushBlue, rectX, rectY, rectWLine, rectH);
}
private void Form1_Load( object sender, EventArgs e )
{
scaleLine.Paint += new PaintEventHandler(this.scaleLine_Paint);
}
Updating the bar requires the existing bar to be erased before the new bar is painted and to this end I have an eraseBrush whose color is the same as the form’s BackColor. When a volume level changes, the following code translates the new volume level to a filled rectangle:
rectW = (int)((newVol / 65535.0) * rectWMax + 1);
gLine.FillRectangle(brushErase, rectX, rectY, rectWMax + 1, rectH);
gLine.FillRectangle(brushBlue, rectX, rectY, rectW, rectH);
That is all that is needed to look after the graphics. Every time the form is repainted, for whatever reason, the bar, which might otherwise be lost, will be repainted. Because the control would look quite odd at zero volume (i.e. no bar) I arrange for the bar to remain just visible for a zero or near-zero volume level.
The MM Class
The MM class contains everything we need to interact with the controls.
I have included in the MM class only those constants and imports which are needed for this demo, to make things easier to follow. There is otherwise a bewildering array of constants and functions to weave your way through, some used, most not. A more formal presentation would include what I have left out and I will include references to where to go to flesh out the class, if you feel the need to do that.
The class enables us to get and set volume levels, and to get and set mute status, which is pretty well an identical operation, and of course to ensure that we have access to the mixer which holds our controls. Once it is clear which parameters are to be passed, and how they are to be passed to the WinMM functions, the rest is easy enough.
You will note that I am dealing with the default mixer only. If you want to have access to other mixers (sound cards) in your system, you may easily do so, though I would point out that DirectSound is rather easier to use and more intuitive for purposes other than the synchronization task dealt with here. Mixers are indexed from zero and the default mixer has a DeviceID of zero.
Synchronizing to the System Volume Control Utility
Some thought is required as to how to synch a control to its counterpart in the system utility, because there is more than one way to achieve this. I use the MM_MIXM_CONTROL_CHANGE ( = 0x3D1 ) message which signals that a control has changed, including any change in a line’s mute status.
On recognition of this message we can either update all controls or, better, as is done here, just the control which has changed. The LParam of the message is the control’s unique ID (dwControlID, a member of the MIXERCONTROL structure). During initialization this structure is referenced for each control in turn, so that when processing the message we will know where it came from and be able to update just the one control, with very little overhead.
To enable the message to be intercepted we need to create a window to which the message can be directed and tested. The NativeWindow sub-class offers a neat solution and its use is well documented. Whenever the message MM_MIXM_CONTROL_CHANGE is detected, updates are posted to the screen.
SubclassHWND is taken straight from MSDN:
using System.Windows.Forms;

namespace SynchronizedVolumeControl
{
    public class SubclassHWND : NativeWindow
    {
        protected override void WndProc( ref Message m )
        {
            base.WndProc( ref m );
        }
    }
}
The window which will intercept the MM_MIXM_CONTROL_CHANGE message is declared during Form1_Load:
SubclassHWND w = new SubclassHWND();
w.AssignHandle(this.Handle);
int iw = (int)this.Handle;
bool b = MM.MonitorControl( iw );
... and so the monitoring has begun.
Here is the MonitorControl function:
public static bool MonitorControl( int iw )
{
int rc = -1;
bool retValue = false;
int hmixer;
rc = mixerOpen(
out hmixer,
0,
iw,
0,
CALLBACK_WINDOW);
return retValue = (MMSYSERR_NOERROR == rc) ? true : false;
}
Detection of an MM_MIXM_CONTROL_CHANGE message triggers the following code which updates graphics and check boxes and therefore keeps the demo controls and their system counterparts synchronized:
protected override void WndProc( ref Message m )
{
if (m.Msg == MM.MM_MIXM_CONTROL_CHANGE)
{
int i = (int)(m.LParam);
bool b1 = i == lineVolumeControlID ? true : false;
bool b2 = i == lineMuteControlID ? true : false;
if (b1)
{
int v = MM.GetVolume(lineVolumeControl, lineComponent);
tbVolLine.Text = v.ToString();
rectWLine = (int)((v / 65535.0) * rectWMax) + 1;
rectWLine = rectWLine < 4 ? 4 : rectWLine;
gLine.FillRectangle(brushErase, rectX, rectY, rectWMax + 1, rectH);
gLine.FillRectangle(brushBlue, rectX, rectY, rectWLine, rectH);
}
if (b2)
{
int muteStatus = MM.GetVolume(lineMuteControl, lineComponent);
cbLine.Checked = muteStatus > 0 ? true : false;
tbMuteLine.Text = muteStatus.ToString();
}
}
base.WndProc(ref m);
}
During Form1_Load, an MM.CheckMixer() function, which I don’t show here, attempts to open, then close, the default mixer and failure aborts the load.
The MM.MonitorControl( iw ) function sets up a reporting mechanism for the message we are wanting to intercept. The CALLBACK_WINDOW and iw parameters set up the NativeWindow w to receive the message of interest.
The reader will appreciate that if you were setting out to build a stand alone utility with the same functionality as the System Volume utility, you would of course do much more than this. You would first determine what the range of input and output capabilities of your sound card are and your coding would be consistent with what you found and what you wanted to include.
Here I am only concerned with illustrating how to use the WinMM functions and how to achieve synchronization.
Conclusion
I know from when I was researching this small project, and particularly from questions being raised on the forums, that there is a lot of uncertainty out there as to how the WinMM.DLL is used, and I hope I have been able to remove some of the mystery and encourage readers to use these functions with confidence.
References
I recommend the following reading for anyone newly interested in this topic. The first reference is a lengthy but definitive dissertation on mixers and their controls and deserves to be read carefully. The list is but a small sample of what is available:
- Mixer Lines and Controls Reference
- Subclassing a control (MSDN) Reference
- NativeWindow.CreateHandle Method (Microsoft TechNet) Reference
- Hardware Audio Mixer Messages (MSDN) Reference
- Audio Mixer Functions Demo (Chen Su – Codeproject) Reference
- mixerOpen (MSDN) Reference
- WinMM.DLL Library (webtropy.com) Reference
- SAMPLE: Volume.exe: Set Volume Control Levels Using Visual Basic (Microsoft) Reference
- This reference includes a large compilation of constants, error codes, imports etc. Reference
An old assembly language programmer (8051 microcontroller) and a recent convert from Delphi. Retired ten years ago and rather enjoy writing C# code.


 General
  News
News  Suggestion
  Question
  Bug
Bug  Answer
  Joke
Joke  Praise
  Rant
Rant  Admin
Admin 


