Introduction
This is a short article addressing some of the basics of working with a TreeView control; the article will address dynamically adding TreeNodes to a TreeView control, searching the nodes to find and highlight a single node or a collection of nodes matching a search term against the TreeNode’s tag, text, or name properties, and manually or programmatically selecting nodes.

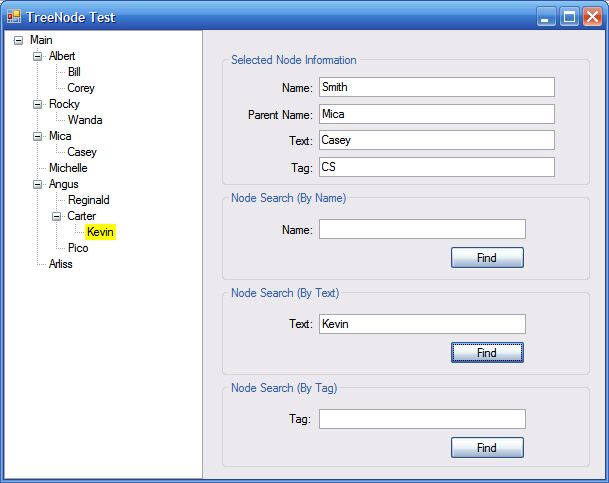
Figure 1: Searching a TreeView Control by the Text Property.
Figure 2: Searching a TreeView Control by the Name Property.
Figure 3: Searching a TreeView Control by the Name Property.
Figure 4: Creating a Node with Specific Properties.
The Solution
The application solution contains a single Windows Application project comprised; all code supplied in support of this project is contained in two Form classes; one is the main form containing the TreeView and a few controls used to display node information (Figures 1, 2, and 3) and to execute searches for a specific node or group of nodes based upon a user supplied search term. The other Form class (Figure 4) is used to create new nodes; within the application, this form is displayed by selecting a node from the TreeView and then selecting the “Add Node” option from the context menu.
There is nothing custom or fancy done with any of the TreeView related components in this application; it is merely a demonstration of how to work with a TreeView within the context of a Windows Forms application.
The Code: Form 1 – The Main Form
The main Form class is a standard Windows Form with a few controls added; the form contains a split container control; on the left hand side of the control is a TreeView control, on the right hand side of the splitter are four group boxes; the first group box contains a set of labels and text boxes used to display information about a selected node, the remaining group boxes contain labels, text boxes, and buttons used to conduct different searches of the TreeView’s node collection based on the node’s text, name, or tag values.
The functionality contained in the class is broken up into several regions; the class begins with the default imports, namespace declaration, and class declaration:
using System;
using System.Collections.Generic;
using System.ComponentModel;
using System.Data;
using System.Drawing;
using System.Text;
using System.Windows.Forms;
namespace EasyTreeView
{
public partial class Form1 : Form
{
public Form1()
{
InitializeComponent();
TreeNode mainNode = new TreeNode();
mainNode.Name = "mainNode";
mainNode.Text = "Main";
this.treeView1.Nodes.Add(mainNode);
}
The Form class constructor creates a main node in the TreeView control; at runtime, the user may select this node (or any child node originating from this node) to add additional nodes to the TreeView. The Form class also contains a context menu; this context menu contains two options; one to add a new node, and one to delete an existing node. When a new node is requested, the application opens an instance of the New Node dialog; this dialog forces the user to set the name, text, and tag values for the new node. The tag value can be any object but in this example, the tag is limited to holding an additional string value. Once the values have been collected from the dialog, the new node is populated with the information and added to the selected node of the TreeView.
When a node is deleted, the selected node and all of its children are removed from the TreeView; one thing to note here is, if you are associating an object with a node through its tag; you will want to write the handler to destroy that object prior to deleting the selected node.
#region Add and Remove Nodes
private void cmnuAddNode_Click(object sender, EventArgs e)
{
NewNode n = new NewNode();
n.ShowDialog();
TreeNode nod = new TreeNode();
nod.Name = n.NewNodeName.ToString();
nod.Text = n.NewNodeText.ToString();
nod.Tag = n.NewNodeTag.ToString();
n.Close();
treeView1.SelectedNode.Nodes.Add(nod);
treeView1.SelectedNode.ExpandAll();
}
private void cmnuRemoveNode_Click(object sender, EventArgs e)
{
treeView1.SelectedNode.Remove();
}
#endregion
The next region of code is used to handle TreeView events; there are only two events handled in this section; the TreeView’s After Select event and the TreeView’s click event. The After Select event handler is used to populate the text boxes used to display information from the selected node (its Name, Text, Tag, and Parent text properties. The find functions described later highlight all found nodes in response to a search by setting the background color of each matching node to Yellow; the click event handler for the TreeView is used to remove all such highlighting.
#region Treeview Event Handlers
private void treeView1_AfterSelect(object sender, TreeViewEventArgs e)
{
try
{
txtName.Text = "";
txtParentName.Text = "";
txtText.Text = "";
txtTag.Text = "";
txtName.Text = treeView1.SelectedNode.Name.ToString();
txtText.Text = treeView1.SelectedNode.Text.ToString();
txtTag.Text = treeView1.SelectedNode.Tag.ToString();
txtParentName.Text =
treeView1.SelectedNode.Parent.Text.ToString();
}
catch { }
}
private void treeView1_Click(object sender, EventArgs e)
{
ClearBackColor();
}
#endregion
The next region in the class is used to find a node by its name property. The method of finding a node by its name is the only find function directly supported by the TreeView; if you want to find a node by something other than its name, you will have to write your own methods to do so. This click event handler populates an array of nodes with an array of nodes with matching names. The find method accepts two arguments; the first argument is the search term and the second is a boolean value used to determine whether or not child nodes should also be included in the search; in this case the search term is collected from a text box on the form and the option of searching child nodes is enabled by setting the second argument to true.
Once the collection of nodes is created; each matching node has its back color set to yellow so as to highlight the node in the TreeView. Prior to setting the back color of the matching nodes, all of the other nodes in the TreeView are set back to having white backgrounds by calling the ClearBackColor method.
#region Find By Name
private void btnFindNode_Click(object sender, EventArgs e)
{
ClearBackColor();
try
{
TreeNode[] tn =
treeView1.Nodes[0].Nodes.Find(txtNodeSearch.Text, true);
for (int i = 0; i < tn.Length; i++)
{
treeView1.SelectedNode = tn[i];
treeView1.SelectedNode.BackColor = Color.Yellow;
}
}
catch { }
}
#endregion
The next region of code is used to remove the back color from any nodes highlighting in an earlier search. This process relies on two separate methods. The first method creates an instance of a tree node collection containing all of the nodes in the form’s TreeView control. Each of the nodes in the collection is passed to a second method (ClearRecursive); this second method is passed the current node. The ClearRecursive method loops through all of the nodes contained within the passed in nodes node collection and sets the back color of each of those nodes to the color white. Each node is then passed recursively back to the same ClearRecursive method where each node’s node collection is processed until there are no more nodes remaining to process. In this way, each node and child node in the entire tree is processed.
While this process is used merely to set each node’s back color to white, the same approach may be used whenever the entire tree must be processed; in fact, the remaining search methods will do just that.
#region Remove BackColor
private void ClearBackColor()
{
TreeNodeCollection nodes = treeView1.Nodes;
foreach (TreeNode n in nodes)
{
ClearRecursive(n);
}
}
private void ClearRecursive(TreeNode treeNode)
{
foreach (TreeNode tn in treeNode.Nodes)
{
tn.BackColor = Color.White;
ClearRecursive(tn);
}
}
#endregion
The next region of code is used to find a node or nodes with text properties matching a search expression. The form contains a group box used to set a text search term and evoke the method from a button click event handler. The button click first clears all highlighted nodes by calling the ClearBackColor method; after the nodes are all restored to white backgrounds, the handler calls the FindByText method; this method works much like the method described for clearing the back color. The method assembles a collection of the tree view nodes and then passes each node to the recursive method. The FindRecursive method looks for nodes with text properties matching the search expression and, when a match is found, sets the back color to yellow. Each processed node is passed back to the FindRecursive method which will continue to examine each node until all of the nodes in the tree have been evaluated.
#region Find By Text
private void btnNodeTextSearch_Click(object sender, EventArgs e)
{
ClearBackColor();
FindByText();
}
private void FindByText()
{
TreeNodeCollection nodes = treeView1.Nodes;
foreach (TreeNode n in nodes)
{
FindRecursive(n);
}
}
private void FindRecursive(TreeNode treeNode)
{
foreach (TreeNode tn in treeNode.Nodes)
{
if (tn.Text == this.txtNodeTextSearch.Text)
tn.BackColor = Color.Yellow;
FindRecursive(tn);
}
}
#endregion
The next region is used to contain the methods used to find nodes by their tag value (which in this case is a string); and to highlight in yellow any matching nodes. These methods work much like the last method with the exception that the matches are determined by their tag values rather than their text values.
#region Find By Tag
private void btnNodeTagSearch_Click(object sender, EventArgs e)
{
ClearBackColor();
FindByTag();
}
private void FindByTag()
{
TreeNodeCollection nodes = treeView1.Nodes;
foreach (TreeNode n in nodes)
{
FindRecursiveTag(n);
}
}
private void FindRecursiveTag(TreeNode treeNode)
{
foreach (TreeNode tn in treeNode.Nodes)
{
if (tn.Tag.ToString() == this.txtTagSearch.Text)
tn.BackColor = Color.Yellow;
FindRecursiveTag(tn);
}
}
#endregion
}
}
That wraps up all of the code necessary to add and remove nodes, and to search for specific nodes based upon their name, text, or tag values.
The Code: Form 2 - New Node Form
The code supplied in the NewNode form is used merely to capture the user supplied values used to populate a newly created node’s name, text, and tag properties. The form is displayed as a dialog and appears in response to the user requesting the addition of a new node from the main form of the application. The imports, namespace declaration, and class declaration are all in the default configuration for a Form class:
using System;
using System.Collections.Generic;
using System.ComponentModel;
using System.Data;
using System.Drawing;
using System.Text;
using System.Windows.Forms;

namespace EasyTreeView
{
    public partial class NewNode : Form
    {
Following the class declaration, three local member variables are defined; each of which is used to store the user supplied name, text, and tag properties:
#region Local Variables

        private string mNewNodeName;
        private string mNewNodeText;
        private string mNewNodeTag;

#endregion
The Form constructor is in the default configuration:
public NewNode()
{
InitializeComponent();
}
The next region of code is used to define three public properties used to hold the new node name, text, and tag values. Once the user has set these values on this form, the main form collects these properties and assigns them to the new node’s name, text, and tag properties.
#region Class Properties

        public string NewNodeName
        {
            get
            {
                return mNewNodeName;
            }
            set
            {
                mNewNodeName = value;
            }
        }

        public string NewNodeText
        {
            get
            {
                return mNewNodeText;
            }
            set
            {
                mNewNodeText = value;
            }
        }

        public string NewNodeTag
        {
            get
            {
                return mNewNodeTag;
            }
            set
            {
                mNewNodeTag = value;
            }
        }

#endregion
This button click event handler is intended to force the user to set all three values; once each is set, the related properties are passed the correct values and the form is closed.
        private void btnSubmit_Click(object sender, EventArgs e)
        {

            if (txtNewNodeName.Text != string.Empty)
            {
                NewNodeName = txtNewNodeName.Text;
            }
            else
            {
                MessageBox.Show("Name the node.");
                return;
            }

            if (txtNewNodeText.Text != string.Empty)
            {
                NewNodeText = txtNewNodeText.Text;
            }
            else
            {
                MessageBox.Show("Provide the new node's text");
                return;
            }

            if (txtTag.Text != string.Empty)
            {
                NewNodeTag = txtTag.Text;
            }
            else
            {
                MessageBox.Show("Provide the new node's text");
                return;
            }

            this.Close();
        }
    }
}
That is all there is to it. Once this code is executed, you may right click on the main node and add as many nodes and child nodes as you see fit. The user may enter in a valid search expression into any of the search options and highlight matching nodes, or the user may select nodes from the tree and read the associated name, text, tag and parent values from the selected node.
Summary
Naturally, there are countless ways to use the TreeView control and this simple demonstration does not begin to explore the variety of options available. The sole intent of the demonstration was to provide a description of how one might add and remove nodes, obtain information from selected nodes, and search for specific nodes on the basis of the node’s name, text, and tag values.
This member has not yet provided a Biography. Assume it's interesting and varied, and probably something to do with programming.


 General
  News
News  Suggestion
  Question
  Bug
Bug  Answer
  Joke
Joke  Praise
  Rant
Rant  Admin
Admin 


