Introduction
Many people want to build cross-platform applications that can be recompiled to run under Windows, Linux or Mac. GTK is a popular graphics library in the Linux world and many developers use the Glade UI builder to design the GUI, which produces GTK code.
In this tutorial we are going to create a simple dialog-based application using the cross-platform GUI builder Glade for Windows. I stole (with apologies) the dialog application used by Dr. Asad Altimeemy in his article A Beginner's Guide to Dialog Based Applications. To use this guide, you must first install the GTK+/Win32 Development Environment.
Creating a New Project
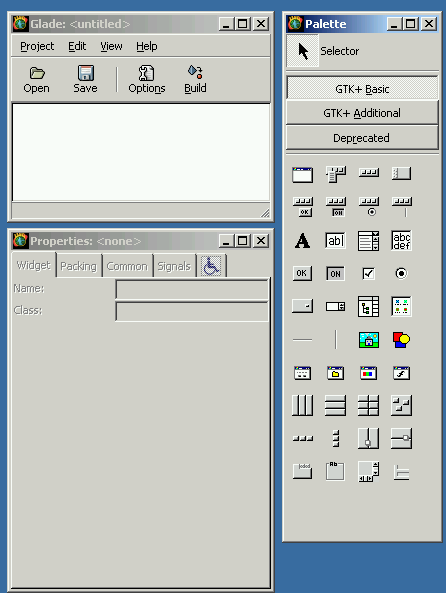
Start Glade. You should see a Project window, a Properties window and a Palette window. If these are not visible, go to the View menu in the Project window and turn them on.
Start designing your dialog box by clicking the “window” control (top left) in the Palette window. You should see a new window like the image below.

Go to the Widget pane in the Properties window. Change the value in the Name field to NameList and the value in the Title field to Name List. Next, select the “fixed position” icon in the Palette window (last control in the 2nd to last row) and then click on your dialog box window.
Save your project by pressing the Save button on the Project window and typing in the directory you want to use. I use C:\Glade\NameList.
Designing the Dialog Box
We will be designing an application that uses the dialog box shown below. We will use the label, text, combo and text view controls on the 3rd row of the Palette window to make the dialog box.
Follow these step-by-step instructions to make the dialog box:
First, add the labels. Press the Label button in the Palette window. Click in your dialog box to place the label, and drag it with the mouse to position it. You can resize with the mouse, but I find it easier to click on the Common pane in the Properties window and type a value into the Width field. Click on the Widget pane in the Properties window and type the label text in Label field. Make three labels with the names Title, First Name and Last Name.
Next, add the combo box cick on the combo box button in the Palette window, and click on your dialog box to place it. Click on the Widget pane in the Properties window, change the name to comboTitle and type in Mr, Mrs, Miss, Ms and Dr in the Items field, as shown below.
Now add the text boxes. Click on the text box button in the Palette window, and click on your dialog box to place it. Resize the length by typing 100 in the Width field of the Common pane in the Properties window. Change the Name field in the Widget pane on the Properties window. Make two text boxes called entryFirstName and entryLastName respectively.
Add the buttons. Use the Button icon (fourth row of the Palette window) to place two buttons on your dialog box. Change the names on the Widget pane of the Palette window. Make two buttons called buttonAdd and ButtonOK respectively. Click on the Add button in your dialog box, select the Signals pane in the Properties window and click on “…” in the signal field. Select “clicked” in the Select Signal window and press OK. The handler function on_buttonAdd_clicked should be shown on the Handler field. Press Add. Repeat the process for the OK button, adding the handler on_buttonOK_clicked for the clicked event.
Change the Your Dialog box to have non-resizable windows. Click on the Dialog box in the Project window. Click on the Resizable field in the Widget pane of the Properties window, and adjust the size by checking the check boxes and adjusting the Height and Width values in the Common pane. You should now have a dialog box that looks like the example. Remember to save your work by pressing the Save button in the Project window.
Generating the Code
Go to the Project window and click on Build to build the application. Browse to the src directory under your project directory. You should see the following files:
main.c – The main function, which calls the constructor for your dialog box and then runs the event processing loop. This file is only generated once, so you can add your own initialization here. The code will not change if you edit your dialog box and regenerate the code.
interface.c – The function that creates the dialog box by calling a series of GTK functions. You should not edit this file; it is regenerated every time you change your dialog box.
support.c – GTK support functions. This file is identical for all projects, but should not be changed.
callbacks.c – Empty functions to be filled out with the actions for each event. This is the only file we will change in this project.
Building and Running
Go to the msvc subdirectory and click on namelist.dsw to open Visual Studio. Glade generates Visual Studio 6.0 project files; Visual Studio automatically converts them for later versions. Build and run the code. You should see the dialog box, which you can close by clicking the “x” icon.
Adding Event Handlers
Write the OK button handler, which closes the dialog box. Open callback.c, go to the empty function on_buttonOK_clicked and add a call to the function gtk_main_quit(). Build and run, checking that the dialog box closes when OK is pressed.
void void on_buttonOK_clicked (GtkButton *button,
                               gpointer   user_data)
{
    gtk_main_quit();
}
Next we add the handler code for the Add button. The logic for the application is to read the text in the text boxes and combo box, concatenate the text and write to the list box. We will add this logic to the on_bottonAdd_clicked function in easy steps. We need pointers to each control before we use them. Glade assigns a text string of the same name as the control to each control. The lookup_widget function returns a pointer to GtkWidget, the base class for all controls.
widgetFirstName = lookup_widget(GTK_WIDGET(button), "entryFirstName");
widgetLastName = lookup_widget(GTK_WIDGET(button), "entryLastName");
widgetTitle = lookup_widget(GTK_WIDGET(button), "comboTitle");
widgetNameList = lookup_widget(GTK_WIDGET(button), "textviewNameList");
To set the tab stops in the list box (Glade calls this a view box), we need to construct a tab array and assign it to the text view control. We also get a pointer to the text buffer used by the text view control so we can write to it.
ptaNameList = pango_tab_array_new_with_positions(2, TRUE,
                                    PANGO_TAB_LEFT, 100, PANGO_TAB_LEFT, 200);
gtk_text_view_set_tabs(GTK_TEXT_VIEW(widgetNameList), ptaNameList);
textNameList = gtk_text_view_get_buffer(GTK_TEXT_VIEW(widgetNameList));
To read the text in a control we call the “get” functions. Each control has a unique get function. The widget pointers are cast to control pointers for each control. These functions return a pointer to the internally stored text; the program does not need to allocate space. GTK uses text in UTF-8 variable length Unicode format. ASCII characters are 8 bits, but foreign language characters could be as large as 64 bits.
textFirstName = gtk_entry_get_text(GTK_ENTRY(widgetFirstName));
textLastName = gtk_entry_get_text(GTK_ENTRY(widgetLastName));
textTitle = gtk_combo_box_get_active_text(GTK_COMBO_BOX(widgetTitle));
We want the text in the combo box and both text boxes to be displayed in the text view control. We insert the text in the text buffer at the cursor, which automatically moves as text is added. The -1 argument asks the function to automatically calculate the string length.
gtk_text_buffer_insert_at_cursor(textNameList, textTitle, -1);
gtk_text_buffer_insert_at_cursor(textNameList, "\t", -1);
gtk_text_buffer_insert_at_cursor(textNameList, textFirstName, -1);
gtk_text_buffer_insert_at_cursor(textNameList, "\t", -1);
gtk_text_buffer_insert_at_cursor(textNameList, textLastName, -1);
gtk_text_buffer_insert_at_cursor(textNameList, "\n", -1);
Now that we have transferred the name, we clear the text in the text boxes and free the memory used to hold the tab positions.
gtk_entry_set_text(GTK_ENTRY(widgetFirstName),"");
gtk_entry_set_text(GTK_ENTRY(widgetLastName),"");
pango_tab_array_free(ptaNameList);
That’s it. Here is the full function:
void on_buttonAdd_clicked   (GtkButton       *button,
                             gpointer         user_data)
{
const gchar     *textFirstName;
const gchar     *textLastName;
const gchar     *textTitle;
GtkTextBuffer   *textNameList;
PangoTabArray   *ptaNameList;
GtkWidget       *widgetFirstName;
GtkWidget       *widgetLastName;
GtkWidget       *widgetTitle;
GtkWidget       *widgetNameList;

    widgetFirstName = lookup_widget(GTK_WIDGET(button), "entryFirstName");
    widgetLastName = lookup_widget(GTK_WIDGET(button), "entryLastName");
    widgetTitle = lookup_widget(GTK_WIDGET(button), "comboTitle");
    widgetNameList = lookup_widget(GTK_WIDGET(button), "textviewNameList");

    ptaNameList = pango_tab_array_new_with_positions(2, TRUE,
                PANGO_TAB_LEFT, 100, PANGO_TAB_LEFT, 200);
    gtk_text_view_set_tabs(GTK_TEXT_VIEW(widgetNameList), ptaNameList);
    textNameList = gtk_text_view_get_buffer(GTK_TEXT_VIEW(widgetNameList));

    textFirstName = gtk_entry_get_text(GTK_ENTRY(widgetFirstName));
    textLastName = gtk_entry_get_text(GTK_ENTRY(widgetLastName));
    textTitle = gtk_combo_box_get_active_text(GTK_COMBO_BOX(widgetTitle));

    gtk_text_buffer_insert_at_cursor(textNameList, textTitle, -1);
    gtk_text_buffer_insert_at_cursor(textNameList, "\t", -1);
    gtk_text_buffer_insert_at_cursor(textNameList, textFirstName, -1);
    gtk_text_buffer_insert_at_cursor(textNameList, "\t", -1);
    gtk_text_buffer_insert_at_cursor(textNameList, textLastName, -1);
    gtk_text_buffer_insert_at_cursor(textNameList, "\n", -1);

    gtk_entry_set_text(GTK_ENTRY(widgetFirstName),"");
    gtk_entry_set_text(GTK_ENTRY(widgetFirstName),"");
    gtk_entry_set_text(GTK_ENTRY(widgetLastName),"");
    pango_tab_array_free(ptaNameList);
    gtk_entry_set_text(GTK_ENTRY(widgetLastName),"");
    pango_tab_array_free(ptaNameList);
}
Conclusion
I hope this has given you some idea of how Glade/GTK can be used to build cross-platform applications. The code shown in the example can also be compiled and run on a Linux machine, and will have a Linux GUI style.
History
- 24 January, 2008 -- Original version posted
This member has not yet provided a Biography. Assume it's interesting and varied, and probably something to do with programming.


 General
  News
News  Suggestion
  Question
  Bug
Bug  Answer
  Joke
Joke  Praise
  Rant
Rant  Admin
Admin 


