Introduction
First of all, please accept my apologies for my poor English. :)
This article discusses creation of a simple templatable treeview in Silverlight. My goal is to explain to the reader how to create a true control (and not a simple UserControl) from scratch by inheriting from Control and ContentControl classes. I want to show the power of INotifyCollectionChanged to manage items in a simple CRUD way to control internal data.
Template?
What is a template? This is a very simple thing according to the Microsoft Silverlight team. A template control is a widget with two parts: a logical part (.NET code) and a visual part (XAML code). For example, all of you know the Button widget; there are a lot of possible skins for a button whether you see it on Linux, Windows, WebSite, etc. But there is only one set of behavior for a button. Each behavior is called State. A button has:
- Pressed State
- Mouse Over State
- Disabled State
- Normal State
How does this state change? The logical part of a control manages this set of states by listening to external events such as mouse events. When, for example, a mouse clicks on our Button, the logical part tries to find in the Visual part a specific storyboard that will give to the Button an aspect of a pressed button and call it.
The relation between the logical part (your C# code) and the visual part (XAML code) is specified by a set of TemplatePartAttribute upon your class. If you open the Button class (Silverlight Framework) in reflector, you can see something like:
[TemplatePart(Name="Normal State", Type=typeof(Storyboard)),
TemplatePart(Name="MouseOver State", Type=typeof(Storyboard)),
TemplatePart(Name="RootElement", Type=typeof(FrameworkElement)),
TemplatePart(Name="Pressed State", Type=typeof(Storyboard)),
TemplatePart(Name="FocusVisualElement", Type=typeof(UIElement)),
TemplatePart(Name="Disabled State", Type=typeof(Storyboard))]
public class Button : ButtonBase
{
protected override void OnApplyTemplate();
}
A templatepart associates a key (a Name here) to a type. This key has to be associated in the logical part to a UIElement or a Storyboard. We can see two important parts here: "Pressed State" that is a Storyboard and RootElement which is a FrameworkElement. When the logical part intercepts a mouse click on the RootElement, it calls the Pressed State storyboard. This storyboard changes the aspect of UI elements specified in the visual parts. If you look at the OnApplyTemplate method in this class, you will see that the code makes a handle towards each of the parts defined here.
 protected override void OnApplyTemplate()
{
    base.OnApplyTemplate();
    object templateChild = base.GetTemplateChild("RootElement");
    this._elementRoot = templateChild as FrameworkElement;
    this._elementFocusVisual = base.GetTemplateChild("FocusVisualElement")as UIElement;
    if (this._elementRoot != null)
    {
        this._stateNormal = this._elementRoot.Resources["Normal State"]as Storyboard;
        this._stateMouseOver =
		this._elementRoot.Resources["MouseOver State"]as Storyboard;
        this._stateMouseOver = obj5 as Storyboard;
        this._statePressed = this._elementRoot.Resources["Pressed State"]as Storyboard;
        this._stateDisabled = this._elementRoot.Resources["Disabled State"]as Storyboard;
     }
    base.UpdateVisualState();
}
This method makes the link between the Visual and Logical part. With those members (like _elementRoot, _stateNormal, ...) the logical can lead the visual part without having to worry about its content. You can create your own Visual Part without any .NET code to change the behavior of your control. You just have to give to your UIElement and Storyboard in the template the same names as those indicated in templates parts.
The template of the Visual Part is defined in your resources. So inside the generic.xaml (the System.Windows.Control uses a generic.xaml) you can specify it inside the app.xaml or your usercontrol resources too, to make your own skin and save the default.
Sorry, this is very theoretical but necessary for the things that follow.
INotifyCollectionChanged
How does a control such as the ListBox control know when to update its UI when its databinded collection is changed?
The Microsoft Silverlight team uses a type named ObservableCollection that inherits from INotifyCollectionChanged. A control can subscribe to its event to know when the collection is changed by:
- adding
- removing
- clearing
- ...
Just take a loot with reflector to the listbox control. We can see that the ItemsSource property calls a method names ItemsSourceChanged when it is changed:
 ItemsSourceProperty = DependencyProperty.Register
   ("ItemsSource", typeof(IEnumerable), typeof(ItemsControl),
new PropertyChangedCallback(ItemsControl.ItemsSourceChanged));
This method subscribes the collection behind ItemsSource to the call of a method named OnCollectionChange. In this method, the control can manage the modification made to its collection and update its visual aspect:
private void OnCollectionChanged(object sender, NotifyCollectionChangedEventArgs e)
{
switch (e.Action)
{
case NotifyCollectionChangedAction.Add:
this.UpdateContainerForItem(e.NewStartingIndex);
return;
case NotifyCollectionChangedAction.Remove:
this.ClearContainerForItemOverride
(elements[e.OldStartingIndex], e.OldItems[0] as UIElement);
return;
case NotifyCollectionChangedAction.Replace:
this.ClearContainerForItemOverride
(elements[e.NewStartingIndex], e.OldItems[0] as UIElement);
elements.RemoveAt(e.NewStartingIndex);
this.UpdateContainerForItem(e.NewStartingIndex);
return;
case NotifyCollectionChangedAction.Reset:
this.ClearVisualChildren(this.GetItems());
break;
default:
return;
}
}
The code of this method is truncated to be "readable".
End of theory, let's start with the practical part.
My DOM
My TreeView control is based upon the two theorical things we just saw.
I have three important classes:
TreeNodeCollection which is used by a Node for its children. This class inherits from control.TreeView that inherits from TreeNodeCollection.TreeNode that inherits from ContentControl.
The treenode expects about 10 parts in its visual part:
[TemplatePart(Name = "Normal Expand State", Type = typeof(Storyboard)),
TemplatePart(Name = "Normal Collapse State", Type = typeof(Storyboard)),
TemplatePart(Name = "Selected Collapse State", Type = typeof(Storyboard)),
TemplatePart(Name = "Selected Expand State", Type = typeof(Storyboard)),
TemplatePart(Name = "NodeIcon Expand State", Type = typeof(Storyboard)),
TemplatePart(Name = "NodeIcon Collapse State", Type = typeof(Storyboard)),
TemplatePart(Name = "MouseOver Collapse State", Type = typeof(Storyboard)),
TemplatePart(Name = "MouseOver Expand State", Type = typeof(Storyboard)),
TemplatePart(Name = "RootElement", Type = typeof(FrameworkElement)),
TemplatePart(Name = "ExpandedNodeIconZone", Type = typeof(FrameworkElement)),
TemplatePart(Name = "ContentZone", Type = typeof(FrameworkElement)),
TemplatePart(Name = "NodesPresenter", Type = typeof(FrameworkElement)),
TemplatePart(Name = "SelectionZone", Type = typeof(FrameworkElement))]
This will give you the opportunity to change your skin and the behavior with freedom.
My treeview is similar to the treeview class of Windows Forms with the same events and same methods.
I will add some others in the coming days.
public interface ITreeView
{
    event Arcane.Silverlight.Controls.TreeViewEventHandler AfterCollapse;
    event Arcane.Silverlight.Controls.TreeViewEventHandler AfterExpand;
    event Arcane.Silverlight.Controls.TreeViewEventHandler AfterSelect;
    event Arcane.Silverlight.Controls.TreeViewCancelEventHandler BeforeCollapse;
    event Arcane.Silverlight.Controls.TreeViewCancelEventHandler BeforeExpand;
    event Arcane.Silverlight.Controls.TreeViewCancelEventHandler BeforeSelect;
    event Arcane.Silverlight.Controls.TreeNodeMouseClickEventHandler NodeMouseClick;
    event Arcane.Silverlight.Controls.TreeNodeMouseClickEventHandler
						NodeMouseDoubleClick;
    event Arcane.Silverlight.Controls.TreeNodeMouseHoverEventHandler NodeMouseHover;
    System.Windows.DataTemplate NodeTemplate { get; set; }
    Arcane.Silverlight.Controls.TreeNode SelectedNode { get; set; }
}
The Sample
The sample shows two skins (the base skin and a WinForm skin) and two ways to insert data :
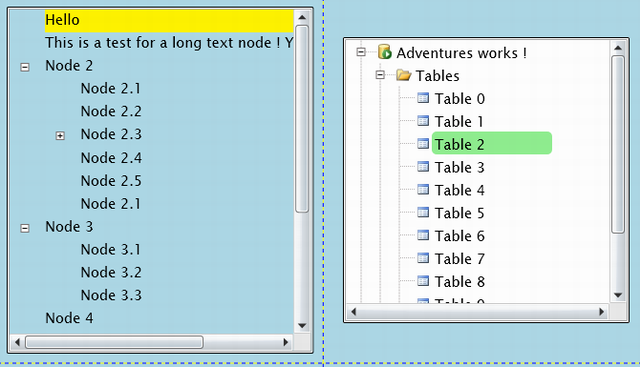
First way, in the XAML:
<src:TreeView Margin="10, 10, 10, 10"  x:Name="myTreeView"  Grid.Column="0" Grid.Row="0">
   <src:TreeNode Background="Transparent">
       <TextBlock Text="Hello"></TextBlock>
   </src:TreeNode>
   <src:TreeNode Background="Transparent">
       <TextBlock Text="This is a test for a long text node !
       Yeah, that's great !"></TextBlock>
   </src:TreeNode>
   <src:TreeNode Background="Transparent">
       <TextBlock Text="Node 2"></TextBlock>
       <src:TreeNode.Nodes>
           <src:TreeNodeCollection>
               <src:TreeNode>
                   <TextBlock Text="Node 2.1"></TextBlock>
               </src:TreeNode>
               <src:TreeNode>
                   <TextBlock Text="Node 2.2"></TextBlock>
               </src:TreeNode>
               <src:TreeNode>
                   <TextBlock Text="Node 2.3"></TextBlock>
                   <src:TreeNode.Nodes>
                       <src:TreeNodeCollection>
                           <src:TreeNode>
                               <TextBlock Text="Node 2.3.1"></TextBlock>
                           </src:TreeNode>
                           <src:TreeNode>
                               <TextBlock Text="Node 2.3.2"></TextBlock>
                           </src:TreeNode>
                           <src:TreeNode>
                               <TextBlock Text="Node 2.3.3"></TextBlock>
                           </src:TreeNode>
                       </src:TreeNodeCollection>
                   </src:TreeNode.Nodes>
               </src:TreeNode>
               <src:TreeNode>
                   <TextBlock Text="Node 2.4"></TextBlock>
               </src:TreeNode>
               <src:TreeNode>
                   <TextBlock Text="Node 2.5"></TextBlock>
               </src:TreeNode>
               <src:TreeNode>
                   <TextBlock Text="Node 2.1"></TextBlock>
               </src:TreeNode>
           </src:TreeNodeCollection>
       </src:TreeNode.Nodes>
   </src:TreeNode>
   <src:TreeNode Background="Transparent">
       <TextBlock Text="Node 3"></TextBlock>
       <src:TreeNode.Nodes>
           <src:TreeNodeCollection>
               <src:TreeNode>
                   <TextBlock Text="Node 3.1"></TextBlock>
               </src:TreeNode>
               <src:TreeNode>
                   <TextBlock Text="Node 3.2"></TextBlock>
               </src:TreeNode>
               <src:TreeNode>
                   <TextBlock Text="Node 3.3"></TextBlock>
               </src:TreeNode>
           </src:TreeNodeCollection>
       </src:TreeNode.Nodes>
   </src:TreeNode>
   <src:TreeNode Background="Transparent">
       <TextBlock Text="Node 4"></TextBlock>
   </src:TreeNode>
   <src:TreeNode Background="Transparent">
       <TextBlock Text="Node 5"></TextBlock>
   </src:TreeNode>
   <src:TreeNode Background="Transparent">
       <TextBlock Text="Node 6"></TextBlock>
   </src:TreeNode>
   <src:TreeNode Background="Transparent">
       <TextBlock Text="Node 7"></TextBlock>
   </src:TreeNode>
   <src:TreeNode Background="Transparent">
       <TextBlock Text="Node 8"></TextBlock>
       <src:TreeNode.Nodes>
           <src:TreeNodeCollection>
               <src:TreeNode>
                   <TextBlock Text="Node 8.1"></TextBlock>
               </src:TreeNode>
               <src:TreeNode>
                   <TextBlock Text="Node 8.2"></TextBlock>
                   <src:TreeNode.Nodes>
                       <src:TreeNodeCollection>
                           <src:TreeNode>
                               <TextBlock Text="Node 8.2.1"></TextBlock>
                           </src:TreeNode>
                           <src:TreeNode>
                               <TextBlock Text="Node 8.2.2"></TextBlock>
                           </src:TreeNode>
                           <src:TreeNode>
                               <TextBlock Text="Node 8.2.3"></TextBlock>
                           </src:TreeNode>
                       </src:TreeNodeCollection>
                   </src:TreeNode.Nodes>
               </src:TreeNode>
               <src:TreeNode>
                   <TextBlock Text="Node 8.3"></TextBlock>
                   <src:TreeNode.Nodes>
                       <src:TreeNodeCollection>
                           <src:TreeNode>
                               <TextBlock Text="Node 8.3.1"></TextBlock>
                           </src:TreeNode>
                           <src:TreeNode>
                               <TextBlock Text="Node 8.3.2"></TextBlock>
                           </src:TreeNode>
                       </src:TreeNodeCollection>
                   </src:TreeNode.Nodes>
               </src:TreeNode>
           </src:TreeNodeCollection>
       </src:TreeNode.Nodes>
   </src:TreeNode>
   <src:TreeNode Background="Transparent">
       <TextBlock Text="Node 9"></TextBlock>
   </src:TreeNode>
</src:TreeView>
and inside the code:
this.treeview.BeforeExpand += new TreeViewCancelEventHandler(treeview_BeforeExpand);
SampleNodeData data = new SampleNodeData();
data.Name = "Adventures works !";
BitmapImage image = new BitmapImage();
image.UriSource = new Uri(HtmlPage.Document.DocumentUri.AbsoluteUri.Replace(
"Arcane.Silverlight.ControlsTestPage.aspx", "database.png"));
data.NodeImage = image;
image = new BitmapImage();
image.UriSource = new Uri(HtmlPage.Document.DocumentUri.AbsoluteUri.Replace(
"Arcane.Silverlight.ControlsTestPage.aspx", "databaseopen.png"));
data.SelectedNodeImage = image;
TreeNode node = this.treeview.Add(data);
node.Nodes = new TreeNodeCollection();
node.Tag = "Database";
with a DataTemplate to show the simple business data.
<src:TreeView x:Name="myTreeViewDataBinded"
             Margin="10, 10, 10, 10" Background="White"
             ItemContainerStyle="{StaticResource WinFormTreeView}"
             Grid.Column="1" Grid.Row="0" Width="300" Height="300">
   <src:TreeView.ItemTemplate>
       <DataTemplate>
           <Grid  Background="Transparent">
               <Grid.ColumnDefinitions>
                   <ColumnDefinition Width="*"/>
               </Grid.ColumnDefinitions>
               <TextBlock Grid.Column="0" Text="{Binding Name}"/>
           </Grid>
       </DataTemplate>
   </src:TreeView.ItemTemplate>
lt;/src:TreeView>
Then to finish, I set two skins in my treeview: the first is inside the generic.Xaml. This is the default skin used for the first treeview (on the left). The second more beautiful one is the custom skin I make inside the app.xaml file. You can create your own very easily.
You can ask me all the questions you want, I am better at reading English than at writing it. :)
History
Changes made on TreeNode.Nodes property: set is now public.
I will update my work as soon as I can. The DOM will not change, but there will be additions.
I spent most of time on Silverlight, Xna (where i am MVP) and ADO.Net Data Services.


 General
  News
News  Suggestion
  Question
  Bug
Bug  Answer
  Joke
Joke  Praise
  Rant
Rant  Admin
Admin 


 ,
, 