Introduction
Recently, our company encountered a project which required the ability for a super-user to configure the data stored for an asset as well as the way in which the asset is displayed in grids and reports and data capture forms. In other words, the Business Object properties, database data, and user interface forms, all had to be definable and customisable by a super-user at the customer’s site. The user interface was required to be created on the fly to cater for the asset attributes and groups set up by each organisation.
Below is an example of a Delivery Vehicle asset type being defined in the system:
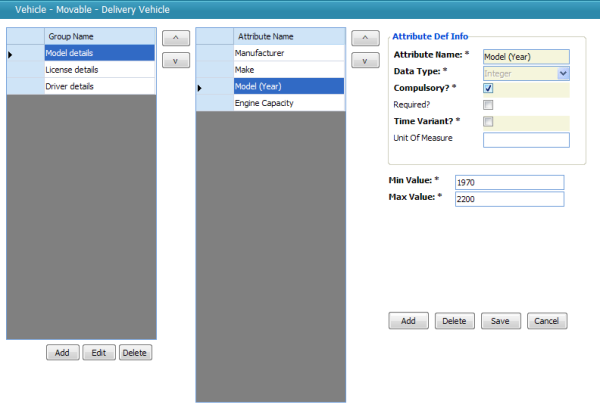
The user is able to create groups of attributes (a group of attributes is merely a set of attributes that would be displayed together on the form), assign attributes to those groups, and alter the order of each group and each attribute within the group. In addition, for each attribute (or property of the Asset), the user is able to define the data type as well as any rules that govern the values of the attributes (in this case, maximum value, minimum value, and whether it's compulsory or not) and also any lookup list values. For instance, the selected asset type Delivery Vehicle has three groups of information, and within the Model details group, we find four attributes. The one selected is Model (Year), and it is a compulsory integer field with a minimum and maximum value set. With this definition of an asset, the system creates a screen that can be used to capture a delivery vehicle’s details:

This form is created on the fly at runtime, complete with indications of which fields are compulsory, with error providers that indicate any contravention of the rules set up for the attribute, with correct control types based on the types of the attributes (such as the combo box provided for the Manufacturer field) and with panels that group together the attributes.
Developing an application where the user defines the user interface for each business object as well as the data stored and the data capture rules for this data, would generally be considered highly complex. The most impressive part from our point of view was that these forms are not generated by hand-crafted code for this specific project – instead, they leveraged the form building that we had been using for years in the Habanero Enterprise Application Framework (or Habanero, for short).
Using the code
Let me move on to the example contained in the code sample. We have, in the past, encountered a very similar idea in the manufacturing sector, where a plant’s machine types needed to be modeled, and where new, upgraded machines and new processes are added on a fairly regular basis, making it impossible to statically create user interfaces for each of them.
Please note that the code sample is not from a production application – it is simply an example put together in a few hours. It is not thoroughly tested, and has some known issues: it was put together to show the core concepts under discussion. It also is using an in-memory data store to simplify distribution, but this can be swapped out for a real database, if required. It uses the Habanero Enterprise Application Framework (which is open source), but all the required DLLs are contained in the zip.
If you open the solution in the example and look at the class diagram in the main project, you should see something like this:
In this example, a Machine Type is defined by a collection of Machine Property Definitions. If I use the example of aluminum rolling machines, these might be properties such as maximum width, max gauge in, max gauge out, and so on. Each Machine that is captured will have a Machine Type, and will receive all the properties defined in the definitions for that Machine Type. If you map this to traditional object oriented principles, you can think of the Machine Type and Machine Property Definitions together as the “Class”, and the Machine and Machine Properties as the instantiated “Object”.
In the sample application, I have written some code to set up some test data when the program starts up – two machine types, along with a few properties of each machine type.
The screen below (which appears under Data | Machine Types) shows the definition of the Machine Type. In it, you can see that the Painter machine type has three configured property definitions, one of which is a compulsory property.
If you then go to Data | Machines and choose to add a Painter machine, a form will pop up that looks like the one shown below. The form contains the properties as defined above, and has full validation, meaning you get the appropriate errors showing if you try to press OK without entering data:
If you add a few more property definitions to the Painter machine type before creating this new Painter machine, the new fields would show up on the form too.
Getting a little more technical
Now, to the technical details: at its heart, Habanero’s UI layer has an object model describing a form structure:
This simplified class diagram indicates how Habanero models a form as a set of fields. Each field has the necessary information to be able to instantiate the correct control as well as the correct mapper to map the assigned business object’s property to the control and vice versa. Habanero’s UI layer is able to take a structure like this and produce a form like we have seen above. The UI layer also has the ability to map that form to a particular business object and each property to a particular control.
Because of this inherent capability, the task of dynamically creating user interfaces becomes the task of modeling the correct data structure to be used in the form creation process. This is easily done by looping through a Machine Type’s Property Definitions and creating a UIFormField for each:
foreach (MachinePropertyDef machinePropertyDef in MachinePropertyDefs) {
    UIFormField uiProperty =
        new UIFormField(null, machinePropertyDef.PropertyName,
                        "TextBox", "System.Windows.Forms", "",
                        "", true, "", new Hashtable(), null);
    form.Add(uiProperty);
}
The various parameters passed into the UIFormField’s constructor simply populate the fields shown in the class diagram above. In the example code, I have used TextBox controls for all fields, since I am only supporting strings and integers for now, but in the real world asset management example above, we have provided all the common controls. The system determines the default control based on the data type. It is simple enough to select the correct control based on the data type of the field as set up by the user.
Once this structure is set up and registered against the corresponding Machine Type, Habanero’s controls (such as the grid, the form builder etc.) simply use it as it is.
This project showed the power and extensibility of using a framework that maintains the form definitions and business object definition as an object, as their structure and behaviour can be modified at run-time based on input data.
Of course, there is still the question of how the controls are mapped onto business object properties, how the business object properties are created based on the definition tables, and how the rules are loaded for each business object. Stay tuned for part 2 tomorrow, where I’ll discuss the sample project code in much more detail and explain the mapping from the UI layer to the BO layer and from there to the database.
Links
History
- 26 Nov 2008: Added the article, corrected some typographical errors.
- 27 Nov 2008: Added the link to Habanero for those who might be interested.
This member has not yet provided a Biography. Assume it's interesting and varied, and probably something to do with programming.


 General
  News
News  Suggestion
  Question
  Bug
Bug  Answer
  Joke
Joke  Praise
  Rant
Rant  Admin
Admin 


