Introduction
In this short article i want to present the fast and easy way customize the view of list of items using the separate resource file.
Background
When we work with the specific framework, some in time, we find that the build in features are not enough. And one of such situation is presenting the list of items. What if do not need to display just list of simple text?
The example in this article is the base line code for feature customization and extension. I try to make it as simple as possible, so i could present only the way to use the resource file for the item layout, as well how to fill it with item data.
How to
As a working environment I use the Eclipse environment with ADT plugin.
To keep the example as simple as possible and focus only on the customizing the list item view, all code base on the clean standard Android Project.
Item layout
First we create new layout file by right click on res/layout folder and choosing New > Android XML File. In the dialog select Resource Type: Layout, Root Element: Linear Layout and enter the File item.xml.
As an example we will display three values of each item on the list:
- position - the index of the element.
- id - customized identifier of the element.
- item - the value of the item.
The source of the item layout looks like this:
="1.0"="utf-8"
<LinearLayout xmlns:android="http://schemas.android.com/apk/res/android"
android:layout_width="fill_parent"
android:layout_height="wrap_content"
android:orientation="vertical" >
<TextView
android:id="@+id/position"
android:layout_width="wrap_content"
android:layout_height="wrap_content"
android:text=":position" />
<TextView
android:id="@+id/id"
android:layout_width="wrap_content"
android:layout_height="wrap_content"
android:text=":id" />
<TextView
android:id="@+id/item"
android:layout_width="wrap_content"
android:layout_height="wrap_content"
android:text=":item" />
</LinearLayout> To preview the layout in the graphical designer I give the initial values to the android:text tag. This way our item will look more or less like this:

We could create the different resource files for this layout depending on the screen size, device orientation and resolution. We inherit all the beauty of the resources system in the android. Righ know we will keep it simple as possible.
Custom list adapter
When we know how the item will looks like now we need to implement the adapter. The purpose of this class will creating the item view based on the collection.
On the main application code package (example: net.origami.android.examples) right click and choose New > Class. Give it the Name CustomAdapter and as the Superclass enter android.widget.BaseAdapter.
First we will create constructor.
public CustomAdapter(Context context, String... items) {
    _inflater = (LayoutInflater)
            context.getSystemService(Context.LAYOUT_INFLATER_SERVICE);
    _items = items;
}
As the parameters we get the context with give us access to the application and system resources and our collection of items. For this example I chose strings but it could be collection of any types that work for you, maybe some custom domain object.
What i will remember in my adapter are:
_inflater - the system service that read the resource and instantiate the View from it. _items - my collection to display.
Next we override the simple methods:
@Override
public int getCount() {
    return _items.length;
}

@Override
public Object getItem(int position) {
    return _items[position];
}

@Override
public long getItemId(int position) {
    return position + 1;
}
<code>getCount - number of item in the collection. getItem - allow to get the item at the specific position. getItemId - allow to get the custom identifier of the item. This could be, but not need, a position. In this example we change the 0 based index to start form 1 to n.
And now the latest overridden method where all the magic is made:
@Override
public View getView(int position, View convertView, ViewGroup parent) {
View view = _inflater.inflate(R.layout.item, null);
TextView positionText = (TextView) convertView
.findViewById(R.id.position);
TextView idText = (TextView) convertView.findViewById(R.id.id);
TextView itemText = (TextView) convertView.findViewById(R.id.item);
positionText.setText("position: " + position);
idText.setText("id: " + getItemId(position));
itemText.setText("item: " + getItem(position));
return view;
}
We implement the method with performing three general steps:
- Create the item view based on resource layout.
We use the remembered in constructor _inflater. - Find all customized elements.
All identifiable texts, images. - Customize the item view based on
position.
Assigning the texts, loading images as well as showing, hiding some elements if needed.
Optimization
The example is not fully workable we do not use of the adapter yet. Anyway the execution optimization in mobile word is the key factor i will make the digression now.
Feature investigation of the getView calls shows that it is executed 3 times for each visible item on the list before it will be displayed for the first time. User maybe will not see much different on the screen but could notice that our app "eat the battery" very fast switching between views.
This happen because of the layout logic in the android. The
measure, layout, and measure are this three passes. This was the reason why the adapter (in real this optimization is implemented in ListView) has build in optimization the contenerView.
The containerView is the parameter that give us possibility to reuse previously inflated item view object to customize it for other item. We do not need care how its happen just know that if the containerView is not null we can reuse it. So after optimization our getView implementation will look like this:
@Override
public View getView(int position, View convertView, ViewGroup parent) {
if (convertView == null) {
convertView = _inflater.inflate(R.layout.item, null);
}
TextView positionText = (TextView) convertView
.findViewById(R.id.position);
TextView idText = (TextView) convertView.findViewById(R.id.id);
TextView itemText = (TextView) convertView.findViewById(R.id.item);
positionText.setText("position: " + position);
idText.setText("id: " + getItemId(position));
itemText.setText("item: " + getItem(position));
return convertView;
}
As you could see only the first step changed dramatically. The view variable was also removed while we use the parameter.
HOW DOES IT WORK? As I mention the ListView has buld in optimization. When the list is filled for the first time the fallowing sequence is performed: measure - the container needs to determine how many elements will be visible in the list. It calls getView on the adapter for the first item view measure its size. For next items its calls getView but pass already created item view as convertView parameter. It continue till it will fill all available space of the ListView. It can do so just because it needs only the size of the items on the list. layout - the container will set visible items in the specific locations. Now its need separate view for each individual item. One it already has so it calls getView for first item with passing cached view. For all other it will require to get the real one so the converterView will be null.measure - in real i do not know why this pass is made beside the fact that the getView for first element gets the null in converterView. All other calls for visible items will get the cached values. The only one reason i figure out is that the additional created view will be the same like the back buffer in the animation.
On the end we got 1 + "number of visible items" of views and this is enough to display the list. Now if we will scroll the items the getView will be called and the view that will disappear will be reused for the item that will just show up. No more inflating of the resources. See the reference material form I/O 2010 session for details. |
There is one more optimization we could make. Searching of the customized elements could be also power consuming. Maybe it is not so spectacular as the converterView parameter but we should do our best to give good quality and optimized software. Look at the code:
static class ViewHolder {
TextView positionText;
TextView idText;
TextView itemText;
}
@Override
public View getView(int position, View convertView, ViewGroup parent) {
ViewHolder holder;
if (convertView == null) {
convertView = _inflater.inflate(R.layout.item, null);
holder = new ViewHolder();
holder.positionText = (TextView) convertView
.findViewById(R.id.position);
holder.idText = (TextView) convertView.findViewById(R.id.id);
holder.itemText = (TextView) convertView.findViewById(R.id.item);
convertView.setTag(holder);
} else {
holder = (ViewHolder) convertView.getTag();
}
holder.positionText.setText("position: " + position);
holder.idText.setText("id: " + getItemId(position));
holder.itemText.setText("item: " + getItem(position));
return convertView;
} The new internal class ViewHolder was created. It is the cache container for result of search elements for customization. We will search them one time for each created item view and store it in the item view itself as the tag. When the convertView is reused we simple retrieve the ViewHolder from tags, no need to search the item view for customized elements again.
Use of adapter
Now its the time to display the list of our items.
First we need to add ListView to the main activity view resource (main.xml):
="1.0"="utf-8"
<LinearLayout xmlns:android="http://schemas.android.com/apk/res/android"
android:orientation="vertical"
android:layout_width="fill_parent"
android:layout_height="fill_parent"
>
<TextView
android:layout_width="fill_parent"
android:layout_height="wrap_content"
android:text="@string/description"
/>
<ListView
android:id="@+id/list"
android:layout_width="fill_parent"
android:layout_height="wrap_content"
/>
</LinearLayout> And assign our adapter with collection to it when the activity is created (MainActivity.java):
@Override
public void onCreate(Bundle savedInstanceState) {
    super.onCreate(savedInstanceState);
    setContentView(R.layout.main);

    ListView list = (ListView) findViewById(R.id.list);
    list.setAdapter(new CustomAdapter(this,
        "Item 1", "Item 2", "Item 3", "Item 4", "Item 5", "Item 6",
        "Item 7", "Item 8", "Item 9", "Item 10", "Item 11", "Item 12",
        "Item 13", "Item 14", "Item 15", "Item 16", "Item 17",
        "Item 18", "Item 19", "Item 20"));
}
This is it!
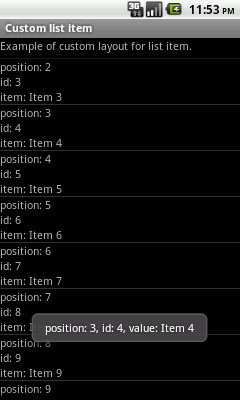
Selection action
One more thing that could be useful is to accessing the selected item on the list. Typical it will show us the details of the item. For this example I will display the simple Toast popup with the same data that are displayed in the item view.
To do so just add the lines bellow just after setting the adapter.
list.setOnItemClickListener(new OnItemClickListener() {
    @Override
    public void onItemClick(AdapterView<?> adapter, View view,
            int position, long id) {
        Toast toast = Toast.makeText(
            getApplicationContext(),
            "position: " + position +
                ", id: " + id +
                ", value: " + adapter.getItemAtPosition(position),
            Toast.LENGTH_LONG);

        toast.show();
    }
});
Feature
This is of course one way to work with ListView other possibilities are:
ListActivity - use this as the base class of your activity and mark the ListView elemnt with id attribute set to @android:id/list. This is useful when we want to display the list on the whole screen. Is such case we do not need to search the ListView in the code, just bind our adapter to the activity using setListAdapter method. ListFragment (since API 11) - the same as ListActivity but in the Fragment way.SimpleCursorAdapter - build in adapter to work with the Cursor object that could be retrived form the Database as well as Content Provider. In the constructor we pass the Cursor as well as the item layout, fields to map and corresponding ids of the item layout elements.
The
ListView and the adapter have lots more features like displaying diffident item types with different customized views. Of course with reusing views. Headers, footers, etc. But this is another story... if you curies see the Google I/O session listed in the references section.
References
History
- 2012-01-21 - initial version of the article.
This member has not yet provided a Biography. Assume it's interesting and varied, and probably something to do with programming.


 General
  News
News  Suggestion
  Question
  Bug
Bug  Answer
  Joke
Joke  Praise
  Rant
Rant  Admin
Admin 


