Introduction
Visual Studio ships with the ResX designer that helps you define resources within projects. Behind the scenes, it creates code for programmatically accessing these resources. It hasn't changes much since the VS 2003 days, does the job and everybody knows how to use it.
There is a shortcoming though. You cannot customize the generated code. As with basically all the other designers, it works, but you might want something different. Writing this article was actually triggered by an excellent article on Code Project Extended Strongly Typed Resource Generator written by Dmytro Kryvko. The need for something different exists as witnessed by the interest and comments raised by the article.
I will show you a different and easier approach on how to customize and enrich the ResX generated code in a matter of minutes. As opposed to the solution above, you will be able to have solution specific customizations running concurrently on the same machine and a much faster customize/test/use cycle when you will apply your own customization. And you won't need to learn how custom tools work for creating your own customizations. The customization is completely transparent for the standard ResX designer and you will still be using it for defining resources.
Brief Explanations
We can split the problem into three scenarios depending on how different the desired generated code is from what ResX designer generates. Each scenario will be discussed in more detail below and will be implemented based on a free Visual Studio tool named Reegenerator.
With this tool you define in the solution a separate project that holds code generators that is not part of the build. You then attach the resource files (.resx) to code generation classes defined in that project. When you use the ResX designer and save a file, the code generation will be invoked automatically in order to create the .Designer.cs that is dependent of the resx file.
Using the Code
Download a zip file from the links above. You will need Visual Studio 2008 and Reegenerator installed. Extract it and load the solution file from the extracted folder into Visual Studio. The solution contains a project named CustomizeDesigners that contains the code generators and a project named Business containing the resx and the resource files. In both the Business and RenderersLibrary projects there are three Scenario folders that host the resx files and the code generators as described below for each scenario. On top of that, there is a ResXFileCodeGeneratorEx folder that emulates what Dmytro's custom tool does.
In order to trigger the code generation, you need to edit and save a resx file or right-click on it and invoke "Run Custom Tool". To debug you simply set a breakpoint in a code generator code in the RenderersLibrary project and start a debug session. The session will invoke a second instance of Visual Studio. Load the same solution in the second instance and trigger the code generation by saving a resx file. The generated code will be saved as project items (generally ".Designer.cs") dependent on the resx file. You will need to click on the plus sign that sits on the left side of the resx project item in order to expand its children.
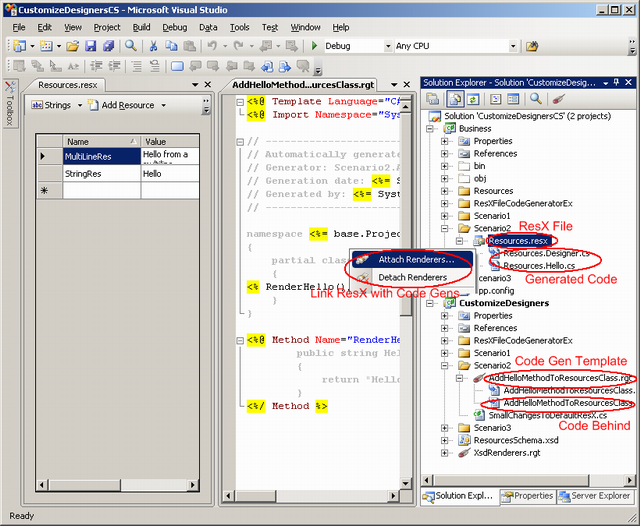
To inspect what a resx project item is attached to, right click on it and click "Attach Rendererers...".
The image below shows how your working environment will look like:
Scenario 1 - Small Changes
In this case we most likely want to simply invoke the ResX default code generator, grab the resulting code as a string, manipulate it the way we want and then send the modified code back to Visual Studio.
The resx file located in the Scenario1 folder in the Business project is linked with the CustomizeDesigners\Scenario1\SmallChangesToDefaultResX class. The code to achieve the desired modification is remarkably simple:
public class SmallChangesToDefaultResX : Generators.CodeRenderer
{
public const string CustomToolName = "ResXFileCodeGenerator";
public override Generators.RenderResults Render()
{
byte[] resultsAsBytes = base.RunOtherCustomTool(CustomToolName);
string results = System.Text.Encoding.Default.GetString(resultsAsBytes);
string modifiedResults = AddSomething(results);
return new Generators.RenderResults(modifiedResults);
}
private string AddSomething(string results)
{
results = results.Replace("internal class", "internal partial class");
results = string.Format(@"// -------------------------------------------
// Automatically generated with Kodeo's Reegenerator
// Generation date: {0}
// Generated by: {1}
// -------------------------------------------------------
{2}",
System.DateTime.Now.ToString("yyyy-MM-dd hh:mm"),
System.Security.Principal.WindowsIdentity.GetCurrent().Name,
results);
return results;
}
As you can see in the code above, we invoke the standard code generator to retrieve the code generated by Microsoft's designer. Once you have it, you can manipulate it by adding code to it, or replace certain portions of it with string manipulation routines or regular expressions. The code above transforms the generated Resources class into a partial class and adds some comments.
To test, edit Business\Scenario1\Resources.resx in the Business project, save it, expand its children and open Business\Scenario1\Resources.Designer.cs. You can see that the file contains extra code added to Microsoft's code.
To debug, set a breakpoint in the Render method, launch a debug session, load the same solution in the second Visual Studio instance and perform the same steps as you do when you test.
Scenario 2 - Significant Additions
In this scenario you are fine with what Microsoft generates, but you want extra code. Examples of extra code could be adding a method to the Resources class generated by Microsoft.
The easiest way to achieve this is to link the resx file to two code generators. The first one invokes Microsoft's code generator and you might want to slightly alter the results as per Scenario 1. The second one generates the extra code.
For properly building a code generator for the resx file you need to able to deserialize it into a serializable class instance. This is achieved by having a schema into the code generators project that creates serializable classes from it. The second code generator deserializes the resx file into such class and then uses it to generate what it is needed.
The resx file schema is stored in the resx files and you can see it if you edit them with the XML editor. That schema is duplicated in the CustomizeDesigners project as ResourcesSchema.xsd. It is linked with the CustomizeDesigners\XsdRenderers.rgt code generator that invokes the same mechanism as xsd.exe to create serializable classes from schemas. Expand the children project items for ResourcesSchema.xsd to see the serializable classes.
Business\Scenario2\Resources.resx is linked to two code generators (right click on it and click "Attach Rendererers..." to inspect and two *.cs file get created/updated when you save it. The Business\Scenario2\Resources.Designer.cs file is generated by CustomizeDesigners\Scenario2\SmallChangesToDefaultResX.cs exactly the same as per Scenario1.
The Business\Scenario2\Resources.Hello.cs file is generated by CustomizeDesigners\Scenario2\AddHelloMethodToResourcesClass.rgt. This is a code generator template file that looks pretty much like an aspx page. There is also a code behind for it, CustomizeDesigners\Scenario2\AddHelloMethodToResourcesClass.rgt.cs that contains manually written code. CustomizeDesigners\Scenario2\AddHelloMethodToResourcesClass.Designer.cs is the code representation of the template. Together with the code behind it forms a class that will be invoked when the resx file gets saved.
The CustomizeDesigners\Scenario2\AddHelloMethodToResourcesClass.rgt code generator template looks like:
<%@ Template Language="C#" ClassName="AddHelloMethodToResourcesClass" %>
<%@ Import Namespace="System" %>

// -------------------------------------------------------
// Automatically generated with Kodeo's Reegenerator
// Generator: Scenario2.AddHelloMethodToResourcesClass
// Generation date: <%= System.DateTime.Now.ToString("yyyy-MM-dd hh:mm") %>
// Generated by: <%= System.Security.Principal.WindowsIdentity.GetCurrent().Name %>
// -------------------------------------------------------

namespace <%= base.ProjectItem.CodeNamespace %>
{
	partial class Resources
	{
<% RenderHello(); %>
	}
}

<%@ Method Name="RenderHello" %>
		public string Hello()
		{
			return "Hello from the <%= this.NumberOfResources %>
						resources defined";
		}
<%/ Method %>
As opposed to aspx you can define render methods that help you break down your code generation work into more manageable units.
The Scenario2\AddHelloMethodToResourcesClass.rgt.cs template code behind looks like:
public partial class AddHelloMethodToResourcesClass
{
root _root;
public override void PreRender()
{
base.PreRender();
this._root = root.FromFileWithNoValidation(base.ProjectItem.FullPath);
}
private int NumberOfResources
{
get
{
int count = 0;
if (this._root.Items != null)
{
foreach (object o in this._root.Items)
{
rootData rd = o as rootData;
if (rd != null)
count++;
}
}
return count;
}
}
The resx file is deserialized into the _root property before the code generation takes place. The root class is the serializable class generated from CustomizeDesigners\ResourcesSchema.xsd.
To test it, edit Business\Scenario2\Resources.resx, save it, expand its children and inspect the content of the two children CS files.
To debug, set a breakpoint in the PreRender method, launch a debug session, load the same solution in the second Visual Studio instance and perform the same steps as you do when you test.
Scenario 3 - Complete Rewrite
This scenario applies when you are completely unhappy with what the designer generates for you or you simply want to use the designer for something else. A good example of this is Dmytro's custom tool.
CustomizeDesigners\Scenario3\ResourcesRenderer.rgt does a good enough job at replicating Microsoft's code generator. Its purpose is to be an example and provide the familiarity and structure to start with for building your heavily customized code generator taking advantage of the already made designer.
Business\Scenario3\Resources.resx is linked with CustomizeDesigners\Scenario3\ResourcesRenderer.rgt and you can do the testing and the debugging the same as per the previous scenarios.
Replicating Dmytro's ResXFileCodeGeneratorEx
This is a real life example of Scenario 3. It emulates Dmytro's custom tool output but with less effort. It is easier to modify and test. You can have different types of resources code generation on the same machine and even within the same solution.
CustomizeDesigners\ResXFileCodeGeneratorEx\ResXFileCodeGeneratorEx.rgt implements the code generation and is basically a modified version of CustomizeDesigners\Scenario3\ResourcesRenderer.rgt.
Business\ResXFileCodeGeneratorEx\Resources.resx is linked with CustomizeDesigners\ResXFileCodeGeneratorEx\ResXFileCodeGeneratorEx.rgt and you can do the testing and the debugging the same as per the previous scenarios.
Final Note
The possibilities are limitless on what you can now do with the ResX designer. Here are some examples:
- You can build your own ResX customizations that magically get created when you use the designer.
- You can use the designer for something completely different and unrelated to resources as long as the designer does a good enough job for what you are trying to achieve.
And last but not least, many thanks to Dmytro.
This member has not yet provided a Biography. Assume it's interesting and varied, and probably something to do with programming.


 General
  News
News  Suggestion
  Question
  Bug
Bug  Answer
  Joke
Joke  Praise
  Rant
Rant  Admin
Admin 


