Introduction
To meet one of my client requirements, I had to write a Windows service which was needed for reading data continuously or with some frequency of time from a device and needed to update the data to a remote database server.
I searched for a simple article which provides a step by step practical approach to create a Windows service and control it from an application and has a way to communicate with the Windows service and a way to interact with the Windows service. Well, I was not so lucky to find such an article. So I decided to write such a practical approach oriented article.
For this article, I am thankful to all the authors and the links I have found and combined into this single article.
Objectives
- Create a simple Windows service
- Add a service installer
- Create a Windows Form Application to control it
- Create a way to get the data from the Windows service
- Update the Remote Database Server
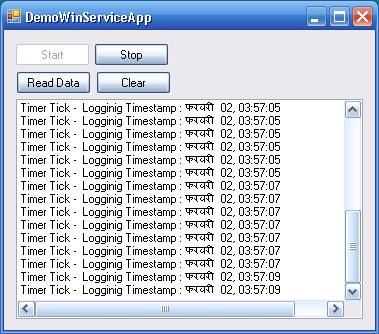
Application Snapshot

Create a Simple Windows Service and Add Installer
Let’s create a new project as a new Windows Service as shown in the template. For my application, I have chosen the name DemoWinService.
After doing so, you will see a screen like this. In this next screen, I am trying to rename Service1.cs to DemoWinService.cs.
While renaming, the wizard will ask you with the following screen to rename every reference of Service1.cs, well you can simply say yes to this screen.
By right clicking on the designer and going to view code, we would be able to go to the code file. When the code file is opened, we can see that there are a few functions already written that are needed for a Windows service such as OnStart, OnStop.
Then I created a string variable which is used to store the name of the log file.
public partial class DemoWinService : ServiceBase
{
    String strFileName = "C:\\DemoWinServ.Log";
    public DemoWinService()
    {
Then I created a function named LogMessage, whose job is to log any message to the log file. The code for the LogMessage looks like this:
private void LogMessage(String strParam)
{
String strTimeStamp = System.DateTime.Now.ToString("MMM dd, HH:mm:ss");
if(!File.Exists(strFileName) != false)
{
using (FileStream fs = File.Create(strFileName))
{
strTimeStamp = "Log File Created at : " + strTimeStamp + "\r\n";
byte[] info = new System.Text.UTF8Encoding(true).GetBytes(strTimeStamp);
fs.Write(info, 0, info.Length);
strTimeStamp = "";
strTimeStamp = strParam + System.DateTime.Now.ToString
("MMM dd, HH:mm:ss") + "\r\n";
fs.Write(info, 0, info.Length);
fs.Close();
}
}
else
{
using (StreamWriter fs = File.AppendText(strFileName))
{
strTimeStamp = strParam + " Logging Timestamp : " +
strTimeStamp + "\r\n";
fs.WriteLine(strTimeStamp);
if (serviceMessageRemotable != null)
serviceMessageRemotable.Message = strTimeStamp;
fs.Flush();
fs.Close();
}
}
}
The above function LogMessage tries to create a file. If the file is not there, it creates a new one, or else, it writes the message to the existing file. In the above function code, you can see that I have put two lines of code in bold. We will implement these lines later, for the time being let it just be commented.
I added the timer as one more member variable to the DemoWinService class.
System.Threading.Timer _timer;
I initialized the timer in the constructor of the class.
public partial class DemoWinService : ServiceBase
{
    String strFileName = "C:\\DemoWinSer.Log";
    System.Threading.Timer _timer;
    public DemoWinService()
    {
        _timer = new System.Threading.Timer(
            new TimerCallback(OnTimerCallBack), null, Timeout.Infinite, Timeout.Infinite);
        InitializeComponent();
    }
I then added the timer’s change in the OnStart function.
protected override void OnStart(String[] args)
{
    LogMessage("Service Started - ");
    _timer.Change(0. 2000);
In the OnStop function, I just put a simple message that the service is stopped.
LogMessage("Service Stopped - ");
I tried to define the OnTimerCallBack event that we have mentioned in the creation of the timer. The code for OnTimerCallBack looks like the following:
public void OnTimerCallBack(object state)
{
    LogMessage("Timer Tick - ");
}
OnTimerCallBack simply passes the message as “Timer Tick – “, which is logged in to the file with the time stamp.
Then go to the design view. By right clicking on it, you will get the following Menu. In this Menu, choose Add Installer.
Then you would be able to see the next screen like this:
I have renamed serviceProcessInstaller1 to serviceProcessInstaller_DemoWinService and then I have renamed serviceInstaller1 to serviceInstaller_DemoWinService.
Then select serviceProcessInstaller_DemoWinService, and go to properties by right clicking on it. And from the Account Option, choose LocalService.
By right clicking on serviceInstaller_DemoWinService, go to properties. Here I changed the ServiceName property to DemoWinService and the DisplayName to DemoWinService.
Then build the service.
Open the console window. And type installutil and the path to your executable of your Windows service project.
By entering this command, you would be able to install the service to your system.
Right click on My Computer and go to manage. From there, you will see the management window. There, please go to services and applications and choose services.
If you do so, you will be able to see DemoWinService entry in the services of Windows.
Right click on our service, and select start. If the service is not able to start, then try right clicking on the service, go to properties, and then the second tab window as LogOn, and from there, select their LocalSystemAccount. And once again, try to start the service.
If the service is started, then you will see the following screen:
If you wanted your service to be started automatically, then go again to our project. In the project, right click on serviceInstaller_DemoWinService. And from there, choose Start Type to be automatic. And build the project. To install it once again, you need to first uninstall the Windows service. To do so, stop the service if it is already running by right clicking in the DemoWinService of the Services window of Computer Management. Then in the console window, type the command installutil with the /u option and the path to the binary of your Windows service project. And install it again.
Now if you will stop the service and open the log file, you would be able to see that the timer has successfully logged the timestamps.
As we have created the WindowsService successfully, we will now create the WindowsApplication that will control the service, and we will stop and start the service from the application.
Controlling the Windows Service from the Application
Now add another new project to our solution by right clicking on the solution file.
After creating the project, I have changed the form name from Form1 to formDemoWinServiceApp and renamed Form1.cs to DemoWinServiceApp.cs in the Solution Explorer.
Then go to tool box and from the All Windows Forms, add a NotifyIcon control to your form. I have renamed notifyIcon1 to notifyIcon_DemoWinService. And in the text property, I have added the text as Demo Windows Service. Then go to the event icon and add the DoubleClick event to the application.
Add the following code in the event handler function:
this.Show();
WindowState = FormWindowState.Normal;
Right click on the form again and go to the event section, and the Resize event. Add the following code in the event handler function:
if (FormWindowState.Minimized == WindowState)
    this.Hide();
Go to the tool box, drag context menu strip to the form. Add two menu contents as Exit and Show Application.
I have changed the name of the control from contextMenuStrip to contextMenuStrip_DemoWinService.
Now add the event handlers for the menu exit and the Show Application. Add the Click event to the notifyIcon_DemoWinService_Click. Add the code as follows:
private void exitToolStripMenuItem_Click(object sender, EventArgs e)
{
    this.Close();
}
private void showApplicationToolStripMenuItem_Click(object sender, EventArgs e)
{
    this.Show();
    this.WindowState = FormWindowState.Normal;
}

private void notifyIcon_DemoWinService_Click(object sender, EventArgs e)
{
    this.Show();
    this.WindowState = FormWindowState.Normal;
}
This code simply controls the Application behavior in the system tray.
Then from the tool box, add another control that is serviceController from the components panel. I have renamed it from serviceController1 to serviceController_DemoWinService.
And in the ServiceName property of this serviceController_DemoWinService, add DemoWinService as it is the name of our service.
Then add two buttons to the form as Start and Stop and one more function to the code named as SetDisplay(ServiceController sc).
private void SetDisplay(ServiceController sc)
{
    sc.Refresh();
    if(sc.Status == ServiceControllerStatus.Stopped)
    {
        btnStop.Enabled = false;
    }
    else if(sc.Status == ServiceControllerStatus.Running)
    {
        btnStart.Enabled = false;
    }
}
Correspondingly in the start and stop, the code follows as:
private void btnStart_Click(object sender, EventArgs e)
{
    Cursor cursor = Cursor.Current;
    Cursor.Current = Cursors.WaitCursor;

    serviceController_DemoWinService.Start();
    btnStart.Enabled=false;
    btnStop.Enabled=true;

    Cursor.Current = Cursors.Default;
}

private void btnStop_Click(object sender, EventArgs e)
{
    Cursor cursor = Cursor.Current;
    Cursor.Current = Cursors.WaitCursor;

    serviceController_DemoWinService.Stop();
    btnStart.Enabled =true;
    btnStop.Enabled=false;

    Cursor.Current = Cursors.Default;
}
The above code is used to control the Windows service. By using the service controller, we are starting and stopping the window service.
Now as we can control the service from the Windows application, we will implement the remoting to get data from the Windows services.
To add remoting to the Windows Service, add the following namespaces:
using System.Runtime.Remoting;
using System.Runtime.Remoting.Channels;
using System.Runtime.Remoting.Channels.Http;
using System.Runtime.Remoting.Channels.Tcp;
We have added two more classes to our application as with the [Serializable] attribute.
[Serializable]
public class ServiceMessage
{
    String strMessage;
    public ServiceMessage()
    {
    }
    public ServiceMessage(string str)
    {
        strMessage = str;
    }
    public string Message
    {
        get
        {
            return strMessage;
        }
        set
        {
            strMessage = value;
        }
    }
}
public class ServiceMessageRemotable:MarshalByRefObject
{
    public ServiceMessage serviceMessage =
        new ServiceMessage();
    public ServiceMessageRemotable(string strMessage)
    {
        serviceMessage.Message = strMessage;
    }
    public override Object InitializeLifetimeService()
    {
        return null;
    }
    public string Message
    {
        set
        {
            serviceMessage.Message = value;
        }
    }
}
Marshaling is a technique that enables objects to be accessed beyond process and application boundaries which supports remoting.
To enable marshalling in our application, we have derived a class that is ServiceMessageRemotable from the MarshalByRefByObject. Another class that is to maintain our messages is ServiceMessage.
Now one more variable is added to our WindowService class, that is:
private ServiceMessageRemotable serviceMessageRemotable;
Within the constructor, this variable is initialized:
serviceMessageRemotable = new ServiceMessageRemotable("Hello Remoting ...");
To enable remoting, first we need to first register the channel and then we need to enable the marshaling for the object. To do so, we have written the following lines of code in the OnStart method of the service.
ChannelServices.RegisterChannel(new TcpChannel(8001), false);
RemotingConfiguration.RegisterWellKnownServiceType
(
 typeof(ServiceMessageRemotable),"ServiceMessage", WellKnownObjectMode.Singleton);
try
{
    RemotingServices.Marshal(serviceMessageRemotable, "ServiceMessage");
    LogMessage("Service Message Marshalled.-");
}
catch (System.Exception ex)
{
    LogMessage(ex.Message);
}
We have made the service to communicate 8001 port from the TCP Channel. And we have marshaled the object serviceMessageRemotable. Add the Reference that is System.Runtime.Remoting.
We are also modifying the LogMessage, so whatever information the WindowsService is logging in it will also make those messages available via remoting. To do so, we have modified the log message as below:
using (StreamWriter fs = File.AppendText(strFileName))
{
    strTimeStamp = strParam + " Logginig Timestamp : " + strTimeStamp + "\r\n";
    fs.WriteLine(strTimeStamp);
    if(serviceMessageRemotable != null)
        serviceMessageRemotable.Message = strTimeStamp;
    fs.Flush();
    fs.Close();
}
The bold and underline lines are the lines that I previously told you to make commented, now you can uncomment them.
To our application project that is the Windows form project, add a reference of the Windows service binary. By doing so, we can see a reference of the service in our Solution Explorer.
A function is also implemented to connect to the Windows service. The code for the function is as below:
public void ConnectToWinService()
{
    Cursor cursor = Cursor.Current;
    Cursor.Current = Cursors.WaitCursor;
    try
    {
        remotableMessage =
            (ServiceMessageRemotable)Activator.GetObject(
            typeof(ServiceMessageRemotable), "tcp://localhost:8001/ServiceMessage");
        MessageBox.Show(remotableMessage.serviceMessage.Message);
    }
    catch(Exception ex)
    {
        MessageBox.Show(ex.Message.ToString());
    }
    Cursor.Current = Cursors.Default;
}
This function basically tries to connect to the Windows service with the specified ipaddress and the port number. For my demo, I have used localshot:8001. The following variable is also added to hold the remotable message:
ServiceMessageRemotable remotableMessage = null;
The start button’s handler function code is also modified, like this:
if(remotableMessage == null)
{
    ConnectToWinService();
}
If the remotableMessage variable is null, then call ConnectToWinService() to initialize the variable. The same code is also implemented in the Form_Load handler as well. So when the Controller application loads in, it checks whether the remotable object is available or not.
Now we are going to add four more controls to the Application. One is ReadData – Button, Clear – Button and a ListBox which will show the data collected from the remotable message, and it will show when ReadData button is clicked. And the clear button will clear the ListBox data’s value. Finally we will use the timer to read with the specified time interval.
The following code is maintained in the ReadData’s Click Handler function. This code simply enables the timer.
private void btnReadValue_Click(object sender, EventArgs e)
{
    if(remotableMessage != null)
    {
        timerReadData.Enabled = true;
    }
}
When we want the ListBox’s data to be cleared by clicking on the clear button, the following code is written.
private void btnClearReadData_Click(object sender, EventArgs e)
{
    for (int nIndex = (lstBoxReadData.Items.Count -1); nIndex >= 0; nIndex--)
    {
        lstBoxReadData.Items.RemoveAt(nIndex);
    }
}
One more function is also written to maintain the code for the auto scrolling of the listbox when the data grows:
private void Log(string data)
{
    lstBoxReadData.Items.Add(data);
    int itemsPerPage = (int)(lstBoxReadData.Height /
        lstBoxReadData.ItemHeight);

    lstBoxReadData.TopIndex = lstBoxReadData.Items.Count - itemsPerPage + 2;
}
Within the timer’s tick event, the following code tries to get the message out of the remotable object:
private void timerReadData_Tick(object sender, EventArgs e)
{
    SetDisplay(serviceController_RFIDHostApp);
    try
    {
        if(remotableMessage != null &&
        remotableMessage.serviceMessage != null
            && remotableMessage.serviceMessage.Message != "")
            Log(remotableMessage.serviceMessage.Message.ToString());
    }
    catch(Exception ex)
    {
        MessageBox.Show(ex.Message.ToString());
        timerReadData.Enabled = false;
    }
}
Updating the Remote Database Server
To update to a remote database, I have used a simple dataset and an InsertData function to update the data to the database. Where the database table has got only two fields one is integer and the other one is DateTime. To update the database, I have put the database call within the LogMessage function. The changed LogMessage code is shown below:
private void LogMessage(String strParam)
{
String strTimeStamp = System.DateTime.Now.ToString("MMM dd, HH:mm:ss");
if(!File.Exists(strFileName) != false)
{
using (FileStream fs = File.Create(strFileName))
{
strTimeStamp = "Log File Created at : " + strTimeStamp +
"\r\n";
byte[] info =
new System.Text.UTF8Encoding(true).GetBytes(
strTimeStamp);
fs.Write(info, 0, info.Length);
strTimeStamp = "";
strTimeStamp = strParam +
System.DateTime.Now.ToString("MMM dd, HH:mm:ss") + "\r\n";
fs.Write(info, 0, info.Length);
fs.Close();
}
}
else
{
using (StreamWriter fs = File.AppendText(strFileName))
{
strTimeStamp = strParam + " Logginig Timestamp : " + strTimeStamp + "\r\n";
fs.WriteLine(strTimeStamp);
if(serviceMessageRemotable != null)
serviceMessageRemotable.Message = strTimeStamp;
fs.Flush();
fs.Close();
UserTimeTableAdapter uta = new UserTimeTableAdapter();
uta.InsertData(++i, System.DateTime.Now);
}
}
}
Conclusion
This kind of Windows service implementation can be in a variety of places, like where you have a MFR (Microsoft Fingerprint Reader), or a RFID device which reads the data continuously from the device and stores it within the local database. In this case, you might need a WindowService that will transfer the data to the centralized database.
I think this tutorial will help you in your learning and will be a step to familiarise yourself with Windows services development.
History
- 2nd February, 2009: Initial version


 General
  News
News  Suggestion
  Question
  Bug
Bug  Answer
  Joke
Joke  Praise
  Rant
Rant  Admin
Admin 


 .
.