Introduction
Android applications can make use of imported XML data from remote locations over the Web, or from the local file system. The Java language provides a range of utilities for processing XML data, including the SAX and DOM parsers. In this tutorial, we will use the SAX parser which is more efficient. We will process XML from a file stored at an Internet location, using the retrieved data to build user interface elements for an Android app. You should be able to adapt the code to suit the needs of your own Android projects.
Prepare the XML Data
If you already have XML data you are working with, you can use it for this tutorial with a few amendments to the Java code. If you want to create a data source for your project, use Liquid XML Studio to generate your XML code. You can automate building the XML from an XSD (XML Schema Definition) if you have one, or can create it from a table or tree. Alternatively, use the code editor to build your XML elements and attributes manually. Once you have your XML data, make sure you also use the software to validate it and address any errors before attempting to parse the file within your Android app.
This tutorial will show you how to load the XML file from a Web location, but you can alternatively load it from the local file system. If you want to use data loaded over the Internet, upload your XML file to a Web server and take a note of the location it is stored at.
The Java code in this tutorial expects XML data with this structure:
="1.0"="utf-8"
<appdata>
<brand name="Lovely Products">
<product>Hat</product>
<product>Gloves</product>
</brand>
<brand name="Great Things">
<product>Table</product>
<product>Chair</product>
<product>Bed</product>
</brand>
</appdata>
You can adapt the Java code to suit your own XML, using this as a reference to understand the steps.
Create or Open an Android Project
If you already have a project you are working with, open it. Otherwise, create a new project. If you plan on using XML data loaded over the Internet, add the following line to your project manifest file:
<uses-permission android:name="android.permission.INTERNET" />
Create a Parsing Class
Create a new class in your project. The class will parse the imported XML data. Use the following outline, adjusting it to suit the class name you chose:
public class DataHandler extends DefaultHandler {
}
The class extends DefaultHandler, which provides the SAX parsing tools. Above this class declaration line, add the following import statements:
import java.io.BufferedReader;
import java.io.IOException;
import java.io.InputStreamReader;
import java.net.URL;
import java.net.URLConnection;
import java.util.ArrayList;
import javax.xml.parsers.SAXParser;
import javax.xml.parsers.SAXParserFactory;
import org.xml.sax.Attributes;
import org.xml.sax.InputSource;
import org.xml.sax.SAXException;
import org.xml.sax.XMLReader;
import org.xml.sax.helpers.DefaultHandler;
import android.content.Context;
import android.graphics.Color;
import android.util.Log;
import android.widget.TextView;
Create the Class Instance Variables and Constructor Method
Add the following code inside your class declaration:
private ArrayList<TextView> theViews;
private String currBrand = "";
private boolean isProduct = false;
private Context theContext;
public DataHandler(Context cont) {
super();
theViews = new ArrayList<TextView>();
theContext = cont;
}
The constructor method simply calls the method of the superclass, instantiates the list to hold the products as read in from the XML data source and instantiates the context object passed so that we can create user interface elements.
Add the Standard SAX Methods
Inside your DefaultHandler class, the standard SAX methods will parse the XML data. These methods are automatically called when the program encounters the start and end of the document, the start and end tags for elements, and the element content. Add the following method outlines after your constructor method:
public void startDocument () { Log.i("DataHandler", "Start of XML document"); }
public void endDocument () { Log.i("DataHandler", "End of XML document"); }
public void startElement (String uri, String name, String qName, Attributes atts)
{
}
public void endElement (String uri, String name, String qName)
{
}
public void characters (char ch[], int start, int length)
{
}
When the program encounters the start or end of the document, we do not need it to do anything, so simply output a status update to the Android log for testing. We will complete the other three methods next.
Process the Start of Each Element
The startElement method can access the name of the element from its opening tag, plus any attributes it has. We are going to create a string for each brand element in the data, with the brand name listed along with each product item for that brand. Add the following code inside your startElement method:
if(qName.equals("brand"))
{
isProduct = false;
TextView brandView = new TextView(theContext);
brandView.setTextColor(Color.rgb(73, 136, 83));
String viewText = "Items from " + atts.getValue("name") + ":";
brandView.setText(viewText);
theViews.add(brandView);
}
else if(qName.equals("product"))
isProduct = true;
When the program encounters a brand element, we create a new View item for the data we want to display for that brand, with the name and some informative text. When you process XML data with SAX, the program moves through the data in a linear fashion, so flags can help to detect what point of the document your app is at when each method executes.
Process the End of Each Element
Add the following inside your endElement method:
if(qName.equals("brand"))
{
TextView productView = new TextView(theContext);
productView.setTextColor(Color.rgb(192, 199, 95));
productView.setText(currBrand);
theViews.add(productView);
currBrand = "";
}
When the endElement method encounters the closing tag for a brand element, we add the string we have been building to a new View, then add this to the list and reset the string back to empty in preparation for the next brand element.
Process the Content of Each Element
The characters method handles XML element content. This method has to take account of the various types of whitespace that may appear in the XML data. In this application, we simply ignore whitespace. Add the following inside your characters method:
String currText = "";
for (int i=start; i<start+length; i++)
{
switch (ch[i]) {
case '\\':
break;
case '"':
break;
case '\n':
break;
case '\r':
break;
case '\t':
break;
default:
currText += ch[i];
break;
}
}
if(isProduct && currText.length()>0)
currBrand += currText+"\n";
The method receives a character array with the element content in it, so the code works through this array in a loop structure. We add each character to a string, resulting in the full element content, which we add to the current item text.
Provide the Data to the Application Context
Your app needs access to the parsed data, for example to display it within the user interface, so after the characters method, add a public method that other classes can call:
public ArrayList<TextView> getData()
{
try
{
System.setProperty("org.xml.sax.driver","org.xmlpull.v1.sax2.Driver");
SAXParserFactory parseFactory = SAXParserFactory.newInstance();
SAXParser xmlParser = parseFactory.newSAXParser();
XMLReader xmlIn = xmlParser.getXMLReader();
xmlIn.setContentHandler(this);
URL xmlURL = new URL("http://mydomain.com/mydata.xml");
URLConnection xmlConn = xmlURL.openConnection();
InputStreamReader xmlStream = new InputStreamReader(xmlConn.getInputStream());
BufferedReader xmlBuff = new BufferedReader(xmlStream);
xmlIn.parse(new InputSource(xmlBuff));
}
catch(SAXException se) { Log.e("AndroidTestsActivity",
"SAX Error " + se.getMessage()); }
catch(IOException ie) { Log.e("AndroidTestsActivity",
"Input Error " + ie.getMessage()); }
catch(Exception oe) { Log.e("AndroidTestsActivity",
"Unspecified Error " + oe.getMessage()); }
return theViews;
}
This code must be contained within a try block, with catch blocks for each of the possible exception types. The code creates object instances of the required SAX classes, opens a connection to the XML file over the Internet and finally instructs the app to parse the data. Make sure you alter the URL code to match the name and location of your own XML file. When the parsing is complete, this method returns the list of product data to another class in the application.
Call the Parsing Function and Display the Data
To call on the DefaultHandler class from your main app Activity class, add this code inside the onCreate method:
public void onCreate(Bundle savedInstanceState) {
super.onCreate(savedInstanceState);
LayoutInflater inflater = getLayoutInflater();
LinearLayout mainLayout = (LinearLayout) inflater.inflate(R.layout.main,null);
try
{
DataHandler handler = new DataHandler(getApplicationContext());
ArrayList<TextView> newViews = handler.getData();
Object[] products = newViews.toArray();
for(int i=0; i<products.length; i++)
{
mainLayout.addView((TextView)products[i]);
}
}
catch(Exception pce) { Log.e("AndroidTestsActivity", "PCE "+pce.getMessage()); }
setContentView(mainLayout);
}
This code uses the data from the XML to display a series of TextView items within the application user interface. First, we gain a reference to the main layout, then create a new instance of the DefaultHandler class, passing the application Context - make sure you alter the code to reflect the name of your own class instead of "DataHandler". Then we call the getData method on the DefaultHandler object we created, to fetch and parse the data, retrieving it as a list of TextView items. After converting the list to an array, we add each TextView item to the layout. The try block takes care of any parsing exceptions. Finally, the Activity sets its main layout.
Add the following import statements for this code:
import java.util.ArrayList;
import android.app.Activity;
import android.os.Bundle;
import android.util.Log;
import android.view.LayoutInflater;
import android.widget.LinearLayout;
import android.widget.TextView;
This is the resulting display running on an Android emulator:
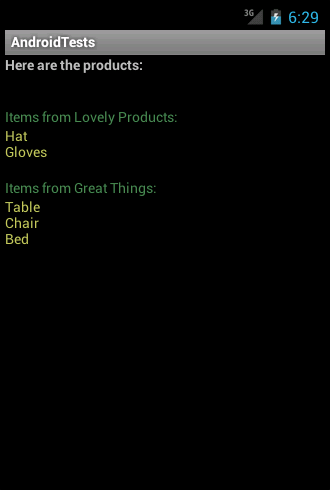
This application simply displays the parsed data items within a basic interface. For your own projects, you can use more sophisticated display methods, such as making the items interactive. Whatever your purpose in parsing the data, you should be able to use this code with a few tweaks and additions to suit your needs.
History
- 23rd February, 2012: Initial version
This member has not yet provided a Biography. Assume it's interesting and varied, and probably something to do with programming.


 General
  News
News  Suggestion
  Question
  Bug
Bug  Answer
  Joke
Joke  Praise
  Rant
Rant  Admin
Admin 


