I'm currently neck deep in refactoring an application for my company and one of the issues that I've just finished tidying up was that of providing a custom Window Style. The original application developer (in his infinite wisdom) had the same markup in every single file to produce the same look-and-feel and then used a complicated WindowHelper class to load the user control into an actual Window.
If you didn't know already, we can simplify this whole process greatly by applying a Style to the Window and implementing whatever appearance you want in the ControlTemplate. In the rest of this article, I'll show you how to implement a custom Style by implementing a custom message box.
Elements of a Custom Window Style
1. Remove the Borders
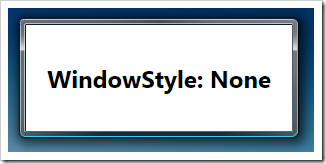
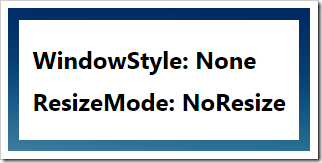
The first thing we need to do is to remove the standard window chrome, borders, etc. At first glance, you might think that setting the window's WindowStyle to WindowStyle.None would do the trick, but as you can see from the following images, this still leaves us with a border. In order to remove all borders completely, you need to set the window's ResizeMode to ResizeMode.NoResize.
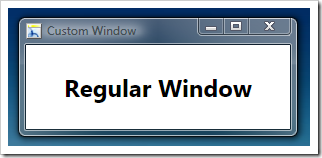
Figure 1. Regular Window.
The following example XAML code shows how to define these properties in the XAML for your Window:
<Window
    ...
    ResizeMode="NoResize"
    WindowStyle="None">
Another use for this approach is to implement a custom splash screen.
2. Define a New Style
It's all very well putting the WindowStyle and ResizeMode in each Window, but if we want to apply our new look-and-feel to multiple windows, then we need to put it into a Style.
The following example XAML code shows how to define the WindowStyle and ResizeMode values in a custom Window style.
<Style x:Key="MessageBox" TargetType="{x:Type Window}">
    <Setter Property="ResizeMode" Value="NoResize" />
    <Setter Property="WindowStyle" Value="None" />
</Style>
The following example XAML code shows how to apply this style to our custom window:
<Window
    xmlns="http://schemas.microsoft.com/winfx/2006/xaml/presentation"
    xmlns:x="http://schemas.microsoft.com/winfx/2006/xaml"
    x:Class="CustomWindow.CustomMessageBox"
    Style="{DynamicResource MessageBox}"
    ...>
3. Custom Look-and-Feel
The next thing we need to do is to make our custom window look the way we want it to. To do this, we provide a ControlTemplate in our Window Style as you can see in the following picture:
You use regular WPF layout controls and elements to provide the look-and-feel that you require, but it's worth mentioning three things.
- You need to include a ContentPresenter element in your ControlTemplate so that the XAML that you supply in the Window definition gets displayed. You should bind the Content property of the ContentPresenter to
{TemplateBinding Content} as shown in the following example XAML code. - You should wrap your ContentPresenter element in an AdornerDecorator element. This isn't strictly necessary unless you want to support drag-and-drop, but it won't hurt to include it just in case.
- If you want to display the window title somehow (which is still likely even though you're using a custom look-and-feel), you can use a template binding to access the regular Window.Title property.
<Style x:Key="MessageBox" TargetType="{x:Type Window}">
    ...
    <Setter Property="Template">
        <Setter.Value>
            <ControlTemplate TargetType="{x:Type Window}">
                ...
                <Label Content="{TemplateBinding Title}" />
                ...
                <AdornerDecorator>
                        <ContentPresenter
                            Content="{TemplateBinding Content}"
                            Margin="{TemplateBinding Margin}" />
                </AdornerDecorator>
            </ControlTemplate>
        </Setter.Value>
    </Setter>
</Style>
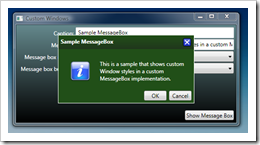
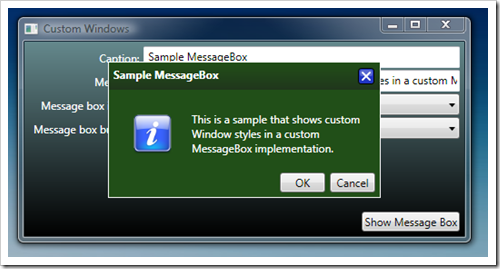
Creating a Custom Message Box
Now that we've got all of the elements of a custom Window Style, moving to a custom message box is just a matter of implementation. The attached sample code includes an almost complete implementation of a Message Box including setting the message box buttons, image, caption, text, and default result. I won't bore you with the details, just download it and take a look, but there are a couple of points worth noting.
Setting the WindowStartupLocation
The WindowStartupLocation property isn't a dependency property, so we can't set it in the Style and apply it to all of our custom windows. The custom message box class simply sets it in the window XAML, but you should be aware of this for your own custom windows.
Binding to Enumerations
I've blogged about binding to enumerations before, but I came across an interesting problem when producing the sample application.
I wanted to bind a ComboBox to the MessageBoxImage enumeration, but this enumeration has several names that resolve to the same value (Asterisk and Information, Error, Hand and Stop, and Exclamation and Warning), so a call to Enum.GetValues results in a list of the enumerated values being recalled. When the binding engine binds the resulting list of values in the ComboBox, it uses the ToString method to display the name of the enumeration. However, because several of the names resolve to the same name, I was getting the first name repeated multiple times.
This makes sense, because there is no way for the binding engine to resolve the same number to different string names.
The solution was to use the GetNames method instead, which results in a list of strings being returned to the ComboBox. As a result, you need to set the SelectedValue using the appropriate string value instead of an actual enumeration in the SelectedItem to set the initial selection, and you'll need to use the System.Enum.Parse method if you want to get an enumeration from the SelectedItem.
I hope you find some or all of this useful. Feel free to use the attached code to whatever end you like, commercial or otherwise.
This member has not yet provided a Biography. Assume it's interesting and varied, and probably something to do with programming.


 General
  News
News  Suggestion
  Question
  Bug
Bug  Answer
  Joke
Joke  Praise
  Rant
Rant  Admin
Admin 


