Introduction
I'm currently writing a simple HTML editor. I needed a control that I could put
in the toolbar that allows the user to quickly insert a new table. Since this
control is intended to appear in the toolbar we wanted the input to be quick.
In other words, no popup dialog. Just specify the row and column size of the
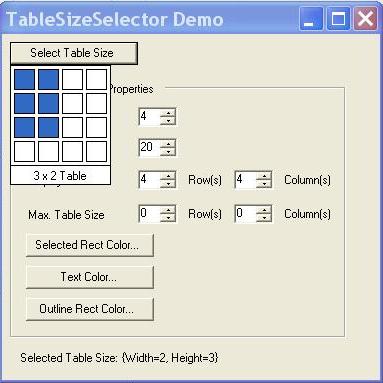
table and voila, a new table appears in the HTML source. Because this article
addresses the control and the issues I encountered while writing it, I've
included a simple test harness to demonstrate how the control works.
Of course, Microsoft does this in MS Word©. Since this is such a nice control
I decided to mimic it as closely as possible. I believe that I've successfully
identified the mouse and keyboard functionality for this control. If you happen to
find additional functionality that I failed to cover please let me know.
This control also deals with the issue of positioning across multiple screens.
In my research for this control, I noticed that this issue is either not dealt
with properly or just plain ignored. Other issues I'll touch include, controlling
flickering effects when painting your form, double buffering and setting the
initial size of your form.
Using the code
How do I get this code into my project?
Option #1
Of course the simplest way is to copy the code into your project. The
functionality is captured in two source files TableSizeSelector.cs
and TableSizeSelectorDropDown.cs. Now build your project. The obvious
downside to this is that, you'll have to keep the files up to date in your project.
By doing this you won't have to reference an additional DLL (mine) in your
project. Assuming this all worked out as planned, you can add the control to the
toolbar by following the directions below.
Option #2
Extract the TableSizeSelector.dll from the demo project to your hard drive.
(Or build it from the source files.) Add a reference to the DLL in your project.
You can now follow the directions below to add
the control to your toolbar.
Add the Control to the Toolbar
The basic steps to adding the TableSizeSelector control to your
toolbox are:
- Right click on the toolbar in Visual Studio .NET. Select 'Customize Toolbar'.
- Select the '.NET Framework Components' tab.
- Select the DLL or EXE that contains the definition of the
TableSizeSelector. This DLL is called TableSizeSelector.dll in the demo project.
That's it! You can now drag and drop the TableSizeSelector button
to your form.
What about customizing the thing?
I'm glad you asked!
First off, it's important to understand that TableSizeSelector derives
from System.Windows.Forms.Button, while TableSizeSelectorDropDown
derives from System.Windows.Forms.Form. Both controls extend the
properties of their respective base class.
You'll notice that the TableSizeSelector button control in the demo
project just looks like a plain old everyday button. This is on purpose. It's up
to you to make it look pretty by adding an image to the button or some similar method.
Each control has its own copy of the properties. I could have just
had TableSizeSelectorDropDown
keep a reference to its parent TableSizeSelector, but I wanted
the TableSizeSelectorDropDown to be available as an independent
piece of code. These properties impact the look and behavior of the
TableSizeSelectorDropDown.
The TableSizeSelector just passes the property values you set for
it, to the drop down control. When the drop down closes, the relevant properties
are read by the TableSizeSelector
and updated appropriately.
OK, enough of that gibberish. Let's see some code! The following code snippet shows the
declaration of the property variables for both of the controls. Please note the
default values of these properties.
private int   cellSpacing       = 4;
private int   displayCellSize   = 20;
private Size  displaySize       = new Size(4,4);
private Size  tableSize         = new Size(0,0);
private Size  maxTableSize      = new Size(0,0);
private Color selectedRectColor = SystemColors.Highlight;
private Color textColor         = SystemColors.WindowText;
private Color outlineRectColor  = SystemColors.WindowText;
And here is an explanation of how each of these properties affects the behavior
of the control.
| Property Name
| Description
|
CellSpacing
| Sets the padding between each of the selection rectangles.
|
DisplayCellSize
| Sets the size of the selection rectangles.
|
DisplaySize
| Controls the number of rectangles initially shown in the drop down control.
This value is updated in the
TableSizeSelectorDropDown as the
selection window grows.
|
TableSize
| (Read-only) The table size selected by the user. This value will
read as Size(0,0) if the user cancels out of the control.
|
MaxTableSize
| Controls the largest table size the user can select. This value is
ignored when set to its default value.
|
SelectedRectColor
| Color used to draw the selected rectangles.
|
TextColor
| Color of the text outputted to the control.
|
OutlineRectColor
| Color used to outline the dropdown and each of the individual rectangles drawn
on the drop down window.
|
The easiest thing to do is to play with the demo project and see what
happens. All of these properties can be set through the IDE in
Visual Studio .NET.
You must have included events?
Of course, of course. What's so great about a custom control without a couple of
new events to track of?
Just like the properties, both TableSizeSelector and
TableSizeSelector expose the same set of events.
Since I'm sure you're bored again, here is some more code for you to read.
The declaration of our delegates:
public delegate void
    TableSizeChangedEventHandler (object sender, TableSizeEventArgs e);
public delegate void
    TableSizeSelectedOKEventHandler (object sender, TableSizeEventArgs e);
public delegate void
    TableSizeSelectedCancelEventHandler (object sender, System.EventArgs e);
And the corresponding events.
public event TableSizeChangedEventHandler TableSizeChanged;
public event TableSizeSelectedOKEventHandler TableSizeSelectedOK;
public event TableSizeSelectedCancelEventHandler TableSizeSelectedCancel;
| Event Name
| Description
|
TableSizeChanged
| Fired whenever the selected table size changes.
|
TableSizeSelectedOK
| Fired when the user successfully selects a new TableSize.
|
TableSizeSelectedCancel
| Fired when the user cancels out of the TableSizeSelectorDropDown.
|
Again, the easiest way to tie into these events is to use the functionality provided by in
Visual Studio .NET. If you just insist on writing the code yourself here is a
sample of how you would catch the TableSizeSelectedOK event.
If you haven't already done so, add the following line to the top of your file.
using CabotSoftware.Controls;
Add a new variable to your form like this:
private TableSizeSelector YourTableSizeSelector;
For brevity, I'm going to skip all of the allocation and setup of the control on the form.
Declare a new method in your code with the appropriate signature. This method
might look something like this:
private void
    YourTableSizeSelector_TableSizeSelectedOK
    (object sender, TableSizeEventArgs e)
{
    string DebugOut = "TableSizeSelectedOK Event. Table Size: "
        + e.NewTableSize.ToString();
    System.Diagnostics.Debug.WriteLine(DebugOut);
}
In the constructor of your form add the following line of code:
this.YourTableSizeSelector.TableSizeSelectedOK +=
    new TableSizeSelectedOKEventHandler
    (this.YourTableSizeSelector_TableSizeSelectedOK);
Done! Well at least in regards to how to use the control.
Points of Interest
I hope you find this interesting because some of these things really left me
puzzled!
What's the big deal about a few screens?
This was fun.
Everyone knows that when you move or set the size of a window you have to
account for the edges of the screen. When writing the code for this control, I
wanted it behave properly. You'll notice that if you drag the demo project
window far enough down on the screen, the dropdown will actually appear on
the top edge of the button. Now move it over to the right. Try to get it so the
Select Table Size button appears just over the clock on your taskbar.
If you're lucky enough to have two monitors move the dialog so that the Select
Table Size button straddles both screens. You'll notice that when
you click the button the TableSizeSelectorDropDown will be
displayed on the same screen that the bottom left corner of
its parent TableSizeSelector button appears on.
private void CalcMaxSize()
{
Screen DisplayOnScreen = Screen.FromPoint(new
Point(ParentRectangle.X, ParentRectangle.Bottom));
Rectangle rect = RectangleToScreen(ClientRectangle);
}
Figuring out which screen you are on is so easy in the .NET Framework. I used
the Screen.FromPoint method to calculate which screen the lower
left corner of the parent button appeared on. After that I just used the
available methods from the Screen object to figure out how
to place my control and to calculate its maximum size.
Hey, you're giving me a headache!
Well it's not because my control is flickering. (If it is please don't tell
anyone, you'll embarrass me!)
After a bit of searching, I figured out that most straight forward technique to
control flickering is to place the following lines of control into the
constructor of your control.
SetStyle(ControlStyles.UserPaint, true);
SetStyle(ControlStyles.AllPaintingInWmPaint, true);
SetStyle(ControlStyles.DoubleBuffer, true);
That worked pretty well, but it still didn't solve all of my flickering
problems. After a bit more searching I found that I had to turn on the
ControlStyles.ResizeRedraw style for my form. The snippet for this
is shown below.
SetStyle(ControlStyles.ResizeRedraw, true);
Basically, I needed to redraw the entire form every time it's
resized. If your control isn't being resized on the fly like this one, then
you can disregard this property. If you're interested, remove this line
of code and start playing with the control. You should see some flickering when
the control is growing from the bottom up. (Move the dialog back to the bottom
of the screen to do this.)
You promised to talk about double buffering!
You're right, I did.
If you've been paying attention I kind of did already. You'll notice that one of
the styles I set in my constructor was ControStyles.DoubleBuffer.
I took this all a bit further and utilized a technique I read about from the
folks at
Got DOT NET. Basically, you create a bitmap in memory. You make all of
your GDI calls to this bitmap. When you're finished you push the bitmap back to
the screen. Here is an abbreviated version of the OnPaint method of
the TableSizeSelectorDropDown control.
protected override void OnPaint(System.Windows.Forms.PaintEventArgs e)
{
System.Drawing.Graphics g = e.Graphics;
Bitmap localBitmap = new Bitmap(ClientRectangle.Width,
ClientRectangle.Height);
Graphics bitmapGraphics = Graphics.FromImage(localBitmap);
bitmapGraphics.Clear(this.BackColor);
g.DrawImage(localBitmap, 0, 0);
bitmapGraphics.Dispose();
localBitmap.Dispose();
}
Now that was pretty easy wasn't it?
What's the deal with that sizing issue you mentioned?
I had a really hard time sizing the <codelang=cs>TableSizeSelectorDropDown control
when it first dropped down. For the life of me I couldn't figure this out. After
a while I put a break point in the OnSizeChanged event
and examined the stack. I've boldened the call to
the System.Windows.Forms.Form.SetBoundsCore.
at CabotSoftware.Controls.TableSizeSelectorDropDown.OnSizeChanged(EventArgs)
at System.Windows.Forms.Control.UpdateBounds
        (Int32, Int32, Int32, Int32, Int32, Int32)
at System.Windows.Forms.Control.UpdateBounds
        (Int32, Int32, Int32, Int32)
at System.Windows.Forms.Control.SetBoundsCore
        (Int32, Int32, Int32, Int32, BoundsSpecified)
at System.Windows.Forms.Form.SetBoundsCore
        (Int32, Int32, Int32, Int32, BoundsSpecified)
at System.Windows.Forms.Control.SetBounds
        (Int32, Int32, Int32, Int32, BoundsSpecified)
at System.Windows.Forms.Control.set_Size(Size)
at System.Windows.Forms.Control.SetClientSizeCore(Int32, Int32)
at System.Windows.Forms.Form.SetClientSizeCore(Int32, Int32)
at System.Windows.Forms.Control.set_ClientSize(Size)
at System.Windows.Forms.Form.set_ClientSize(Size)
at CabotSoftware.Controls.TableSizeSelectorDropDown.InitializeComponent()
at CabotSoftware.Controls.TableSizeSelectorDropDown..ctor(Control)
at CabotSoftware.Controls.TableSizeSelector.OnClick(EventArgs)
I figured out that the internal working of the .NET Framework was modifying the
size of my control. I tried a number of approaches, including commenting out
the default line of code you get in your form that probably looks like this.
this.AutoScaleBaseSize = new System.Drawing.Size(5, 13);
I finally fixed this by overriding the SetBoundsCore method in
my form. Here is the code I included in my form.
protected override void
    SetBoundsCore(int x, int y, int w, int h, BoundsSpecified bs)
{
    base.SetBoundsCore( x, y, CalcWidth(), CalcHeight(), bs);
}
That's it folks. I hope you found some of this useful.
History
- Release Version 1.0.1130.21991 - February 4, 2003 -Initial release.
Copyright
Copyright © 2002-2003 by Cabot Software, Inc.
This article, as well as any accompanying source code and compiled
binaries, are subject to local and international copyright laws and all rights
are reserved. All code is original unless otherwise noted.
The code described in this article is available in the
public domain and can be incorporated, either in it's entirely or modified, into
client applications.
When using any of the accompanying code, please provide
acknowledgment of the author. All final
products must include the phrase “Portions copyright © 2002-2003 by Cabot Software, Inc.”
in the about screen, or where appropriate.
I've been writing code for over eleven years now. I started out writing C on a VAX system. I've been writing code for Microsoft Windows for nine years. I've coded everything from online streaming solutions to front end applications for the travel industry. My main focus has been on C++, ATL and COM but I've recently been doing quite a bit of work with .NET and C#.
I'm married with two kids and have a golden retriever named Rufus.


 General
  News
News  Suggestion
  Question
  Bug
Bug  Answer
  Joke
Joke  Praise
  Rant
Rant  Admin
Admin 


