Download the latest source code for this article on Code Project (opens in new window)
Download the latest release from Code Plex (opens in new window)
Introduction - Managing the Genesis Smart Client Framework
Understanding how to manage the Genesis Smart Client Framework is important for application developers as well as operators. It helps application developers develop and test their applications on the framework and operators to manage a production environment.
If you start any of the Smart Client Windows Application projects and sign in using either user1 or user2 you will be allowed to sign into the Genesis Management System 2010 application. This is the application that we will be demonstrating with this article.
This article is part VI of VII. Go to part I to see the index.
Please refer to our web site www.bluemarble.co.za for the most up to date information about the Genesis Smart Client Framework or any of our newsfeeds.
News feed
Development feed
View our blog
Follow our tweets
In order to pursue our active interest in releasing this version of the Genesis Smart Client Framework as an open source product, we've created a profile on www.codeplex.com where we maintain the most recent copy of the source code. If you want the latest version of the Genesis Smart Client Framework source code go to our code plex profile or download the latest release from Code Plex.
Application Management
Because the Genesis Smart Client Framework allows developers to host their applications inside of the Genesis Smart Client Framework, an important part of managing the Genesis Smart Client Framework is managing the applications that are available for the users to sign into.
A hosted application is simply a set of files and DLL's that are kept synchronized on the Genesis File System (Genesis.FileHost) and in the Genesis database. These files and settings are made available through the Genesis Smart Client Framework client API and allow implementations of the IHost interface to load and execute code from inside the DLL's.
Application
When creating a new application, the user will be required to sign into the Genesis Management System 2010 hosted application. Once the user is authorized and the user interface has been constructed the user has go to the 'Genesis Administration' ribbon. There are a number of custom buttons that have been added to this ribbon. These are grouped in ribbon bars namely Users & Groups, File & Commands and Ribbon & Items.
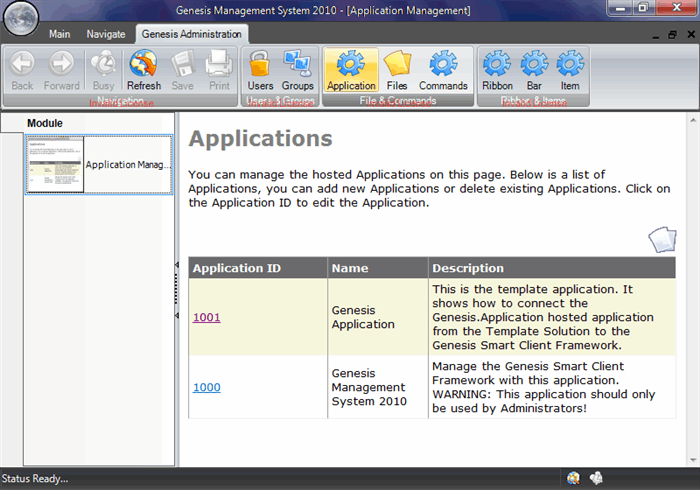
Click on the 'Application' button in the File & Commands ribbon bar. This will open the Application screen. The Application screen returns a list of all the available hosted applications. The user can either add a new Application by clicking on the new files icon above the grid, or edit an existing Application by clicking on the Application ID.

When adding a new Application, the user has to enter an Application Name, Description, the application order in the list displayed to an authorized user and if the application is invisible or not.
The Application Name is displayed to the user right after authorization happens to allow the user to choose which hosted application to sign into. This is generally during the login process.
The Description is rarely used and is most useful to system operators.
The Order is the order that the application is displayed in the list presented to the user when he/she signs in.
The Visible field tracks whether an application is hidden, even from authorised users. This is useful to set if the hosted application is going into maintenance mode.
When you click save the new application will be registered. By subscribing the application to security groups the application will be delivered to users who are members of those security groups.
File
Applications are made up of one or more files. To manage the files associated with a hosted application, click on the 'Files' button in the File & Commands ribbon bar. This will open the File screen. The File screen returns a list of all the available files. The user can either add a new File by clicking on the new files icon above the grid, or edit an existing File by clicking on the File ID.
Files are downloaded right after a user has been authorized to use a specific application.
When adding a new file, the user has to specify the file name details, the type of file, the hosted application that this file is part of, version of the file and its download path.
The File Name is used to find the file when doing database synchronizations with the file system, and when displaying information to the user.
The Type field contains a lookup for the type of file that you are adding.
The Description field is used to display the progress of file downloads to the user.
The Application field indicates with which hosted application this file is associated.
The Order field determines the download order for the file when the Smart Client application synchronizes with the server.
The Path field contains the local server path (relative to the DevelopmentPath value stored in the web.config file of the Genesis.FileHost web project) where the database/file system synchronization loads the file from.
The Url field contains the web URI for where the server has to make the file available. This is where the Smart Client application will connect too to download this file. During the database/file system synchronization, the process works out how to copy the file from the Path to the local system path for the Url.
The Version field determines the version of a file. It is automatically updated during the database/file system synchronization for Library type files. Only when this value changes from the local file cache of the Smart Client application will it be resynchronized.
Files are not controlled with security by means of group subscriptions. The main reasoning here is that you don't want to deploy half baked solutions to your users. If you can exclude a file from a users view you can exclude a potential execution path through your code. If all the files are downloaded, possible run-time errors can be avoided. If you want to create files that are visible only to a select group of users, create a new application just for those users.
Command
If a file is a Library, then it may contain Commands. Commands are units of code that are found in the file through reflection with the information managed in this section. To manage the commands associated with a files, click on the 'Commands' button in the File & Commands ribbon bar. This will open the Command screen. The Command screen returns a list of all the available Commands. The user can either add a new Command by clicking on the new files icon above the grid, or edit an existing Command by clicking on the Command ID.
Commands are loaded right after all the files have been downloaded and before the main form is displayed. Each file with registered Commands is opened using Reflection and the Commands are loaded into memory tables for quick access. Security is also applied at this point so unauthorized code cannot be executed.
The File value shows what file this command is linked with. This file will be loaded and analyzed using Reflection.
The Command Name is a short name for the Command. This value is used when referencing Commands from menu's and lookups.
The Code is the internal Genesis Smart Client Framework reference to the command. When scripts execute commands, or commands execute other commands, the Code is the reference that is used.
The Description value stores a simple description for the Command.
The Type field stores the .NET full type name (full namespace + full class name) for use by Reflection to find the Command in the Library. This field is also used during the database/file system synchronization when the Libraries are analyzed and the relevant Command entries are created or updated.
When you click save the new Command will be registered. By subscribing the Command to security groups the Command will be accessible to users who are members of those security groups.
Commands are automatically added/updated in the configuration when the database/file system synchronization executes. Usually the operator would register the Application and Files, execute the database/file system synchronization and then set the security on the Application and Command objects.
User Interface Management
The commercial Smart Client application implements an Office 2007 styled Ribbon control. The configuration is geared more around Office 2007 styled Ribbon menu's than standard menu's, however as the custom Smart Client application demonstrates, it is still possible to render the information using a standard menu control.
The configuration consists of the Ribbon, which are the main strips along the top of the screen, the Ribbon Bars which are the grouped panels contained inside of each Ribbon and the Bar Items, which are the buttons, textboxes, seperators, containers and other controls displayed on the Ribbon.
Ribbon
The Ribbon is the main container for the rest of the menu controls. Ribbons allow the operator to define functional area's for users and groups to access. To manage the Ribbons click on the 'Ribbon' button in the Ribbon & Items ribbon bar. This will open the Ribbon screen. The Ribbon screen returns a list of all the available Ribbons. The user can either add a new Ribbon by clicking on the new files icon above the grid, or edit an existing Ribbon by clicking on the Ribbon ID.
The Ribbon Name value is the name of the Ribbon. This value is displayed in the Ribbon.
The Application field links the Ribbon to a hosted application. This Ribbon will not be visible to a user if they are signed into other hosted applications even if they are allowed to access it through their security profile.
The Order value is used to ensure specific orders of the items when displayed in the user interface.
When you click save the new Ribbon will be registered. By subscribing the Ribbon to security groups the Ribbon will be visible to users who are members of those security groups.
Ribbon Bar
The Ribbon Bar is the group container for the menu controls inside of a Ribbon. Ribbon Bars allow the operator to define functional area's for users and groups to access. To manage the Ribbon Bars click on the 'Bar' button in the Ribbon & Items ribbon bar. This will open the Ribbon Bar screen. The Ribbon Bar screen returns a list of all the available Ribbon Bars. The user can either add a new Ribbon Bar by clicking on the new files icon above the grid, or edit an existing Ribbon Bar by clicking on the Ribbon Bar ID.
The Bar Name value is the name of the Ribbon Bar. This value is displayed in the Ribbon Bar.
The Ribbon field links the Ribbon Bar to a Ribbon.
The Order value is used to ensure specific orders of the items when displayed in the user interface.
When you click save the new Ribbon Bar will be registered. By subscribing the Ribbon Bar to security groups the Ribbon Bar will be visible to users who are members of those security groups.
Bar Item
The Bar Item is the group container for the menu controls inside of a Ribbon. Bar Items allow the operator to define functional area's for users and groups to access. To manage the Bar Items click on the 'Item' button in the Ribbon & Items ribbon bar. This will open the Bar Item screen. The Bar Item screen returns a list of all the available Bar Items. The user can either add a new Bar Item by clicking on the new files icon above the grid, or edit an existing Bar Item by clicking on the Bar Item ID.
The Bar Item Name value is the name of the Bar Ite. This value is displayed in the Bar Item.
The Parent Bar Item field creates a hierarchy for this Bar Item. This allows the operator to define drop down buttons with lists op options. If containers are used, the Parent Bar Item would reference the container.
The Bar Item Type field specifies the type of Bar Item to create. This can be a button, text box, combo box, seperator, container or any other control.
The Ribbon Bar field links the Bar Item to a specific Ribbon Bar.
The Command field links the Bar Item to a specific Command. This Command is executed when the user activates the Bar Item through the user interface.
The Image and Image Size values store the name of the image to display for the Bar Item and its display size.
The Order value is used to ensure specific orders of the items when displayed in the user interface.
The Bar Item cannot be linked to specific security groups.
User Access Management
User Access Management in the Genesis Smart Client Framework is done by maintaining a list of users and their membership to specific groups, and the list of groups that users can be members of.
Group
The Group is a security object that users can be members of, and other security elements (such as Applications and Commands) can subscribe to. To manage the Groups click on the 'Groups' button in the Users & Groups ribbon bar. This will open the Group screen. The Group screen returns a list of all the available Groups. The user can either add a new Group by clicking on the new files icon above the grid, or edit an existing Group by clicking on the Group ID.
The Group Name is the name of the security group.
The Description field contains a description of the group and its possible members.
User
The User is a security object that users can be members of, and other security elements (such as Applications and Commands) can subscribe to. To manage the Users click on the 'Users' button in the Users & Users ribbon bar. This will open the User screen. The User screen returns a list of all the available Users. The user can either add a new User by clicking on the new files icon above the grid, or edit an existing User by clicking on the User ID.
The User name value defines the user's login name.
The Password and Confirm Password fields ensure that the user's password has been confirmed and allow the operator to change the user's password.
The e-mail and confirm e-mail fields ensure that the user's e-mail address has been confirmed and allow the operator to define a collaboration address for the user.
The Is User Active field is used to disable user accounts. If a user account is not active, they are not allowed to sign into any hosted applications.
The User Login Script is the path to the login script that is executed everytime that the user signs into any application.
When you click save the new User will be created. By subscribing the User to security groups the User will be able to access resources that are also subscribed to the same security groups.
Database/File System Synchronization
In order to get the Smart Client application to update the local file cache with the correct versions of all the files, the database and file system have to be synchronized. This process is important during the development stage as each time that the developer has updated the hosted application library code, the database and file system have to be synchronized. It is also used after an operator has deployed updates to a production environment to ensure that the Smart Client applications will be aware of the updates that have been made available.
The process is executed by launching the Update.ASPX file from the Genesis.Filehost web application. During the development cycle the developer can simply right click the Update.ASPX file in the Solution Explorer and select 'View in Browser'. If an operator is updating a production environment, the Genesis.Filehost web application should be hosted on a production server. In this scenario, the operator would browse to the server address for the Genesis.Filehost web application including the Update.ASPX filename.
Production Environment Deployment
Deploying code to active production environments is always risky. We have created a reliable means for the developer to release the correct code to the operators for deployment into the production environment.
Deployment Package
Developers can create deployment packages using the Genesis.Deployment tool. This tool allows the developer to create templates (called modules) of files that always deploy to the same location on the server. The developer can also choose how the files are deployed on the server, by either overwriting existing files or first creating backups before deploying the new application.
Once Modules have been defined, developers can create deployment packages by selecting the modules that they would like to deploy. These files are then collected from the file system and compressed into a zip file. An instruction XML file is also embedded in the archive to instruct the server how to deploy the files.
The developer would deliver the deployment package to the operator who would then use the online deployment tools to deploy the updates to the required servers.
Online Deployment
An online deployment tool is used by operators deploying application updates to production environments. This tool allows the operator to upload the deployment package and executes the deployment script on the server.
After a deployment packages has been processed through the online deployment tool, the operator has to execute the database/file system synchronization process. This will update all of the production files and the Meta-Data for the application to ensure that the Smart Client applications automatically download the required files next time they connect to the Genesis Smart Client Framework back-end.
Database Backup
The Genesis Smart Client Framework allows for database backups to be created by an operator and the files are exposed through the Genesis File System. To create a backup, simply browse to the Genesis.Filehost web application and add /deployment/database/backup.aspx and provide the DatabaseName and ConnectionStringKey parameters.
Further Reading
This article is part VI of VII. Go to part VII to read about the source code.
Other information
Blue Marble is proud to be a Microsoft BizSpark startup company.
DISCLAIMER
The Genesis Smart Client Framework is a commercial closed source application. It is being provided on Code Project with all of the benefits that articles on Code Project grant its users (ie. Free and Fair use), however it must be noted that some modules contain a 3rd party control that we are unable to license via Code Project. Once all of the articles are uploaded, the code will be extracted to a seperate obfusicated library to protect our vendor's Intellectual Property. The full source code will be provided for this library, excluding the few lines that could compromise our License. An alternative will also be provided for developers who wish to use a completely free version.
DISCLAIMER UPDATE
An implementation of a standard Microsoft.NET controls user interface has been created and is available on Code Plex as of release 1.30.1024.0. This release complies with all of the Code Project article publishing terms and conditions.
This member has not yet provided a Biography. Assume it's interesting and varied, and probably something to do with programming.


 General
  News
News  Suggestion
  Question
  Bug
Bug  Answer
  Joke
Joke  Praise
  Rant
Rant  Admin
Admin 


 I only used screenshots from the compiled code of the Code Project source code.