Introduction
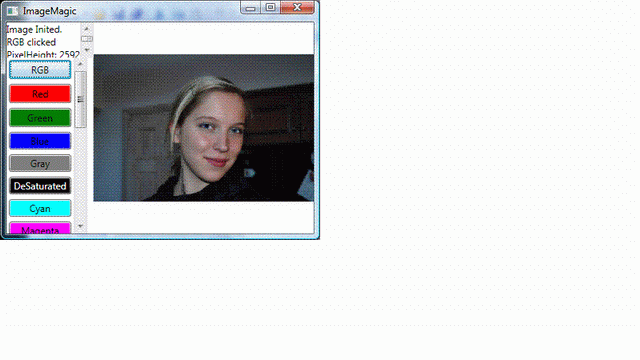
Ever wonder how to extract data from a JPEG and manipulate it using only WPF? Or how WPF performs on a moderately sized image (10 MB)? The ImageMagic program provides an answer. The program opens an included 2592 x 3872 JPEG, extracts its data and redisplays it using the RGB, CMYK and HSL colorspace channels. File Open and Save facilities are provided. The user may enjoy his own images or save the current display as a JPEG. It's a good way to become familiar with popular colorspaces. Methods are provided to convert arrays of RGB data to CMYK or HSL as well as the inverse operation.
ColorSpace Background
Programmers typically are familiar with the RGB colorspace. But less so with CMYK, HSL and black and white. Each of these color spaces have well known uses. Image data manipulations difficult in RGB may be trivial in another colorspace. A detailed description of the properties of each color space is not provided here. However here are some things to keep in mind.
- Device Dependence The color space does not define colors the way the eye sees them or the way a device will display them. For example 2 colors may be distant from one another in the color space, but the eye may see them as similar. To help get around this definition problem, a device profile may be provided with the image.
- Reduced Gamut CMYK and black and white typically do not describe every color defined in RGB. In other words, there may be an information loss converting an image from RGB to another color space.
- Problems Converting Back to RGB CMYK is expressed in percent (0-100). Hue is defined in degrees. In order to ensure an accurate conversion back to RGB, CMYK and HSL are defined here as floats (0.0-1.0).
- Lack of Accepted Standards The colorspaces used in this program are defined using textbook definitions. In the commercial world, the definitions are applied far more loosely. Expect to see differences in the images rendered by this program and say Photoshop.
CMYK Widespread commercial use to print images. It's a subtractive color space based on the way inks work. Inks absorb a frequency range from ambient light and reflect the rest. CMYK does the same. For example, Cyan absorbs red. One may color balance the red in an image by adding or removing the amount of Cyan in each pixel. Similarly use Magenta to control green and Yellow to control blue. In theory 3 channels (CMY) should be enough to specify any color. However, when one mixes all inks together, something that looks like mud appears rather than the theoretical black. To get around this, a forth channel, K, is used which adds black. There is no general agreement on how much black to use in CMYK. The algorithm here takes out the maximum. Black ink is cheap.
HSL Used for easy image manipulations. Want to change the Saturation or Lightness of an image? Just multiply the S or L channels by a constant. Similarly the H channel can be used to select a color range or shift the color. Also used in color pickers or for computing complimentary colors.
Black and White There are many ways of converting a color image to Black and White. Each gives different results. Several are given here. Try the Gray, Desaturated, K and L buttons. Typically one does whatever is needed to produce the desired image. The Gray algorithm is fairly popular.
How the Code Works
Inside a displayed WPF Image object, the Source property contains a BitmapSource object. The BitmapSource determines what image WPF displays. It has properties identifying the pixel dimensions, format, dots per inch, etc. of the image to be displayed. The BitmapSource object also has a method, CopyPixels, which may be used to retrieve the raw RGB data associated with the image. After retrieval, the RGB data can be manipulated and used to create a new BitmapSource object. Updating the Source property of the displayed image with the new BitmapSource displays the manipulated data.
ImageMagic displays a single Named image, rgbImage created by the Window1.xaml file. rgbImage is loaded from the included file DSC_4394copy.jpg. You can replace this file with your own JPEG if you wish to change the way the ImageMagic comes up. Named XAML images are accessible to the program logic, meaning rgbImage's Source property can be read or updated. So XAML kicks everything off. But the program must provide a way to extract RGB data and create new BitmapSources.
The extraction of RGB data and the creation of new BitmapSources are handled by the static BmsEngine class. In order to create new BitmapSources compatible with the original image, BmsEngine must be inited. This is performed when the RGB button is loaded with the following code:
void OnLoad(object sender, RoutedEventArgs e)
{
tb1.Text = "Image Inited.\n";
rgbBms = (BitmapSource)this.rgbImage.Source;
BmsEngine.Init(rgbBms);
rgbValues = BmsEngine.GetRgbData();
}
The following code shows how the BmsEngine is used to create a new BitmapSource when the Yellow button is clicked. This is an expensive operation.
private void Yellow_Click(object sender, RoutedEventArgs e)
{
tb1.Text += "Yellow clicked\n";
if (yellowBms == null)
{
byte[] newJpegBytes = BmsEngine.GetRgbData();
for (int i = 0; i < BmsEngine.dataLength; i += 4)
{
newJpegBytes[i+(int)RGB.Blue] = 0;
}
yellowBms = BmsEngine.CloneBms(newJpegBytes);
}
this.rgbImage.Source = yellowBms;
}
Using the Code
When the program begins, the included image is displayed in RGB. Along the left side of the screen are 20 buttons that perform simple tasks. The Operator is encouraged to use his own images. The display of CMYK or HSL channels is usually surprising. It is very dependent on the image used. As a check that the conversion is valid, click the button to reconvert the colorspace back to RGB. One should wind up with the original RGB image.
The code is simple. If you wish to reuse the conversion logic, look at classes in CmykSpace.cs and HslSpace.cs.
Points of Interest
WPF performance as well as the color space algorithms are dependent on image size. The image provided with this program reflects what a typical DSLR produces today. It is several times smaller than what a professional camera produces. As the trend in pixel count is rising faster than the speed of computers, new methods for dealing with image data must be employed.
To minimize the download size, I applied increased compression on the JPEG. The compressed image looked OK in RGB, but degradation was very apparent in the HSL channels.
History
- 16th June, 2009: Initial release
This member has not yet provided a Biography. Assume it's interesting and varied, and probably something to do with programming.


 General
  News
News  Suggestion
  Question
  Bug
Bug  Answer
  Joke
Joke  Praise
  Rant
Rant  Admin
Admin 


