Introduction
A many to many relationship is a bi-directional one to many relationship between two entities defined by an intersection table with a one-to-many relationship to each entity. Most developers would consider many to many relationships a fairly standard database design. However, LINQ to SQL offers no native support for these types of relationships. PLINQO makes it very simple to work with many to many relationships. We are going to walk you through how this was implemented in PLINQO by showing how to manually add support for many to many relationships.
Getting Setup
We will work with the commonly used relationship between users and roles. A user can have many roles and a role can contain many users. We will use a sample database containing the three tables that make up this relationship. Here is a look at the User/Role relationship:
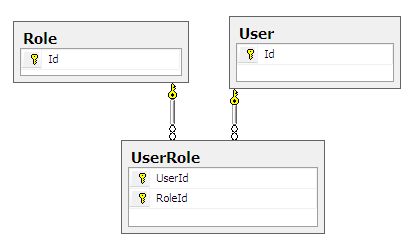
LINQ to SQL will create an entity for each of these tables with no direct link between User and Role even though the relationship is actually between the User and the Role. To get the roles for a user, we must step through the UserRole list and get the associated Roles.
var user = db.Users.FirstOrDefault(u => u.Id = 1);
var roles = new Roles();
foreach(var userRole in db.Users.UserRoles)
roles.Add(userRole.Role);
This is work we don't want to do and work we expect our ORM to do for us. All we want to do is find the role membership for a user. Being forced to go through this process for each many to many relationship is tedious and frustrating, especially since these relationships are common. We should be able to see the roles for a user directly since that is the actual relationship we are concerned about. So, we need to figure out a way to handle it. Let's do that now.
Implementation
Using the LINQ to SQL designer, we will create the LINQ to SQL entities that correspond to the tables. Once the DBML is created, we need to make an update. We need to add the DeleteOnNull attribute for each association in the UserRole entity. Since the designer doesn't support managing this attribute, we will have to manually update the DBML to make this change. To update the DBML directly, right-click on the DBML file, select Open with and select the XML Editor. Once you are in the DBML file, find the UserRole entity. We need to add the DeleteOnNull attribute for each association and set it to true.
<Table Name="dbo.UserRole" Member="UserRoles">
  <Type Name="UserRole">
    <Column Name="UserId" Type="System.Int32"
       DbType="Int NOT NULL" IsPrimaryKey="true" CanBeNull="false" />
    <Column Name="RoleId" Type="System.Int32"
       DbType="Int NOT NULL" IsPrimaryKey="true" CanBeNull="false" />
    <Association Name="Role_UserRole" Member="Role"
       ThisKey="RoleId" OtherKey="Id" Type="Role"
       IsForeignKey="true" DeleteOnNull="true" />
    <Association Name="User_UserRole" Member="User"
       ThisKey="UserId" OtherKey="Id" Type="User"
       IsForeignKey="true" DeleteOnNull="true" />
  </Type>
</Table>
Setting DeleteOnNull to true makes it possible to delete the object when the association is set to null. After updating and saving the DBML file, right-click the DBML file in Solution Explorer and select Run Custom Tool. This will recreate the UserRole entity with the updates.
We want to be able to manage the list of Roles that relate to the User without having to bother with managing the intersecting table that represents the relationship. So, we will need a list of Roles plus the ability to handle adding and removing the roles from the relationship. Let's start with building the list. We will add the following Roles property to the User object to do this:
private System.Data.Linq.EntitySet<role /> _roles;
public System.Data.Linq.EntitySet<role> Roles
{
    get
    {
        if (_roles == null)
        {
            _roles = new System.Data.Linq.EntitySet<role>(OnRolesAdd, OnRolesRemove);
            _roles.SetSource(UserRoles.Select(c => c.Role));
        }
        return _roles;
    }
    set
    {
        _roles.Assign(value);
    }
}
As you can see, we are using the data from the UserRole entity in the background to manage the relationship. This abstracts away all of the plumbing associated with many to many relationships. The Roles property is an EntitySet making it easy to set the source to the Roles relationship defined in UserRole, and use the property as you would any other EntitySet in LINQ to SQL. Creating this property will make it possible to write the following line of code:
user.Roles
However, we aren't done. We must be able to add and remove Roles and update the database accordingly. When a new instance EntitySet<role> is instantiated, we can supply handlers for these actions. To handle our case, we have created the OnRolesAdd and OnRolesRemove event handlers.
[System.Diagnostics.DebuggerNonUserCode]
private void OnRolesAdd(Role entity)
{
    this.UserRoles.Add(new UserRole { User = this, Role = entity });
    SendPropertyChanged(null);
}

[System.Diagnostics.DebuggerNonUserCode]
private void OnRolesRemove(Role entity)
{
    var userRole = this.UserRoles.FirstOrDefault(
        c => c.UserId == Id
        && c.RoleId == entity.Id);
    this.UserRoles.Remove(userRole);
    SendPropertyChanged(null);
}
The complex operations required for the many to many relationship will be abstracted away since we are managing the necessary actions in the event handlers. When a Role is added to the role list, we will also add a UserRole object to the UserRole list containing the appropriate User and Role objects that make up the relationship. When a Role is deleted, we will find the matching object in the UserRole list and remove it. Now that we have the code created to easily handle many to many relationships, let's see it in action.
We have created two tests that will add and remove a role. Let's look at adding first. All we have to do is add the Role to the Roles list and execute SubmitChanges().
var role = db.Roles.First(r => r.Id == 1);
var user = db.Users.First(u => u.Id == 1);
user.Roles.Add(role);
db.SubmitChanges();
After the add test is run, the data in the database looks like this:

Now, we want to remove the Role from the User.
using (var db = new SampleDataContext())
{
    var user = db.Users.First(u => u.Id == 1);
    var role = user.Roles.First(r => r.Id == 1);
    user.Roles.Remove(role);
    db.SubmitChanges();
}
One more look at the database shows that the row and the relationship are removed.
Conclusion
It may not look like too much to add support for many to many relationships. However, the property and event handlers discussed here above must be added for each many to many relationship encountered. After doing this manually a few times, I am sure you will grow tired of having to handle this scenario. PLINQO will examine each relationship in your database and generate the property and event handlers necessary to handle the many to many relationships the way you would have expected LINQ to SQL to handle it in the first place. This means you do not have to worry about what is needed to handle many to many relationships. PLINQO has already taken care of it.
When using PLINQO, all you have to do is generate and enjoy using a LINQ to SQL that supports many to many relationships!
This member has not yet provided a Biography. Assume it's interesting and varied, and probably something to do with programming.
This member has not yet provided a Biography. Assume it's interesting and varied, and probably something to do with programming.


 General
  News
News  Suggestion
  Question
  Bug
Bug  Answer
  Joke
Joke  Praise
  Rant
Rant  Admin
Admin 


