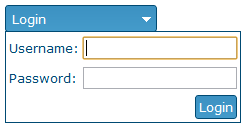
In this post, we will use the jqxDropDownButton and jqxButton widgets. The DropDownButton’s content will be a simple Form with 2 input fields and 1 submit button.
- The first step is to include the
JavaScript(jQuery Framework, jQWidgets Core, jqxButton and jqxDropDownButton) and the CSS files. In the sample, we’ll use the Dark Blue theme and we include the jqx.base.css and jqx.darkblue.css files.
   <link rel="stylesheet"
href="../../jqwidgets/styles/jqx.base.css"
type="text/css" />
   <link rel="stylesheet"
   href="../../jqwidgets/styles/jqx.darkblue.css" type="text/css" />
   <script type="text/javascript"
   src="../../scripts/jquery-1.7.2.min.js"></script>
   <script type="text/javascript"
   src="../../jqwidgets/jqxcore.js"></script>
   <script type="text/javascript"
   src="../../jqwidgets/jqxdropdownbutton.js"></script>
   <script type="text/javascript"
   src="../../jqwidgets/jqxbuttons.js"></script>
- Add the HTML structure in the document’s body. We add a
DIV tag for the DropDownButton and inside the DIV tag, we add the Form that we want to be displayed in a drop down when the user clicks the button.
<div id="dropDownButton">
  <form style="border-width: 1px; border-style: solid;"
  class="jqx-widget-content jqx-widget-content-darkblue"
  method="post" action="?page=login">
  <table>
    <tr>
      <td>
        Username:
      </td>
      <td>
        <input style="width: 150px;"
        type="text" name="user" />
      </td>
    </tr>
    <tr>
      <td>
        Password:
      </td>
      <td>
        <input style="width: 150px;"
        type="password" name="password" />
      </td>
    </tr>
    <tr>
      <td colspan="2" align="right" valign="bottom">
        <input type="submit" id="submit" value="Login" />
      </td>
    </tr>
  </table>
  </form>
</div>
- The final step is to initialize the
jqxDropDownButton and jqxButton widgets.
<script type="text/javascript">
  $(document).ready(function () {
    $("#dropDownButton").jqxDropDownButton
    ({ width: 150, height: 25, theme: 'darkblue' });
    var dropDownContent = '<div style="position: relative;
    margin-left: 3px; margin-top: 5px;">' + "Login" + '</div>';
    $("#dropDownButton").jqxDropDownButton('setContent', dropDownContent);
    $("#submit").jqxButton({ theme: 'darkblue' });
  });
</script>

CodeProject
This article was originally posted at
http://www.jqwidgets.com/login-popup
jQWidgets specializes in the development of platform independent and cross-browser compatible presentation layer components for building modern web-based applications for PC, Touch and Mobile. Our product provides developers with the essential set of User Interface widgets needed to streamline their development and reduce project costs.
Our goal is to help our customers deliver better web-based applications that can be accessed through any device and are pleasure to use.


