Introduction
This article is devoted to the methods of the driver packages installation/uninstallation using WiX. In particular we will discuss the usage of the Microsoft DPInst utility for the installation and removal of the drivers during the Windows Installer package setup, review the principles of DPInst functioning, review the issues with the unsigned drivers installation and learn how to launch multiple MSI installations from already running Windows Installer package setup.
Table of Contents
Signed and Unsigned Drivers Installation and Uninstallation Using WiX
Installation..
Uninstallation
How does DPInst work?
DPInst and System Restore
The Issues With the Unsigned Drivers
Windows Installer Packages Installation and Uninstallation Using WiX
Installation..
Uninstallation
Summary
Bibliography
Signed and Unsigned Drivers Installation and Uninstallation Using WiX
Very often the driver package is represented by the folder containing INF, SYS, CAT, DLL, and other files. In this case the driver installation description is located in the INF files. To install or uninstall such drivers you can use Microsoft DPInst utility. It is the part of the Microsoft Windows Driver Kit (you can download it from Microsoft site). Please note, that WDK distribution contains DPInst versions for both x86 and x64 platforms.
For example, we have extracted DPInst.exe versions for x86 and x64 platforms from Windows Driver Kit and placed them to the “C:\DPInst\x32” and “C:\DPInst\x64” folders correspondingly.
Let’s define the appropriate WiX components:
<Component Id="DPInst_x32" Guid="PLACE-YOUR-GUID-HERE">
  <File Id="DPInst.exe_x32" Name="DPInst.exe" LongName="DPInst.exe"
Vital="yes" DiskId="1"  src="C:\DPInst\x32\DPInst.exe" />
  <Condition>NOT VersionNT64</Condition>
</Component>

<Component Id="DPInst_x64" Guid="PLACE-YOUR-GUID-HERE">
  <File Id="DPInst.exe_x64" Name="DPInst.exe" LongName="DPInst.exe"
Vital="yes" DiskId="1"  src="C:\DPInst\x64\DPInst.exe" />
  <Condition>VersionNT64</Condition>
</Component>
and features:
<Feature Id='DPInst_x32' Level='0'  AllowAdvertise="no"
Absent="disallow"  Display="hidden">
 <ComponentRef  Id='DPInst_x32' />
 <Condition Level="1">NOT VersionNT64</Condition>
</Feature>

<Feature Id='DPInst_x64' Level='0'  AllowAdvertise="no"
Absent="disallow"  Display="hidden">
 <ComponentRef Id='DPInst_x64' />
 <Condition Level="1">VersionNT64</Condition>
</Feature>
Please note, that the GUIDs of the components provided in all examples in this article are not real. You must generate your own GUIDs to use given parts of code in your projects.
Also let’s add two driver components: Signed_driver and Unsigned_driver. For example, their files are located in “C:\Drivers\Signed_driver” and “C:\Drivers\Unsigned_driver” folders correspondingly.
The components:
<Directory Id="Signed_driver"  Name="SIGNED_1"
LongName="Signed_driver">
  <Component  Id="Signed_driver" DiskId="1" Guid="PLACE-YOUR-GUID-
HERE">
    <File Id="driver1.cat"  Name="driver1.cat"
src="C:\Drivers\Signed_driver\driver1.cat"  />
    <File Id="driver1.inf" Name="driver1.inf"
src="C:\Drivers\Signed_driver\driver1.inf" />
    <File Id="driver1.sys" Name="driver1.sys"
src="C:\Drivers\Signed_driver\driver1.sys" />
  </Component>
</Directory>
<Directory  Id="Unsigned_driver" Name="UNSIGN_1"
LongName="Unsigned_driver">
  <Component  Id="Unsigned_driver" DiskId="1" Guid="PLACE-YOUR-GUID-
HERE">
    <File Id="driver2.inf"  Name="driver2.inf"
src="C:\Drivers\Unsigned_driver\driver2.inf"  />
    <File Id="driver2.sys" Name="driver2.sys"
src="C:\Drivers\Unsigned_driver\driver2.sys" />
  </Component>
</Directory>
And the feature for them:
<Feature Id="RootFeature"  Level="1" ConfigurableDirectory="TARGETDIR"
Description="Sample" Display="expand"  Title="Sample"
AllowAdvertise="no"  TypicalDefault="install">
  <Feature Id="Drivers" Level="1"  AllowAdvertise="no"
ConfigurableDirectory="TARGETDIR" Description="Drivers"
Display="collapse" Title="Drivers" >
    <ComponentRef Id='Signed_driver' />
    <ComponentRef Id='Unsigned_driver' />
  </Feature>
</Feature>
Installation
To install all INF files from the specified directory you can use the following DPInst command line:
DPInst.exe [/LM] [/SW] [/Q] [/SA] /PATH "Path to the drivers folder"
The /LM key allows you to launch the utility in ‘legacy’ mode (obsolete on Windows Vista and higher). In such case DPInst will install even unsigned drivers and those drivers which miss some of the files described in their INF files.
The /SW key turns off the displaying of the DPInst GUI. Note, that the operating system still will be able to display dialogs (such as the unsigned driver installation warnings, for example).
The /Q key turns off both the displaying of the DPInst GUI and the displaying of the operating system dialogs. In this case, if DPInst meets an unsigned driver, the operating system will not display the installation prompt for it and such driver will be skipped.
The /SA key turns off the creation of the ‘Add/Remove Programs’ entry for each installed INF file (otherwise DPInst will create it by default).
After the /PATH key you should specify the path to the folder containing driver package.
Now let’s see how this stuff works inside the WiX script.
We will use the installation custom actions to install signed and unsigned drivers with DPInst.
The custom actions definitions for both packages look as follows:
<CustomAction Id='Install_Signed_Driver' Execute='deferred'
Directory='Drivers' ExeCommand='"[Drivers]DPinst.exe" /SW
/SA /PATH "[Signed_driver]' Return='ignore' />
<CustomAction Id='Install_Unsigned_Driver' Execute='deferred'
Directory='Drivers' ExeCommand='"[Drivers]DPinst.exe" /LM
/SW /SA /PATH "[Unsigned_driver]' Return='ignore' />
Now we should schedule these actions for execution. We will do it in the InstallExecuteSequence. To setup drivers correctly we must be sure that all required files were unpacked. So theoretically we should schedule the execution of the custom actions somewhere after InstallFiles standard action. Practically we should set Execute='deferred' for each custom action if we want it to be executed between InstallFiles and InstallFinalize. Or we should schedule it after InstallFinalize standard action. In this case the deferred execution is not necessary.
So, the installation sequence will look as follows:
<InstallExecuteSequence>
  <Custom  Action="Install_Signed_Driver" After="InstallFiles">NOT
Installed</Custom>
  <Custom Action="Install_Unsigned_Driver"  After="Install_Signed_Driver">NOT
  Installed</Custom>
</InstallExecuteSequence>
Uninstallation
To uninstall specified INF file you can use the following DPInst command line:
DPInst.exe /U "Path to the INF file" [/SW] [/D]
The /U key tells DPInst to perform the uninstallation. It should be followed by the path to the target INF file. Please note, that DPInst supports only the uninstallation of one file at a time (as opposed to the installation). So the wildcards are not supported here.
The /D key tells DPInst to remove not only the driver registry settings but its binaries as well from the system.
Again, the parts of the WiX script.
The custom actions definition for the Signed_driver and Unsigned_driver components:
<CustomAction Id='Uninstall_Signed_Driver' Directory='Drivers'
ExeCommand='"[Drivers]DPinst.exe" /U
"[Signed_driver]driver1.inf" /SW /D' Return='ignore' />
<CustomAction Id='Uninstall_Unsigned_Driver' Directory='Drivers'
ExeCommand='"[Drivers]DPinst.exe" /U
"[Unsigned_driver]driver2.inf" /SW /D' Return='ignore' />
The execution of these custom actions should be scheduled somewhere before the RemoveFiles standard action (we will use the same INF files for both drivers installation and uninstallation so these files should be present on the hard drive when we run uninstallation custom actions). For example, the scheduling of these actions after the RemoveRegistryValues standard action would be a good idea:
<Custom  Action="Uninstall_Signed_Driver"
After="RemoveRegistryValues">Installed</Custom>
<Custom  Action="Uninstall_Unsigned_Driver"
After="Uninstall_Signed_Driver">Installed</Custom>
How does DPInst work?
In general, DPInst is simply the wrapper on two Windows API functions: DriverPackagePreinstall for driver installation and DriverPackageUninstall for uninstallation. Header files and libraries which are necessary for using them are the part of the Windows Driver Kit. If you don’t want to use Microsoft utility, you can use these functions in your application instead.
DriverPackagePreinstall function receives two parameters: the path to the driver INF file and the flags configuring the way of driver installation (legacy mode, silent installation, repair mode, etc. – all these options could be mentioned here).
For example, to install the Signed_driver package from the example above you can use DriverPackagePreinstall function:
DriverPackagePreinstall(L"C:\\Drivers\\Signed_driver\\driver1.inf",
DRIVER_PACKAGE_SILENT);
And to install Unsigned_driver package you can use the following code:
DriverPackagePreinstall(L"C:\\Drivers\\Unsigned_driver\\driver2.inf",
DRIVER_PACKAGE_LEGACY_MODE);
You can read the detailed information about this function on MSDN: http://msdn.microsoft.com/en-us/library/ms793500.aspx.
DriverPackageUninstall function receives four parameters:
- path to the driver INF file
- configuration flags (silent uninstallation, delete the binary files, etc.)
- pointer to the constant
INSTALLERINFO structure supplying the information about an application associated with the driver (an optional parameter) - pointer to
BOOL variable which indicates on return whether the system is to be restarted.
To uninstall the Signed_driver package from the example above you can use DriverPackageUninstall function:
BOOL needReboot = false;
DriverPackageUninstall(L"C:\\Drivers\\Signed_driver\\driver1.inf",
DRIVER_PACKAGE_DELETE_FILES, NULL, &needReboot);
The detailed information on this function you can find, as well, on MSDN: http://msdn.microsoft.com/en-us/library/ms793508.aspx.
Please note, that you must place difxapi.dll library from Windows Driver Kit to your application’s directory to make it work correctly.
DPInst and System Restore
Another interesting peculiarity of DPInst functioning is that it automatically creates System Restore Point before each driver installation (if the corresponding feature is enabled on the target OS). It takes some time, so, if you plan to install big amount of drivers using DPInst, your installation could be a very long process (in particular, on Windows Vista).
If you want to speed up your installation and don’t want to disable Windows System Restore, you can use transactional restore points. When the creation of the transactional restore point starts, the operating system forbids the creation of other restore points before the end of the transaction. So, if you start the transaction before the drivers installation and finish it after the installation completes, only one restore point will be created and the whole process will require much less time.
To create such restore points you can use the CreateRestorePoint method of SystemRestore WMI class. You can find the detailed information about it in MSDN: http://msdn.microsoft.com/en-us/library/aa378847%28VS.85%29.aspx.
This method obtains 3 parameters: the string with the restore point description, the restore point type and the event type. For our installation restore point type you can use 0 (APPLICATION_INSTALL) or 10 (DEVICE_DRIVER_INSTALL) value. And the event type is the most important parameter. In our case it will represent the information about the transactional action. Before the beginning of the drivers installation you should invoke CreateRestorePoint with 102 (BEGIN_NESTED_SYSTEM_CHANGE) value as the event type. This will start the transaction. It can look as follows:
CreateRestorePoint("Drivers Installation", 10, 102);
And after the drivers installation is completedyou should call CreateRestorePoint with 103 (END_NESTED_SYSTEM_CHANGE) value to end the transaction. It can look as follows:
CreateRestorePoint("Drivers Installation", 10, 103);
Also you should remember that the target machine may have System Restore feature disabled. Or the CreateRestorePoint function may fail for some reason. You should handle these situations in your code.
To access CreateRestorePoint method you can use C++, VBScript or Jscript. In the example below we will use Jscript implementation. It is more simple than C++ one and more flexible in handling the errors than VBScript one.
So, the function for the restore point creation can look as follows:
function CreateRestorePoint(name, type, event)
{
try
{
var srObject = GetObject("winmgmts:\\\\.\\root\\default:Systemrestore");
if (srObject == null)
{
return 0;
}
var srStatus = srObject.CreateRestorePoint(name, type, event);
return srStatus;
}
catch (e)
{
return -1;
}
}
And the functions to begin and complete the transaction:
function BeginDriverInstallation()
{
    var srPointName = "Drivers Installation";
    var DEVICE_DRIVER_INSTALL = 10;
    var BEGIN_NESTED_SYSTEM_CHANGE = 102;
    CreateRestorePoint(srPointName, DEVICE_DRIVER_INSTALL, BEGIN_NESTED_SYSTEM_CHANGE);
    return 0;
}

function EndDriverInstallation()
{
    var srPointName = "Drivers Installation";
    var DEVICE_DRIVER_INSTALL = 10;
    var END_NESTED_SYSTEM_CHANGE = 103;
    CreateRestorePoint(srPointName, DEVICE_DRIVER_INSTALL, END_NESTED_SYSTEM_CHANGE);
    return 0;
}
Please note, that in our examples we simply skip the errors that may appear during the restore point creation. So, if we have been unable to create the transactional restore point for some reason we just skip this step and continue with the installation. But if you need it you can add more detailed error handling.
Let’s save these three functions, for example, to “C:\Scripts\SystemRestore.js”. Then to use them in our WiX script we should add the following Binary tag to it:
<Binary Id="SystemRestore" src=".\Scripts\SystemRestore.js" />
After this let’s add two custom actions to begin and complete the transaction:
<CustomAction Id='BeginDriverInstallation'  BinaryKey='SystemRestore'
JScriptCall='BeginDriverInstallation'  Execute='deferred'
Return='ignore' />
<CustomAction Id='EndDriverInstallation'  BinaryKey='SystemRestore'
JScriptCall='EndDriverInstallation'  Execute='deferred'
Return='ignore' />
Then we should insert them into InstallExecuteSequence. It will look in the following way:
<InstallExecuteSequence>
  <Custom  Action="BeginDriverInstallation" After="InstallFiles">NOT
Installed</Custom>
  <Custom  Action="Install_Signed_Driver"
After="BeginDriverInstallation">NOT  Installed</Custom>
  <Custom Action="Install_Unsigned_Driver"
After="Install_Signed_Driver">NOT Installed</Custom>
  <Custom  Action="EndDriverInstallation"
After="Install_Unsigned_Driver">NOT  Installed</Custom>
</InstallExecuteSequence>
The Issues With the Unsigned Drivers
As it was mentioned above, to install the unsigned drivers with DPInst you should use its ‘legacy mode’ - the /LM key (it is not necessary on Windows Vista and higher). But this method has several problems.
By default Windows XP and more recent operating systems will display the unsigned driver installation warning on every attempt to install the unsigned driver. It is not very uncomfortable if you are installing one or two drivers. But if your setup includes, for example, dozens of unsigned drivers the installation would be quite annoying.
Windows XP has the local policy setting concerning the system behavior when there is an attempt to install the unsigned driver. You can access this setting in System Properties->Hardware->Driver Signing:
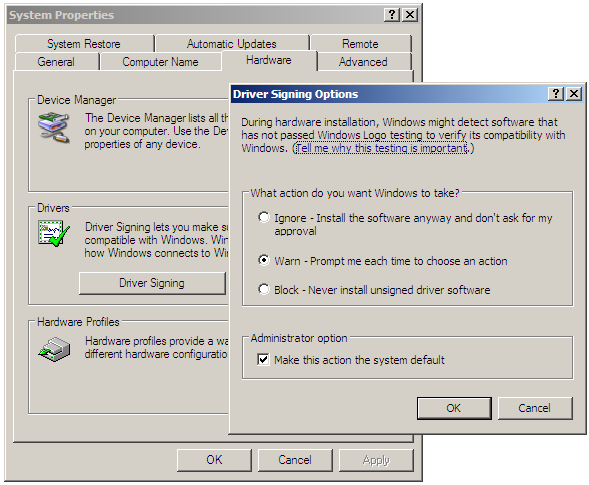
If you choose ‘Ignore’ the setup will install the unsigned drivers without warning.
Programmatically this setting is accessible via the registry. It is stored in HKEY_LOCAL_MACHINE\Software\Microsoft\Driver Signing. To disable the unsigned driver installation warning the Policy value must be set to 0.
But this task is not as simple. The operating system protects this value from the manual modification. And if you edit it directly from your application there will be no effect.
The working C++ solution which allows to temporary disable the unsigned driver warning on Windows XP is proposed here: http://openvpn.net/archive/openvpn-users/2004-11/msg00341.html.
Windows Vista and above do not have the setting described above. So the mentioned solution will not work there. To disable the unsigned driver installation warning on these operating systems you should write some solution to locate the warning window and press the Install Anyway button, or some kind of redirecting driver, or something else. All these tasks are not quite simple. Beside this, Windows Vista x64 and Windows 7 could allow you to install the unsigned drivers but might not allow you to load them.
So, the simplest way to solve the problem with the unsigned drivers installation is to sign them. By passing the Windows Logo test or by buying the Authenticode certificate.
Windows Installer Packages Installation and Uninstallation Using WiX
Sometimes the driver packages are packed into the MSI installers. It is handy when the driver requires some additional actions for correct functioning – like installing system services, copying files to system directories, etc. In this section we will review some peculiarities of the installation and uninstallation of the MSI packages from the running Windows Installer setup.
First of all, let’s add two MSI components to our WiX script. For example, their files are located in “C:\Drivers\MSI\1” and “C:\Drivers\MSI\2”. Then the component definition will look as follows:
  <Directory Id="MSI"  Name="MSI">
    <Directory  Id="MSI_1" Name="1">
      <Component Id="MSI_1"  DiskId="1" Guid="PLACE-YOUR-GUID-HERE">
         <File  Id="sample1.msi" Name="sample1.msi"
src="C:\Drivers\MSI\1\sample1.msi"  />
      </Component>
    </Directory>
    <Directory  Id="MSI_2" Name="2">
      <Component Id="MSI_2" DiskId="1" Guid="PLACE-YOUR-GUID-HERE">
         <File Id="sample2.msi"  Name="sample2.msi"
src="C:\Drivers\MSI\2\sample2.msi" />
      </Component>
    </Directory>
  </Directory>
And the feature for them:
<Feature Id="RootFeature"  Level="1" ConfigurableDirectory="TARGETDIR"
Description="Sample" Display="expand"  Title="Sample"
AllowAdvertise="no"  TypicalDefault="install">
  <Feature Id="Drivers" Level="1"  AllowAdvertise="no"
ConfigurableDirectory="TARGETDIR"  Description="Drivers"
Display="collapse"  Title="Drivers" >
    <ComponentRef  Id='MSI_1' />
    <ComponentRef Id='MSI_2' />
  </Feature>
</Feature>
Installation
We will install these packages with standard Microsoft utility msiexec. In our example we will use “quite” type of the installation (the /qn key) and the maximal verbose logging (/L*v). Here is the corresponding custom actions definition:
<CustomAction Id='Install_MSI_1' Return="ignore"
Directory="SystemFolder" ExeCommand="msiexec /i
"[MSI_1]sample1.msi" /qn /L*v
"[TempFolder]sample1.log" ALLUSERS=1 REBOOT=ReallySuppress
ARPSYSTEMCOMPONENT=1" />
<CustomAction Id='Install_MSI_2' Return="ignore"
Directory="SystemFolder" ExeCommand="msiexec /i
"[MSI_2]sample2.msi" /qn /L*v
"[TempFolder]sample2.log" ALLUSERS=1 REBOOT=ReallySuppress
ARPSYSTEMCOMPONENT=1" />
Now the main question is when to execute these custom actions.
Generally speaking, the Windows Installer technology supports the installation of only one MSI package at a time. The installation grabs the execution mutex at the beginning and the next installation doesn’t start until it is free. If we try to schedule Install_MSI_1 or Install_MSI_2 like we did it earlier with DPInst custom actions the installation will fail.
There are two possible things to do about it.
The first one is described here: http://www.advancedinstaller.com/user-guide/qa-uninstall-msi.html. We should modify the installation custom action definition to match the option “Asynchronous Execution, do not wait for return” and make it immediate:
<CustomAction Id='Install_MSI_1' Execute="immediate"
Return="asyncNoWait" Directory="SystemFolder" ExeCommand="msiexec /i
"[MSI_1]sample1.msi" /qn /L*v
"[TempFolder]sample1.log" ALLUSERS=1 REBOOT=ReallySuppress
ARPSYSTEMCOMPONENT=1" />
Also we should schedule it after InstallFinalize:
<InstallExecuteSequence>
  <Custom  Action="Install_MSI_1" After="InstallFinalize">NOT
Installed</Custom>
</InstallExecuteSequence>
Thus the custom action will be launched right after the main installer finishes. In this case two installations will not interfere.
Probably, this method is good for one additional MSI setup. But if you want to start two or more MSI packages installations during the running of the main installer, you’ll be unable to do it in the described way.
The second method does not have this disadvantage. It is about the scheduling of the MSI installation custom actions not in the InstallExecuteSequence, but in the InstallUISequence after the ExecuteAction standard action. Roughly speaking, the ExecuteAction is the whole InstallUISequence. When it completes, the execution mutex is released. So if we schedule some Windows Installer custom actions after it we will be able to execute as many MSI installations as we want before the actual finish of the main installation. Also we don’t need to modify the custom actions definitions.
Thus the InstallUISequence for two sample actions will look as follows:
<InstallUISequence>
  <Custom Action="Install_MSI_1"  After="ExecuteAction">NOT
Installed</Custom>
  <Custom Action="Install_MSI_2"  After="Install_MSI_1">NOT
Installed</Custom>
</InstallUISequence>
Please note that for the correct work of this method the main installation must be launched in full UI mode. Otherwise the actions from InstallUISequence will be skipped.
Uninstallation
Again we will use msiexec to uninstall the MSI packages. In our examples we will perform the uninstallation with the package GUID. The corresponding custom actions for Install_MSI_1 and Install_MSI_2 components will look as follows:
<CustomAction Id='Uninstall_MSI_1' Execute='deferred' Return="ignore"
Directory="SystemFolder" ExeCommand="msiexec /x {MSI-1-GUID} /qn /L*v
"[TempFolder]sample1.log" ALLUSERS=1 REBOOT=ReallySuppress"
/>
<CustomAction Id='Uninstall_MSI_2' Execute='deferred' Return="ignore"
Directory="SystemFolder" ExeCommand="msiexec /x {MSI-2-GUID} /qn /L*v
"[TempFolder]sample2.log" ALLUSERS=1 REBOOT=ReallySuppress"
/>
As usual, you should replace MSI-1-GUID and MSI-2-GUID with real GUIDs to use this code in your projects.
The uninstallation of the MSI package from the running Windows Installer package setup has the same problem with execution mutex as the installation.
So, the first possible solution (acceptable only for the single additional MSI package uninstallation) is to modify the corresponding custom action definition to match the option “Asynchronous Execution, do not wait for return” and make it immediate:
<CustomAction Id='Uninstall_MSI_1' Execute="immediate"
Return="asyncNoWait" Directory="SystemFolder" ExeCommand="msiexec /x
{MSI-1-GUID} /qn /L*v "[TempFolder]sample1.log" ALLUSERS=1
REBOOT=ReallySuppress" />
And then schedule it after InstallFinalize:
<InstallExecuteSequence>
  <Custom  Action="Uninstall_MSI_1" After="InstallFinalize">Installed</Custom>
</InstallExecuteSequence>
The more universal solution which allows multiple MSI uninstallations during the main package setup is to schedule the uninstallation custom actions after the ExecuteAction standard action of the InstallUISequence:
<InstallUISequence>
  <Custom Action="Uninstall_MSI_1"
After="ExecuteAction">Installed</Custom>
  <Custom Action="Uninstall_MSI_2"
After="Uninstall_MSI_1">Installed</Custom>
</InstallUISequence>
Yet again please note that for the correct work of this method the main installation must be launched in full UI mode. Otherwise the actions from InstallUISequence will be skipped.
Summary
The topic of the driver installation using Windows Installer is very wide. This article is not supposed to describe it all. The author has tried to collect the main problems which he has met working on the driver installer and describe the solutions which he has found. He hopes that this article would be useful :).
Attached sample installer contains the implementation of the most of things described in the article.
Read more articles from our specialists at Apriorit Articles Section.
- http://msdn.microsoft.com/en-us/library/ms790308.aspx - Driver Package Installer (DPInst)
- http://msdn.microsoft.com/en-us/library/ms790806.aspx - DPInst command line switches
- http://msdn.microsoft.com/en-us/library/ms793500.aspx - DriverPackagePreinstall function
- http://msdn.microsoft.com/en-us/library/ms793508.aspx - DriverPackageUninstall function
- http://msdn.microsoft.com/en-us/library/aa378847%28VS.85%29.aspx - CreateRestorePoint Method of the SystemRestore Class
- http://support.microsoft.com/default.aspx?scid=KB;en-us;295299 – VBScript code samples for working with System Restore
- http://msdn.microsoft.com/en-us/library/aa378987%28VS.85%29.aspx – C++ code samples for working with System Restore
- http://openvpn.net/archive/openvpn-users/2004-11/msg00341.html - C++ solution for disabling and enabling of the unsigned driver installation warning on Windows XP
- http://technet.microsoft.com/en-us/library/cc750035.aspx - Authenticode
- http://www.advancedinstaller.com/user-guide/qa-uninstall-msi.html - launching of the MSI installation from already running MSI setup
- http://www.tramontana.co.hu/wix/ - WiX Tutorial
- http://wix.sourceforge.net/manual-wix2/wix_index.htm - WiX 2.0 manual
- http://wix.sourceforge.net/manual-wix3/main.htm - WiX 3.0 manual
- http://blogs.technet.com/alexshev/default.aspx - TechNet blog of Alex Shevchuk (a lot of useful information about WiX)
ApriorIT is a software research and development company specializing in cybersecurity and data management technology engineering. We work for a broad range of clients from Fortune 500 technology leaders to small innovative startups building unique solutions.
As Apriorit offers integrated research&development services for the software projects in such areas as endpoint security, network security, data security, embedded Systems, and virtualization, we have strong kernel and driver development skills, huge system programming expertise, and are reals fans of research projects.
Our specialty is reverse engineering, we apply it for security testing and security-related projects.
A separate department of Apriorit works on large-scale business SaaS solutions, handling tasks from business analysis, data architecture design, and web development to performance optimization and DevOps.
Official site: https://www.apriorit.com
Clutch profile: https://clutch.co/profile/apriorit
This member has not yet provided a Biography. Assume it's interesting and varied, and probably something to do with programming.


 General
  News
News  Suggestion
  Question
  Bug
Bug  Answer
  Joke
Joke  Praise
  Rant
Rant  Admin
Admin 


