Introduction
Live SDK provides a set of controls and APIs that enable applications to integrate single sign-on (SSO) with Microsoft accounts and access information from SkyDrive, Hotmail, and Windows Live Messenger on Windows Phone and Windows 8.
Live SDK support several platforms such as: iOS, Android and of course Windows Phone and Windows 8 applications using C# and JS.
In this demo I’ll show how to use Live SDK with Windows 8, so in order to follow this article you need to have the following installed:
- Windows 8 – Download
- Live SDK -Live SDK downloads
Also you can assist Interactive Live SDK
Step 1: Building Our App
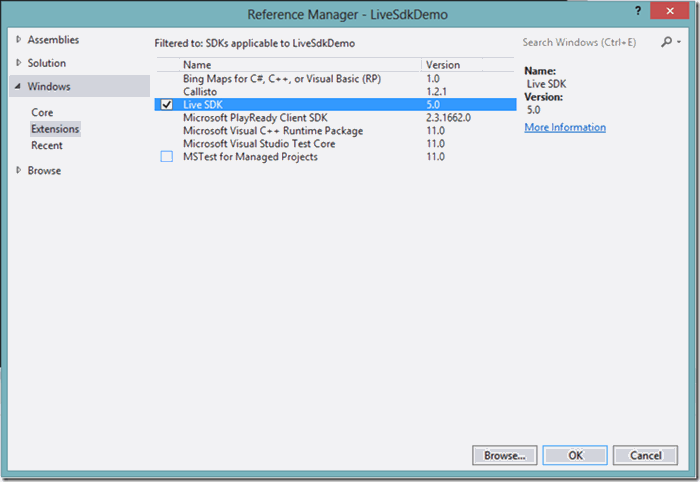
I’ve create a C#\JavaScript Blank App called – “LiveSdkDemo”, and add a reference to “Live SDK” we just installed.
Step 2: Adding a “Sign In” Button
Before we can do anything with Live SDK we first need to “Sign In” using our Window Live ID. To do that we need to add the “SignInButton” control coming with Live SDK. But just before we'll add the control let's talk about a very important thing when using Live SDK:
Scopes:
Before your app makes requests of the Live Connect APIs to work with Live Connect info, in most cases you must get permission from the user to access that info or to create new objects on behalf of the user. In the Live Connect APIs, this permission is called a scope. Each scope grants a different permission level.
Live SDK Scope Types
In this demo I’m using three Scopes:
- wl.signin - Single sign-in behavior. With single sign-in, users who are already signed in to Live Connect are also signed in to your website.
- wl.basic - Read access to a user's basic profile info. Also enables read access to a user's list of contacts.
- wl.skydrive_update - Read and write access to a user's files stored in SkyDrive.
Beside Scopes I've also registered “
onSessionChange” event this will let us know when we made a successful connection and when we received an Sign In error.
JavaScript
I've created a html element called – “signin”, in JS we need to populate the element from code.
<p id="signin"></p>
Now just before we can populate the “signin” element with Live SDK button we need to call WL.init with the Scopes for this session, this function initializes the JavaScript library. An application must call this function before making other function calls to the library except for subscribing/unsubscribing to events.
WL.Event.subscribe("auth.login", onLoginComplete);
WL.Event.subscribe("auth.sessionChange", onSessionChange);
WL.init({ scope: ["wl.signin", "wl.basic", "wl.skydrive_update"] });
WL.ui({
    name: "signin",
    element: "signin"
});
C#
So I’ve added a using to Microsoft.Live.Controls and add “SignInButton” control.
I’ve also add a TextBlock to display any errors coming from the SignIn operations.
<Page
    x:Class="LiveSdkDemo.MainPage"
    xmlns="http://schemas.microsoft.com/winfx/2006/xaml/presentation"
    xmlns:x="http://schemas.microsoft.com/winfx/2006/xaml"
    xmlns:local="using:LiveSdkDemo"
    xmlns:d="http://schemas.microsoft.com/expression/blend/2008"
    xmlns:mc="http://schemas.openxmlformats.org/markup-compatibility/2006"
    xmlns:live="using:Microsoft.Live.Controls"
    mc:Ignorable="d">

    <Grid Background="{StaticResource ApplicationPageBackgroundThemeBrush}">
        <live:SignInButton x:Name="btnSignin" Scopes="wl.signin wl.basic wl.skydrive_update"
                           Branding="Skydrive" SessionChanged="OnSessionChanged"
                           VerticalAlignment="Top" Width="141" HorizontalAlignment="Left"
			   Margin="100,100,0,0" />

        <TextBlock x:Name="txtStatus" HorizontalAlignment="Center" Margin="0"
 	TextWrapping="Wrap" VerticalAlignment="Center" Foreground="Red" FontSize="24"/>
    </Grid>
</Page>
Now let’s run our application and see what’s happens.
You’ll notice that you receive the following error:
"The app is not configured correctly to use Live Connect services. To configure your app, please follow the instructions on http://go.microsoft.com/fwlink/?LinkId=220871."
The reason is before we begin building this app, you need to register it with Windows Live. You can register your app by going to the application management site.
Then you have two steps in order to register your application:
1. You need to enter the application name and publisher (you can find it in “Package.appxmanifest” located under project solution).

After you click “I accept”, we’ll receive a new “Package name” and Client secret (I’ll talk about this in later posts).
For now all you need to do is copying the “Package name” from the site and adding it instead the current in Package.appxmanifest.
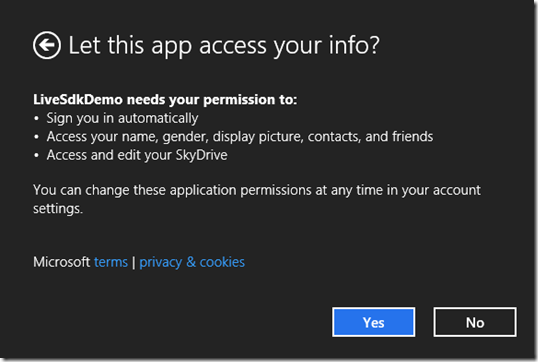
Now let’s run the application again, and after you click the “Sign In” button you’ll see this message: (this will only appear one time)
After clicking “Yes” you should see that “Sign In” changed to:
Step 3: Getting User Data
After we made a successful Sign In we can start using Live SDK, the first thing I’ll show is how to get user data from his Live Account.
JavaScript
Using global WL (Windows Live) object we’ll can call “api” function to perform Ajax Requests to LiveSDK REST services. You can always use other Ajax libraries to use LiveSDK REST just call this url passing the access token:
https://apis.live.net/v5.0/me/albums?access_token=ACCESS_TOKEN
- path - Required. Contains the path to the REST API object. For information on specifying paths for REST objects, see REST reference.
- method - Optional. An HTTP method that specifies the action required for the API call. These actions are standard REST API actions: "COPY", "GET", "MOVE", "PUT", "POST", and "DELETE".
- body - Optional. A JSON object that specifies the REST API request body. The body property is used only for "POST" and "PUT" requests.
WL.api("me", function (data) {
    $("#txtStatus").innerHTML = "Full Name:" + data.name +
        "<br/>First Name:" + data.first_name +
        "<br/>Last Name:" + data.last_name +
        "<br/>Profile Link:" + data.link +
        "<br/>Gender:" + data.gender +
        "<br/>Locale:" + data.locale;
    $("#btnBrowse").disabled = false;
});
Add getting my profile picture, same goes here first define the user I want to get his picture and then the string “picture”
WL.api("me/picture", function (data) {
    $("#userImg").src = data.location;
});
Full Code:
function onSessionChange(response) {
    var session = WL.getSession();
    if (!session.error) {
        WL.api("me", function (data) {
            $("#txtStatus").innerHTML = "Full Name:" + data.name +
                "<br/>First Name:" + data.first_name +
                "<br/>Last Name:" + data.last_name +
                "<br/>Profile Link:" + data.link +
                "<br/>Gender:" + data.gender +
                "<br/>Locale:" + data.locale;
            $("#btnBrowse").disabled = false;
        });
        WL.api("me/picture", function (data) {
            $("#userImg").src = data.location;
        });
    }
    else {
        $("#txtStatus").textContent = session.error.message;
    }
}
C#
Using LiveConnectClient object (using our Access Token) we get the following abilities:
- GET—Returns a representation of a resource.
- POST—Adds a new resource to a collection.
- PUT—Updates a resource at the location pointed by the URL or creates a new resource, if it doesn't exist.
- DELETE—Deletes a resource.
- MOVE—Moves the location of a resource.
- COPY—Duplicates a resource.
For now I’ll use GetAsync method passing the string “me” telling Live SDK I want to receive my information.
this.liveClient = new LiveConnectClient(e.Session);
var myData = await this.liveClient.GetAsync("me");
txtStatus.Text = string.Format("Full Name:{0}\nFirst Name:{1}\nLast Name:{2}\nProfile Link:{3}\nGender:{4}\nLocale:{5}", myData.Result["name"],
                                    myData.Result["first_name"],
                                    myData.Result["last_name"],
                                    myData.Result["link"],
                                    myData.Result["gender"],
                                    myData.Result["locale"]);
Add getting my profile picture, same goes here first define the user I want to get his picture and then the string “picture”
var myPic = await this.liveClient.GetAsync("me/picture");
var bmp = new BitmapImage(new Uri(myPic.Result["location"].ToString()));
imgProfile.Source = bmp;
Full Code:
private LiveConnectClient liveClient;
private async void OnSessionChanged(object sender, LiveConnectSessionChangedEventArgs e)
{
    if (e.Status == LiveConnectSessionStatus.Connected)
    {
        this.liveClient = new LiveConnectClient(e.Session);
        var myData = await this.liveClient.GetAsync("me");
        txtStatus.Text = string.Format("Full Name:{0}\nFirst Name:{1}\nLast Name:{2}\nProfile Link:{3}\nGender:{4}\nLocale:{5}", myData.Result["name"],
                                            myData.Result["first_name"],
                                            myData.Result["last_name"],
                                            myData.Result["link"],
                                            myData.Result["gender"],
                                            myData.Result["locale"]);
        var myPic = await this.liveClient.GetAsync("me/picture");
        var bmp = new BitmapImage(new Uri(myPic.Result["location"].ToString()));
        imgProfile.Source = bmp;
    }
    else
    {
        if (e.Error != null)
        {
            txtStatus.Text = e.Error.Message;
        }
    }
}
Result
Accessing a user's public info
There is an exception to the rule that you must get the permission from the user before you can access his or her info: your app can access a user's publicly available info without requesting any scope. Public info includes the user's ID, first and last names, display name, gender, locale, and picture. The user's Messenger friends list is also available if the user has elected to make it public.
For example: I've changed “me” to my friend Gil Fink Live Id and here is the result:
Step 4: Uploading File To User Folder
In this part we’ll see how to upload a file to SkyDrive using Live SDK, first I’ve added to more buttons and a progress bar so we can see the upload progress.
The first button for picking a file and the second one for starting the upload process.
Pick a File
Because of SkyDrive file restrictions you can upload any file you want (you basically can but you need to change file extension to txt, doc or any kind of picture extension), so right now I've create a File Picker just for text files and word.
JavaScript
function openFile() {
var openPicker = new Windows.Storage.Pickers.FileOpenPicker();
openPicker.viewMode = Windows.Storage.Pickers.PickerViewMode.list;
openPicker.suggestedStartLocation = Windows.Storage.Pickers.PickerLocationId.documentsLibrary;
openPicker.fileTypeFilter.replaceAll([".txt", ".docs", ".doc"]);
openPicker.pickSingleFileAsync().then(function (file) {
if (file) {
_file = file;
$("#btnStart").disabled = false;
WinJS.log && WinJS.log("Picked photo: " + file.name, "sample", "status");
} else {
_file = undefined;
$("#btnStart").disabled = true;
WinJS.log && WinJS.log("Operation cancelled.", "sample", "status");
}
});
} C#
private async void btnPickFile_Click(object sender, RoutedEventArgs e)
{
    var fp = new FileOpenPicker();
    fp.ViewMode = PickerViewMode.List;
    fp.SuggestedStartLocation = PickerLocationId.DocumentsLibrary;
    fp.FileTypeFilter.Add(".txt");
    fp.FileTypeFilter.Add(".doc");
    fp.FileTypeFilter.Add(".docx");
    var file = await fp.PickSingleFileAsync();
    if (file != null)
    {
        _file = file;
        txtFilePath.Text = file.Path;
        btnStartUpload.IsEnabled = true;
    }
    else
    {
        _file = null;
        txtFilePath.Text = string.Empty;
        btnStartUpload.IsEnabled = false;
    }
}
Start Upload
JavaScript
To Upload file using Live SDK we’ll use - WL.backgroundUpload method.
- path - Required. The path to the file to upload.
- file_name - Optional. The name of the file to upload.
- file_input (StorageFile) - Optional. The file input object to read the file from.
- stream_input - Optional. The file input stream to read the file from.
- overwrite - Optional. Indicates whether the uploaded file should overwrite an existing copy. Specify true or "true" to overwrite, false or "false" to not overwrite and for theWL.backgroundUpload method call to fail, or "rename" to not overwrite and enable SkyDrive to assign a new name to the uploaded file.
backgroundUpload returns a Promise so we can implement code for onError and onProgress (to update the progress bar)
WL.backgroundUpload({
path: "me/skydrive",
file_name: _file.fileName,
file_input: _file,
overwrite: "true"
}).then(function (args) {
$("#txtStatus").textContent = "Upload Completed!";
toggle(true);
},
function (err) {
$("#txtStatus").textContent = e.response;
$("#pb").className = "hidden";
},
function (e) {
$("#pb").value = Math.round(e.progressPercentage);
}); C#
Once we got a file to upload we’ll first create new Progress object of type LiveOperationProgress using this object we’ll see the upload progress and assign it to our ProgressBar.
In order to upload the file we need to get the file Stream so just call – OpenStreamForReadAsync to get file stream.
Last we’ll use a built in method “BackgroundUploadAsync”, passing the following parameters:
- Upload Location
- File Name
- File Stream
- Overwrite Option
- Cancellation Token
- Progress Handler
private CancellationTokenSource cts;
private async void btnStartUpload_Click(object sender, RoutedEventArgs e)
{
    if (_file == null) return;
    btnPickFile.IsEnabled = btnStartUpload.IsEnabled = false;
    txtStatus.Text = string.Format("Uploading Backup...");
    this.pb.Value = 0;
    var progressHandler = new Progress<LiveOperationProgress>(
        (progress) => { this.pb.Value = progress.ProgressPercentage; });
    var stream = await _file.OpenStreamForReadAsync();
    this.cts = new CancellationTokenSource();
    LiveOperationResult result =
        await this.liveClient.BackgroundUploadAsync("/me/skydrive", _file.Name, stream.AsInputStream(), OverwriteOption.Overwrite, this.cts.Token, progressHandler);
    txtStatus.Text = string.Format("Upload Completed!");
    btnPickFile.IsEnabled = btnStartUpload.IsEnabled = true;
}
Result
Step 5: Get SkyDrive Files
Now before downloading files from SkyDrive you need to know their ID, name is not enough for download using Live SDK, so to makes things simpler let’s first get all files from our SkyDrive.
Getting all files using Live SDK will also bring the file ID so we’ll be able to save those files locally.
JavaScript
I’ve added a ListView to our body to present the files.
<div id="fileTemplate" data-win-control="WinJS.Binding.Template">
<div class="file">
    <span data-win-bind="textContent: id"></span>
    -
    <span data-win-bind="textContent: type"></span>
    -
    <span data-win-bind="textContent: name"></span>
    -
    <span data-win-bind="textContent: created_time"></span>
</div>
<div id="fileList" data-win-control="WinJS.UI.ListView"
    data-win-options="{ selectionMode: 'single',layout: { type: WinJS.UI.ListLayout},
                        itemTemplate:select('#fileTemplate')}">
</div>
Now all we need to do is using the “api” method passing “me/skydrive/files”, this will return all folder and files under my main folder. Once we received the files list from the server I've converted the response into List and assigned its dataSource to out ListView itemDataSource property.
function getFiles() {
    toggle(false);
    WL.api("me/skydrive/files", function (response) {
        var skyDriveFiles = response.data;
        var dataList = new WinJS.Binding.List(skyDriveFiles);
        var files = $('#fileList').winControl;
        files.itemDataSource = dataList.dataSource;
        toggle(true);
    });
}
C#
First I've create new object called – SkyDriveFile to save the important data we get from SkyDrive.
public class SkyDriveFile
{
    public string ID { get; set; }
    public string Name { get; set; }
    public string Type { get; set; }
    public string Link { get; set; }
    public DateTime CreationDate { get; set; }
    public SkyDriveFile(dynamic fileData)
    {
        this.Name = fileData.name;
        this.ID = fileData.id;
        this.Link = fileData.link;
        this.Type = fileData.type;
        this.CreationDate = Convert.ToDateTime(fileData.created_time);
    }
}
I've added a ListView to our XAML to present the files, now all we need to do is using the GetAsync method passing “me/skydrive/files”, this will return all folder and files under my main folder.
private async void btnGetFiles_Click(object sender, RoutedEventArgs e)
{
    this.cts = new CancellationTokenSource();
    LiveOperationResult Aresult =
            await this.liveClient.GetAsync("me/skydrive/files", this.cts.Token);
    var fileList = new List<SkyDriveFile>();
    dynamic data = Aresult.Result;
    foreach (var dd in data)
    {
        foreach (var d in dd.Value)
        {
            fileList.Add(new SkyDriveFile(d));
        }
    }
    listFiles.ItemsSource = fileList;
}
Result
Step 6: Download File
Now that we got all file ids we can proceed to downloading them into our machine.
JavaScript
To download a file using Live SDK we’ll use the “backgroundDownload” method almost in the same way we use the “backgroundUpload” method, but is time we need to pass the file id that we want to download and adding “/content” after it.
First let’s get the selected file from the fileList and create new file under Temp folder with the same name.
list.selection.getItems().then(function (selectedFiles) {
var fileToDownload = selectedFiles[0].data;
list.selection.clear();
Windows.Storage.ApplicationData.current.temporaryFolder.createFileAsync(fileToDownload.name,
Windows.Storage.CreationCollisionOption.replaceExisting).then(function (localFile) {
Now that we have new file under temp folder we can start the download:
var properties = { path: fileToDownload.source, file_output: localFile, overwrite: "true" };
WL.backgroundDownload(properties).then(function (args) {
$("#txtStatus").textContent = "Download Completed! - " + localFile.path;
toggle(true);
}, function (err) {
$("#txtStatus").textContent = e.response;
$("#pb").className = "hidden";
}, function (progress) {
$("#pb").value = Math.round(progress.progressPercentage);
});
}); C#
To download a file using Live SDK we’ll use the “BackgroundDownloadAsync” method almost in the same way we use the “BackgroundUploadAsync” method, but is time we need to pass the file id that we want to download and adding “/content” after it.
I’ve create a new file under Temp folder and using Stream.CopyToAsync method I’ve copied the stream I got from SkyDrive into the new file I’ve created.
private async void btnDownloadFile_Click(object sender, RoutedEventArgs e)
{
this.pb.Value = 0;
var progressHandler = new Progress<LiveOperationProgress>(
(progress) => { this.pb.Value = progress.ProgressPercentage; });
var file = listFiles.SelectedItem as SkyDriveFile;
txtStatus.Text = string.Format("Downloading Backup...");
LiveDownloadOperationResult result =
await this.liveClient.BackgroundDownloadAsync(string.Format("{0}/content", file.ID), this.cts.Token, progressHandler);
var stream = await result.GetRandomAccessStreamAsync();
var temp = Windows.Storage.ApplicationData.Current.TemporaryFolder;
var localFile = await temp.CreateFileAsync(file.Name, CreationCollisionOption.GenerateUniqueName);
var fileStream = await localFile.OpenStreamForWriteAsync();
await stream.AsStreamForRead().CopyToAsync(fileStream);
await fileStream.FlushAsync();
fileStream.Dispose();
stream.Dispose();
txtStatus.Text = string.Format("File Save! - " + localFile.Path);
}
Result
History
Shai Raiten is VS ALM MVP, currently working for Sela Group as a ALM senior consultant and trainer specializes in Microsoft technologies especially Team System and .NET technology. He is currently consulting in various enterprises in Israel, planning and analysis Load and performance problems using Team System, building Team System customizations and adjusts ALM processes for enterprises. Shai is known as one of the top Team System experts in Israel. He conducts lectures and workshops for developers\QA and enterprises who want to specialize in Team System.
My Blog: http://blogs.microsoft.co.il/blogs/shair/


 General
  News
News  Suggestion
  Question
  Bug
Bug  Answer
  Joke
Joke  Praise
  Rant
Rant  Admin
Admin 


