Quick guide for setting up your C++ application to use a RavenDB database
As a design philosophy, we at Hibernating Rhinos try to make life easier for developers, and our C++ client is no exception.
In this article I will walk you through the steps to set up your application to interact with a RavenDB database. I’ll dive right into the client API, but the appendix at the end explains how to fetch the client and relevant dependencies from its repository using a CMake script.
The RavenDB Client API
As an example of the data we want to store, I’ve defined an object to hold a ‘user’ record. This record will be stored in the database as a document (for you SQL aficionados, a document is sort of equivalent to a row in a table, except it’s not required to obey a schema, and can consist of arbitrarily complex object graphs).
struct user
{
    std::string  id;
    std::string  name;
    int  age{};
    std::vector<std::string> emails;
};
CRUD-ing
Let’s look at some code, and then I’ll break it down in detail below. RavenDB clients are designed to have similar function names and usage patterns, so if you have experience with our other clients you’ll probably find this familiar. The following connects our application to a RavenDB server, then creates and stores our first user:
auto doc_store = ravendb::client::documents::DocumentStore::create();
doc_store->set_urls({ "http://live-test.ravendb.net" });
doc_store->set_database("Demo");
doc_store->initialize();
{
auto session = doc_store->open_session();
auto user_record = std::make_shared<user>();
user_record->name = "John Doe";
user_record->emails = {"john.doe@example.com","non_existing@example.com","bar@example.com"};
session.store(user_record);
user_record->age = 35;
session.save_changes();
}
Serialization and de-serialization needs to be defined for our record classes. In the appendix I explain how this can be done easily using the nlohmann/json library.
If we take a look in RavenDB Studio at this point, we’ll see this:
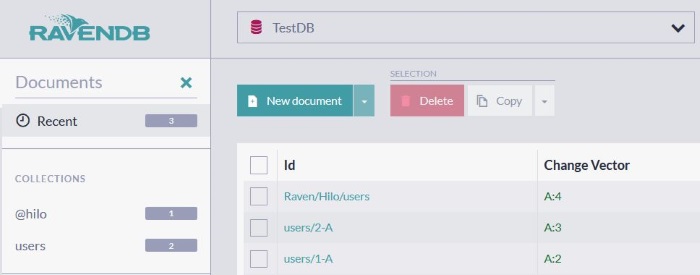
We could have specified an ID for this document, but since we didn’t, RavenDB helpfully generated a unique ID on its own: users/1-A.
Below we can see that the document is JSON, and its structure closely matches the structure of our user class.

What just happened?
The above code does some "magic". The RavenDB C++ Client allows us to work with the database with a high level API and our native application objects. Serialization, once defined, is handled automatically. You might also notice that the user’s age field is modified after we call store(), but this change is still persisted when we call save_changes().
Now that we have stored our first document on RavenDB, let’s see how we Read, Update, and Delete:
{
auto session = store->open_session("TestDB");
const std::shared_ptr<user> user = session.load<user>("users/1-A");
user->age = 19;
session.delete_document("users/2-A");
session.save_changes();
}
The session object allows us to perform many operations as part of a single ACID transaction. Instead of making a round-trip to the server each time we make a deletion or a partial update, all these operations are committed in one trip when we call save_changes().
Queries, queries everywhere!
RavenDB offers the querying capabilities of a dedicated search engine. Here are some example queries:
const std::vector<std::shared_ptr<user>> usersNamedJohn =
session.query<user>()->where_starts_with("name", "John")
->order_by_descending("name")
->to_list();
const std::vector<std::shared_ptr<user>> rawUsersNamedJohn =
session.advanced().raw_query<user>("from users where search(name, $name_to_search)")
->add_parameter("name_to_search","john")
->to_list();
This code is pretty "magical" too. After storing our documents we can just specify the data we’re interested in and let RavenDB to figure out how to retrieve it.
The raw_query() above is written in Raven Query Language (RQL). This is the query language we designed to expose all our low-level querying options. It’s very easy to learn if you know SQL - or even if you don’t.
What if we want to perform an aggregation? This query counts how many users have the same email:
std::string aggregation_rql_query =
"from users "
"group by emails[] "
"select key() as email, count() as count";
const auto rawCountEmailsPerUser =
session.advanced().raw_query<email_count_result>
(aggregation_rql_query)->to_list();
This aggregation query projects the results into a different object defined below:
struct email_count_result
{
std::string email;
int count{};
};
This class also needs serialization as explained in the appendix.
Now let’s look at a query with the whole shebang, including parentheses and logical operators.
std::string complex_query =
     "from users "
     "where emails[] in ( $email_list ) or "
     "(age > 25 and endsWith(name, 'Doe'))";

const vector<shared_ptr<user>> complexQueryResult =
  session.advanced().raw_query<user>(complex_query)
     ->add_parameter("email_list",
         nlohmann::json::array(
              {"john.doe@example.com","jane.doe@example.com" }))
     ->to_list();
The End
As you can see, interacting with and querying RavenDB is simple, intuitive, and doesn’t require lots of complex "plumbing" code.
You can download the complete demo source code for this article from GitHub. It assumes a RavenDB instance running at localhost, but alternatively you can point it to our playground server at http://live-test.ravendb.net.
To start working with the C++ client, you can download it from the GitHub repo and compile it with CMake as in the appendix below. It compiles libraries for both static and dynamic linking for your convenience.
I want to learn more about RavenDB!
Well I’ve got you covered! You will find detailed information in the RavenDB documentation and a step-by-step guide with code samples in our bootcamp.
Consult chapter two of Inside RavenDB 4.0 for help with downloading and setting-up on premise instances.
Appendix: Setting-up serialization
In the demo project, we use set_val_to_json() and get_val_from_json() to define serialization and de-serialization of the user record. These are utility functions defined in the RavenDB C++ client that simplifies some functionality of the nlohmann/json library for convenience.
inline void to_json(nlohmann::json& j, const user& u)
{
    using ravendb::client::impl::utils::json_utils::set_val_to_json;
    set_val_to_json(j, "name", u.name);
    set_val_to_json(j, "age", u.age);
    set_val_to_json(j, "emails", u.emails);
}

inline void from_json(const nlohmann::json& j, user& u)
{
    using ravendb::client::impl::utils::json_utils::get_val_from_json;
    get_val_from_json(j, "name", u.name);
    get_val_from_json(j, "age", u.age);
    get_val_from_json(j, "emails", u.emails);
}
Appendix: Setting-up the dependencies
Fetching sources
In the root CMakeLists.txt, the following commands will fetch the RavenDB client source and set it as a compilation target that we will statically link to the parent app:
set (RAVENCPP_SRC "${PROJECT_SOURCE_DIR}/libs/RavenDB" CACHE INTERNAL "RAVENCPP_SRC")
#fetch the RavenDB C++ client from the repo using ‘git clone’
include(FetchContent)
FetchContent_Declare(
ravendb_client_cpp
GIT_REPOSITORY https:
GIT_TAG master
SOURCE_DIR ${RAVENCPP_SRC}/repository
SUBBUILD_DIR ${RAVENCPP_SRC}/subbuild
BINARY_DIR ${RAVENCPP_SRC}/binary
)
FetchContent_GetProperties(ravendb_client_cpp)
if(NOT ravendb_client_cpp_POPULATED)
FetchContent_Populate(ravendb_client_cpp)
#since we don't want to compile tests and tryouts, only the client
set(BUILD_TRYOUTS OFF)
set(BUILD_TESTS OFF)
add_subdirectory("${RAVENCPP_SRC}/repository/" "${RAVENCPP_SRC}/binary")
endif()
Make sure to include the client’s header folders:
list(APPEND CMAKE_INCLUDE_PATH ${RAVENCPP_SRC}/repository/Raven.CppClient)
set(CMAKE_INCLUDE_PATH ${CMAKE_INCLUDE_PATH}  CACHE  INTERNAL  "CMAKE_INCLUDE_PATH")
Since we’re compiling the C++ client as part of a parent app, we need to include its dependencies (which RavenDB manages with vcpkg):
include_directories(${CMAKE_INCLUDE_PATH})
link_directories(${CMAKE_LIBRARY_PATH})
This will ensure that in the next step we can link not only to the client, but to all its dependencies.
Note: the RavenDB client adds relevant folders for headers and libraries in the variables:
${CMAKE_INCLUDE_PATH}, ${CMAKE_LIBRARY_PATH}
The RavenDB C++ client uses vcpkg. This is a C++ package manager created by Microsoft that can download and compile dependencies for CMake projects. You can read more about it at its GitHub repo
Linking
Now that we have the client sources, we need to link them to the actual project (‘subfolder’ in CMake terminology) that will be connecting to RavenDB.
In CMakeLists.txt of the subfolder, add the following CMake commands:
find_package(CURL REQUIRED)
find_package(OpenSSL REQUIRED)
find_package(CURL REQUIRED)
find_package(Threads REQUIRED)
Lastly, we link the client and its dependencies:
add_executable ([executable name] "[executable name].cpp"  "[executable name].h")
target_include_directories([executable name] PUBLIC  ${CMAKE_INCLUDE_PATH})
target_link_libraries([executable name]
        Raven_CppClient_static #the RavenDB client
        OpenSSL::SSL
        OpenSSL::Crypto
        ${CURL_LIBRARIES}
        Threads::Threads)
Michael is an experienced coder who is rather happy that his hobby and his profession are the same. Also, he really likes a good challenge. The complex, the better.
By day, a member of RavenDB Core Team, he works on internals of RavenDB and by night he is Batman!
Well... not exactly, but don't tell anyone!
In his free time, Michael is a tinkerer with a passion for the unknown, coding in general and lots of unfinished pet projects. And sometimes, for fun he speaks at conferences too.


 General
  News
News  Suggestion
  Question
  Bug
Bug  Answer
  Joke
Joke  Praise
  Rant
Rant  Admin
Admin 


