In this article I created a new SSH key especially for use with Bitbucket Pipelines. I look at how are SSH keys used, and then show, for setting up CI, how Bitbucket Pipelines needs to connect via SSH to my webspace.
After years of executing a “build and upload per FTP” batch on my machine, I now have a GitHub Pages-like experience when updating this site.
The source code lives in a repository on Bitbucket, and I already had automated building and publishing it, but this only worked on a computer with Mercurial, Jekyll and WinSCP installed.
I always liked GitHub Pages’ “push to the repo and we’ll auto-publish the site for you” experience, but moving this site to GitHub Pages is not an option because it contains some PHP code.
With Bitbucket offering its own CI service with Bitbucket Pipelines for some time now, I finally sat down and tried to setup auto-publishing this site to my webspace.
1. Building the Site with Jekyll
That was the (relatively easy) part. This is actually the second time I tried this, but couldn’t get it to work the first time.
The problem was that I’m on Windows, and a few years ago I discovered Portable Jekyll, which I’m using since then to build my Jekyll sites on my machine (because it’s easier than installing Ruby and stuff manually).
Unfortunately, Portable Jekyll hasn’t been updated for a while, so I’m using the same (fixed) Jekyll version 3.2.1 for years.
This is okay for me, but it means that my Jekyll sites don’t have a Gemfile, and honestly I never actually figured out how Gemfiles work.
When I tried to build my site with Bitbucket Pipelines for the first time, I used some generic Docker image with only Ruby already installed.
I then installed Jekyll myself during the build…and found that I couldn’t get my site to build unless I added a Gemfile. Unfortunately, building with Portable Jekyll on my local machine stopped working as soon as I added the Gemfile, and I never figured out to get both builds to work.
Apparently others had problems with that as well, so in the meantime, the creators of Jekyll created the jekyll/builder Docker image, which has a fully working Jekyll version already installed. Plus, there’s a separate image for every existing Jekyll version, which means I can just always use the version matching my local Portable Jekyll installation.
With this Docker image, I was able to build my site without a Gemfile, with this pipeline:
image: jekyll/builder:3.2.1

pipelines:
  default:
    - step:
        script:
          - jekyll build
2. Publishing the Site to My Webspace
This took me a long time until it properly worked.
I tried publishing the site via FTP first, like I had done in the past with WinSCP on Windows.
Bitbucket Pipelines runs on Linux, so WinSCP was not an option. I found Git-ftp, but my site is in a Mercurial repository and I preferred a “scm-agnostic” solution, because I have multiple sites in Git and Mercurial repos.
In the end, I had no luck with FTP on Bitbucket Pipelines. I had a solution which worked in a test run with a few files, but unfortunately not with this whole site. It’s not that big and Ftp’ing it from my Windows machine takes under a minute, but on Pipelines the FTP upload took so long that one build used up most of my free Pipeline minutes for the month.
But while I was Googling to find out all this, I found some other information on the way which sounded promising:
- Uploading to my server with rsync and SSH should be faster (and the best solution when the webserver supports SSH)
- Connecting via SSH enables me to run quite a lot of shell commands on my server, even when it’s just (relatively) cheap webspace on a shared server
Especially the second one sounded interesting…because that means I can zip my whole site on the build server, upload the archive to my webserver and unzip it there.
This should reduce the upload time dramatically, because copying one large file is always faster than copying a great number of small files with the same total size… especially when uploading via the Internet.
2a. Figuring Out the Shell Commands
I pulled the basic commands from this tutorial: Deploying Jekyll blog automatically using Bitbucket Pipelines
The tutorial has all the shell commands directly in the Pipelines YAML file, I decided to put them in separate shell scripts and just call those from the YAML file.
In case I’ll switch to a different CI provider in the future, the shell scripts can stay as they are and I just need to migrate the part that’s in the YAML.
Note: I’m a Windows guy and this was my first attempt writing shell scripts, so there are probably things that could be improved.
Here are the final YAML file and the final shell scripts, with comments what each step does:
options:
  max-time: 4
pipelines:
  branches:
    default:
      - step:
          name: Jekyll Build
          # use the "Jekyll Builder" Docker image
          image: jekyll/builder:3.2.1
          script:
            # set permissions for the script so BB Pipelines is able to execute it
            - chmod +x ci-build.sh
            # actually execute the build script (see below)
            - ./ci-build.sh
          # save the content of the build script's output dir for the second step
          artifacts:
            - build/**
      - step:
          name: Deploy
          deployment: production
          # use the Docker image https://hub.docker.com/_/alpine because it's tiny
          image: alpine
          script:
              # update everything and install openssh and rsync
              # (apk is Linux Alpine's package manager)
              - apk update && apk add openssh rsync
              # connect to my webserver via SSH and rsync the "build" directory
              # from the first step to the server
              - rsync -rSlh --stats build/ $user_host:$webpath/tar
              # execute the deploy script (see below) DIRECTLY ON THE SERVER
              - ssh -o StrictHostKeyChecking=yes $user_host 'bash -s' -- < ci-deploy.sh $webpath
This uses two repository variables which are defined in the settings of this repository in Bitbucket:
(https://bitbucket.org/USERNAME/REPO/admin/addon/admin/pipelines/repository-variables)
Screenshot
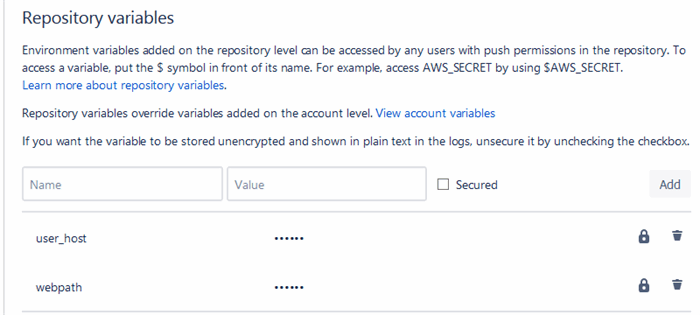
$webpath contains the full path on the webspace, something like /www/htdocs/MY_ACCOUNT_NAME/blog$user_host contains the SSH username and the domain name separated with :, in my case it’s SSH-USERNAME:christianspecht.de
Oh, and apparently, it’s important that in the last line of the YAML, StrictHostKeyChecking is set to yes.
I don’t remember where I copied the line from, but it originally had StrictHostKeyChecking = no. I then asked a question on Security.StackExchange (about something completely different), included that line and was told multiple times that StrictHostKeyChecking = no is a security risk.
jekyll build
if [ $? -ne 0 ]
then
exit 1
fi
mkdir build
tar -czvf build/build.tar.gz -C _site .
cp ci-deploy.sh /build
jekyll build
if [ $? -ne 0 ]
then
exit 1
fi
I’m using multiple subdirectories here. The main directory of my whole webspace (/www/htdocs/MY_ACCOUNT_NAME/) looks like this:
└───MY_ACCOUNT_NAME
    ├───blog
    │   ├───tar
    │   ├───tmp
    │   └───site
    ├───something_else
    └───something_else2
/www/htdocs/MY_ACCOUNT_NAME/blog is the path that’s passed to the deploy script.
The deploy script first copies the archived build result to /tar, then unpacks it to /tmp, then rsyncs this to /site, which is where the domain christianspecht.de points to.
2b. SSH for Dummies (or: Which Key Goes Where?)
First, I created a new SSH key especially for use with Bitbucket Pipelines. Here’s a tutorial how to do this, usually by running some command line tool.
A SSH key consists of two files, a private and a public key. The key I’m using here is named bitbucket, so I have:
-
bitbucket_rsa: this is the private key.
The content looks like this:
-----BEGIN RSA PRIVATE KEY-----
xxxxxxxxxxxxxxxxxxxxxxxxxxxxxxxxxxxxxxxx
xxxxxxxxxxxxxxxxxxxxxxxxxxxxxxxxxxxxxxxx
[...]
xxxxxxxxxxxxxxxxxxxxxxxxxxxxxxxxxxxxxxxx
xxxxxxxxxxxxxxxxxxxxxxxxxxxxxxxxxxxxxxxx
-----END RSA PRIVATE KEY-----
-
bitbucket_rsa.pub: this is the public key.
The content looks like this:
ssh-rsa xxxxxxxxxxxxxxxxxxxxxxxxxxxxxxxxxxxx user@machinename
Tip
The user@machinename part (which was created by the key generator tool) is just a comment and can be set to any value. I replaced it by Bitbucket CI, because the content of the file (without file name) might end up in a list of multiple public keys, and then that comment is the only way to see which key is which.
So how are SSH keys used?
When a client wants to connect to a server via SSH, the server needs to know the public key. The client sends the private key when connecting, and then the server can somehow figure out that this private key belongs to the public key it already knows, thus the client is allowed to connect.
For setting up CI, Bitbucket Pipelines needs to connect via SSH to my webspace.
So Bitbucket Pipelines is the client, that’s why the private key needs to be stored in the repository settings:
(https://bitbucket.org/USERNAME/REPO/admin/addon/admin/pipelines/ssh-keys)

(There’s also a field for the public key, but this is more for convenience and not actually needed.)
And then, I need to enter my hostname (at the bottom of the screenshot), so Bitbucket knows it and shows me its fingerprint.
The web server is the server that BB Pipelines connects to, so it must know the public key.
Apparently the “standard Linux way” is to add the key to a file on the server, because on the screenshot it says:
Copy this public key to ~/.ssh/authorized_keys on the remote host.
I’m on relatively cheap webspace on a shared host, so I don’t have direct access to those files…I have only a web UI where I can enter SSH keys into a text box (which will probably save them in that file on the server).
The same screen shows me the fingerprint of the server as well, which I can now compare with the one Bitbucket showed me in the previous step.
Wrap Up
And that’s all that needs to be set up. When I now push changes to Bitbucket, the pipeline starts, builds my site and deploys it to my server. And because of the “tricks” in the shell scripts (archiving the site, uploading just one big file, and unpacking it on the server), it’s really fast compared to the old way of uploading every single file via FTP.
So far, it’s working fine - already for about a year. I actually set all this up about a year ago, then started writing this post, but didn’t finish it until now.
I had hoped that everything would “just work” now and I wouldn’t have to touch it for possibly a long time, but unfortunately that’s not the case. The source code for this blog is in a Mercurial repository, and in the meantime, Bitbucket has announced that they will drop Mercurial support (and all Mercurial repositories) on June 1, 2020.
So I’ll need to do something soon - and probably will write another post about it.
This member has not yet provided a Biography. Assume it's interesting and varied, and probably something to do with programming.


