Table Of Contents
Note: This is a multi-part article. The downloads are available in Part 1.
Introduction
In the application, there are various graphics (images) used to present information to the user. For instance, there are:
- Compass Rose
- Car Side Elevation
- Car Front Elevation
- Car Plan
These images are stored within the application as resources. In the initial versions of UltraDynamo, the user is stuck with these images, but at a later date, I may allow the user to select their own images for use with the application.
The images are jpg files that I stored within an "/images" folder in the project solution. After copying the images into the solution, to make these available to the code as embedded resources and not as images that accompany the main executable as additional files, it is required to set a couple of properties for each of the files. If we look at the properties for the compass rose:
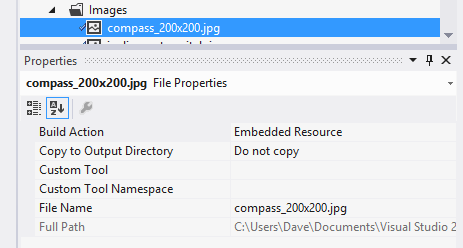
You will notice that the Build Action has been set to Embedded Resource and the Copy to Output Directory has been set to Do not Copy.
Loading the Resources
The next thing we need to be able to do is load the images into the application at runtime and make them visible to the user. To achieve this, I created a helper function that returns a stream to the caller, that contains the image resource. The function to do this is shown below:
private Stream LoadCompassImage()
{
  Assembly _assembly;
  Stream _imageStream;

  _assembly = Assembly.GetExecutingAssembly();

  _imageStream = _assembly.GetManifestResourceStream("UltraDynamo.Images.compass_200x200.jpg");

  return _imageStream;
}
As you can see in the code, we first get a reference to the running assembly and then set the path to the internal image as string.
Rotating the Image
The compass is not much use unless it is rotated relevant to compass sensor current heading. A compass typically always leaves the users heading at the top, and rotates the compass accordingly. The rotation function is shown below, we simply pass in the image to rotate, and the angle of rotation. The function returns the rotated image.
private Image getRotatedImage(Image image,float angle)
{
Bitmap rotated = new Bitmap(image);
Graphics g = Graphics.FromImage(rotated);
g.TranslateTransform((float)image.Width / 2, (float)image.Height / 2);
g.RotateTransform(angle);
g.TranslateTransform(-(float)image.Width / 2, -(float)image.Height / 2);
g.DrawImage(image, new Point(0, 0));
return rotated;
}
An important fact to notice is the image rotation is normally performed on the top left of the image. We need to be able to rotate on the centre of the image. This requires for a transform to be done to move image to correct point on which to rotate, and then return it back to its original location post rotation.
The compass heading in fact needs to be a negative number, otherwise the compass rotates in the wrong direction, so we simply multiply the Heading from the sensor by -1, before passing into the rotation function.
I was using a user control to host the compass. This made it easy to then drop the control onto anywhere I needed it within the application. The paint event handler is where we placed the code to actually draw the image onto the user control surface.
The code below was placed in the paint event, and you can see the image being loaded, the compass heading being read and multiplied by -1 to get the rotation direction correct, and then being rotated:
Graphics g = e.Graphics;
g.DrawImage(getRotatedImage(Image.FromStream(LoadCompassImage()),
(float)compassValues.Heading *-1), 0, 0, this.Width, this.Height);
The last thing I did was to then draw a line at the top of the compass as a heading indicator. The pen was defined as a private member of the control, so it did not need to be defined with each paint event, then the line was simply drawn using the pen:
Pen headingPen = new Pen(Color.FromArgb(190, 255, 0, 0), 3);
g.DrawLine(headingPen, new Point((this.Width / 2) -1, this.Height / 2),
new Point((this.Width/2)-1, (this.Height - (int)(this.Height * 0.92))));
Below, you can see what the rotated compass rose with heading line looks like once loaded into a standalone form window;

The Inclinometer Views
The three car images were used to show the Roll, Pitch and Yaw of the vehicle. These images were manipulated in much the same way as the compass rose.
The main difference however with these views were the addition of the angle being displayed and also reference lines for the base line and the angle of offset lines.
The Inclinometer views also employed a small improvement / optimisation over the compass view (which I will endeavour to update in the future), namely the base image was only loaded from the assembly when the usercontrol was first instantiated. It is not repeatedly loaded with each paint event. The image is simply stored as a private member variable and the image loaded on construction of the user control.
The Trigonometry
When creating the lines, the hardest thing to do was calculate where the starting and ending points of the rotate lines would fall in relation to the X/Y co-ordinates for the points. And this is where the "haven't used or needed for years" trigonometry came into play. Yes, Sohcahtoa came back to haunt me!
Now, I don't know about the rest of you, but for me, I have had absolutely no use for this since it was taught to me at school, then probably refreshed again during my apprenticeship. For me, I needed to head of to Google and find some refreshers. Here is one such page you can refer [^].
Basically, we know the rotation angle, and we know the width (and height) of the display surface we are drawing in. Using these as parameters into the trig, we can calculate the other line lengths and thus give us the (x,y) co-ordinates for the points.
If we take a look at the Inclinometer Pitch, we first draw the horizontal reference line (Pens.Blue) and then use trigonometry to calculate the rotated lines (Pens.Red) (x,y) coordinates.
g.DrawLine(Pens.Blue, new Point(0, this.Height / 2), new Point(this.Width, this.Height / 2));
if (this.InclinometerViewState == InclinometerViewOptions.Pitch)
{
try
{
g.DrawLine(Pens.Red,
new Point(0,(int)((this.Height / 2) - ((this.Width / 2) *
Math.Tan(((double)inclinometerValues.Pitch * Math.PI) / 180)))),
new Point(this.Width,(int)((this.Height / 2) + ((this.Width / 2) *
Math.Tan(((double)inclinometerValues.Pitch * Math.PI) / 180)))));
}
catch (Exception)
{
g.DrawLine(Pens.Red, new Point(this.Width/2, 0), new Point(this.Width/2, this.Height));
}
}
You will also notice that there is a dirty hack in there to catch the overflow that occurs if the angle hits 90degrees, and we simply draw a straight line where we know it should be. This is another area that I need to look into in more detail in the future.
Drawing the Angle String
I also write the angle out to the top centre of the inclinometer views. We must calculate the size of this string to allow us to calculate where the string will be placed on the form.
if (this.ShowAngleValue)
{
  Font f = this.Font;
  f = new Font(f.FontFamily, 18, FontStyle.Bold);
  SizeF testSize = g.MeasureString(angle, f);

  g.DrawString(angle, f, Brushes.Green, new Point((this.Width - (int)testSize.Width) / 2, 0));
}
Once thing you will note is that this is placed within an if{}, I have added a number of private variables so that in future, I can change the application so the user has more configuration options for the displays. At present, these are all fixed.
With the image rotation, the angle text and the reference lines all added to the inclinometer views, the images below show what these look like:
Fitting Font To Space
One interesting aspect of fonts came to light during development of the Compass Heading display. The Compass Heading display, simply displays either N, NE, E, SE, S, SW, W, NW to the user, to give a general idea of direction.
I turns out you cannot simply provide a given rectangle to the graphics objects and say 'fill this with the biggest text allowed for the string and the rectangle size', but you have to physically iterate through the fonts, increasing them until the size of the output exceeds the available space and then go back a size.
If you take a look at the following code, you can see this in action:
private void UICompassHeadingLetters_Paint(object sender, PaintEventArgs e)
{
String output = "N";
double heading = compassValues.Heading;
if (heading >= 22.5 && heading < 67.5)
output = "NE";
if (heading >= 67.5 && heading < 112.5)
output = "E";
if (heading >= 112.5 && heading < 157.5)
output = "SE";
if (heading >= 157.5 && heading < 202.5)
output = "S";
if (heading >= 202.5 && heading < 247.5)
output = "SW";
if (heading >= 247.5 && heading < 292.5)
output = "W";
if (heading >= 292.5 && heading < 337.5)
output = "NW";
Graphics g = e.Graphics;
Font f = this.Font;
Font newFont = this.Font;
SizeF testSize;
float fHeight=0;
float fWidth=0;
bool fontGood = true;
for (int newSize = 1; fontGood; newSize++)
{
newFont=new Font(f.Name,newSize,f.Style);
testSize = g.MeasureString(output,newFont);
fHeight = testSize.Height;
fWidth = testSize.Width;
if ((fHeight > (this.Height)) | (fWidth > (this.Width)))
{
fontGood = false;
newSize--;
if (newSize <6 ) { newSize=6;};
newFont = new Font(f.Name,newSize,f.Style);
testSize = g.MeasureString(output,newFont);
fHeight = testSize.Height;
fWidth = testSize.Width;
}
}
g.DrawString(output, newFont, Brushes.Green,
new Point((this.Width - (int)fWidth) / 2, (this.Height - (int)fHeight) / 2));
First, we read the compass sensor for the heading value, and translate this into the relevant string representation, e.g. 'NW'. Then we grab the grabs object, and pick a small font and calculate the size of the space it occupies. If it is smaller than the available space, we try the next size. If it exceeds the space available, we know the previous size was the correct maximum size, so draw it again using that size and draw it to the graphics surface.
There has to be a more efficient way of doing this, but something for another day! You can see the Compass Heading forms automatically scale the text to fit the drawing surface as the forms resizes:
Double Buffering
This is probably the single most important thing you must not forget to enable. In the very first version I forgot, and this resulted in 'flickering' displays. So, whether it is a Windows Form or a UserControl, don't forget to set DoubleBuffered property to True.
You can read exactly what this does here.
Suspend Your Layouts
Another thing that you should do is suspend layouts during paint events. This basically stops lots of screen flickering, etc. and all the various aspects of the changes are drawn to the surface of the form or control. You suspend the layout at the start of a paint event, and then resume them again immediately before leaving the paint event, for example:
private void UICompassFull_Paint(object sender, PaintEventArgs e)
{
this.SuspendLayout();
this.ResumeLayout();
}
You can read more on this here.
On to the Next Part
Part 5 is all about the building, packing and code signing aspects of deployment.
Part 5 - Building, Code Signing and Packaging


 General
  News
News  Suggestion
  Question
  Bug
Bug  Answer
  Joke
Joke  Praise
  Rant
Rant  Admin
Admin 


